Quantcast
Channel: Kubernetes – Production-Grade Container Orchestration

Blog: Expanding User Support with Office Hours

$
0
0

Today’s post is by Jorge Castro and Ilya Dmitichenko on Kubernetes office hours.

Today’s developer has an almost overwhelming amount of resources available for learning. Kubernetes development teams use StackOverflow, user documentation, Slack, and the mailing lists. Additionally, the community itself continues to amass an awesome list of resources.

One of the challenges of large projects is keeping user resources relevant and useful. While documentation can be useful, great learning also happens in Q&A sessions at conferences, or by learning with someone whose explanation matches your learning style. Consider that learning Kung Fu from Morpheus would be a lot more fun than reading a book about Kung Fu!

We as Kubernetes developers want to create an interactive experience: where Kubernetes users can get their questions answered by experts in real time, or at least referred to the best known documentation or code example.

Having discussed a few broad ideas, we eventually decided to make Kubernetes Office Hours a live stream where we take user questions from the audience and present them to our panel of contributors and expert users. We run two sessions: one for European time zones, and one for the Americas. These streaming setup guidelines make office hours extensible—for example, if someone wants to run office hours for Asia/Pacific timezones, or for another CNCF project.

To give you an idea of what Kubernetes office hours are like, here’s Josh Berkus answering a question on running databases on Kubernetes. Despite the popularity of this topic, it’s still difficult for a new user to get a constructive answer. Here’s an excellent response from Josh:

It’s often easier to field this kind of question in office hours than it is to ask a developer to write a full-length blog post. [Editor’s note: That’s legit!] Because we don’t have infinite developers with infinite time, this kind of focused communication creates high-bandwidth help while limiting developer commitments to 1 hour per month. This allows a rotating set of experts to share the load without overwhelming any one person.

We hold office hours the third Wednesday of every month on the Kubernetes YouTube Channel. You can post questions on the #office-hours channel on Slack, or you can submit your question to Stack Overflow and post a link on Slack. If you post a question in advance, you might get better answers, as volunteers have more time to research and prepare. If a question can’t be fully solved during the call, the team will try their best to point you in the right direction and/or ping other people in the community to take a look. Check out this page for more details on what’s off- and on topic as well as meeting information for your time zone. We hope to hear your questions soon!

Special thanks to Amazon, Bitnami, Giant Swarm, Heptio, Liquidweb, Northwestern Mutual, Packet.net, Pivotal, Red Hat, Weaveworks, and VMWare for donating engineering time to office hours.

And thanks to Alan Pope, Joe Beda, and Charles Butler for technical support in making our livestream better.


Blog: Principles of Container-based Application Design

$
0
0

It’s possible nowadays to put almost any application in a container and run it. Creating cloud-native applications, however—containerized applications that are automated and orchestrated effectively by a cloud-native platform such as Kubernetes—requires additional effort. Cloud-native applications anticipate failure; they run and scale reliably even when their infrastructure experiences outages. To offer such capabilities, cloud-native platforms like Kubernetes impose a set of contracts and constraints on applications. These contracts ensure that applications they run conform to certain constraints and allow the platform to automate application management.

I’ve outlined seven principlesfor containerized applications to follow in order to be fully cloud-native.

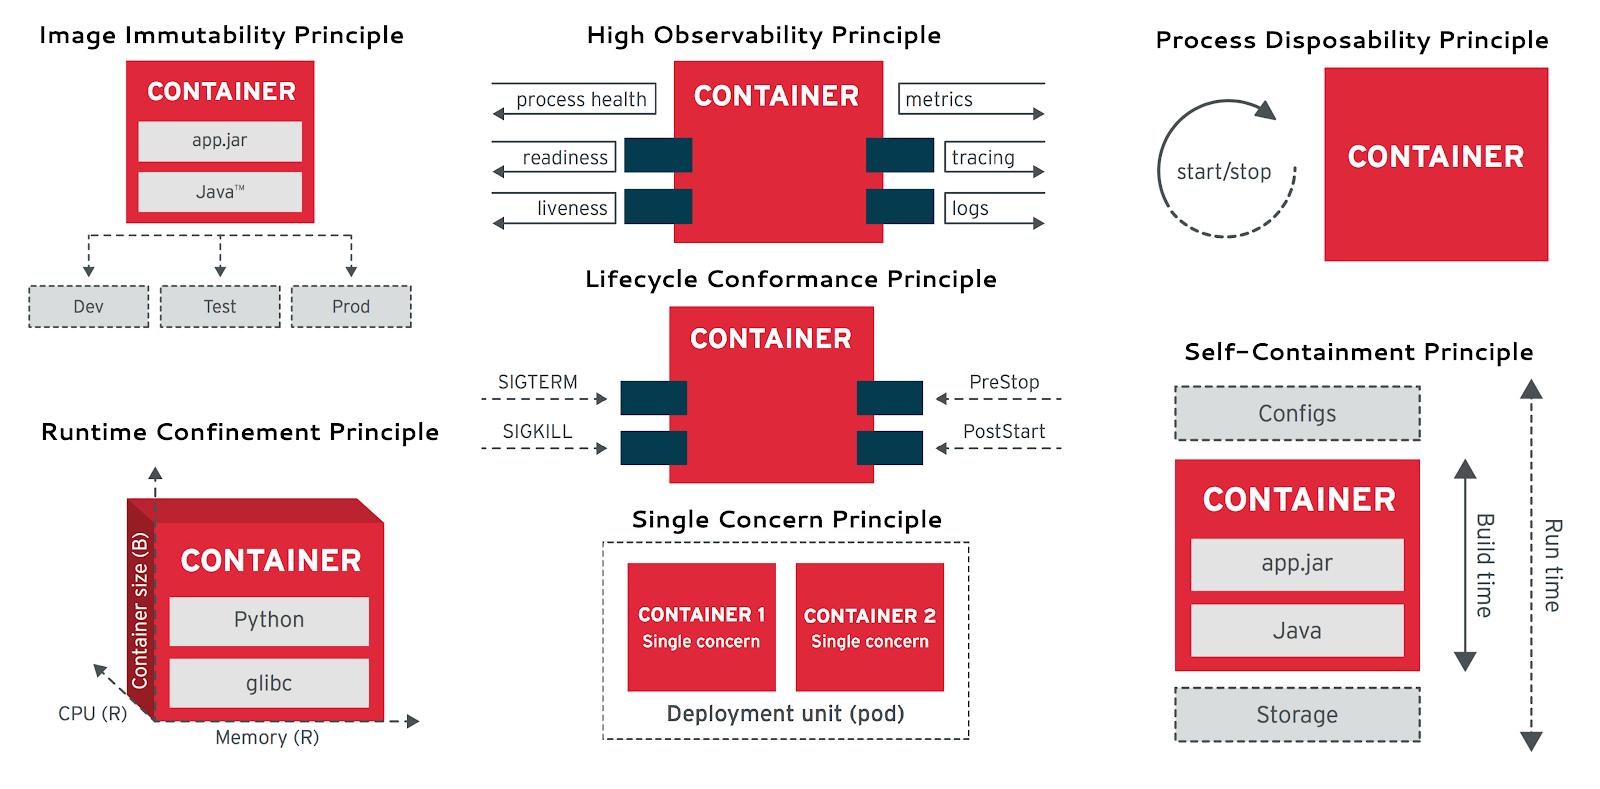
| —– | | | | Container Design Principles |

These seven principles cover both build time and runtime concerns.

Build time

  • Single Concern: Each container addresses a single concern and does it well.
  • Self-Containment: A container relies only on the presence of the Linux kernel. Additional libraries are added when the container is built.
  • Image Immutability: Containerized applications are meant to be immutable, and once built are not expected to change between different environments.

Runtime

  • High Observability: Every container must implement all necessary APIs to help the platform observe and manage the application in the best way possible.
  • Lifecycle Conformance: A container must have a way to read events coming from the platform and conform by reacting to those events.
  • Process Disposability: Containerized applications must be as ephemeral as possible and ready to be replaced by another container instance at any point in time.
  • Runtime Confinement: Every container must declare its resource requirements and restrict resource use to the requirements indicated. The build time principles ensure that containers have the right granularity, consistency, and structure in place. The runtime principles dictate what functionalities must be implemented in order for containerized applications to possess cloud-native function. Adhering to these principles helps ensure that your applications are suitable for automation in Kubernetes.

The white paper is freely available for download:

To read more about designing cloud-native applications for Kubernetes, check out my Kubernetes Patterns book.

Bilgin Ibryam, Principal Architect, Red Hat

Twitter: 

Blog: http://www.ofbizian.com
Linkedin:

Bilgin Ibryam (@bibryam) is a principal architect at Red Hat, open source committer at ASF, blogger, author, and speaker. He is the author of Camel Design Patterns and Kubernetes Patterns books. In his day-to-day job, Bilgin enjoys mentoring, training and leading teams to be successful with distributed systems, microservices, containers, and cloud-native applications in general.

Blog: Kubernetes 1.10: Stabilizing Storage, Security, and Networking

$
0
0

Editor’s note: today’s post is by the 1.10 Release Team

We’re pleased to announce the delivery of Kubernetes 1.10, our first release of 2018!

Today’s release continues to advance maturity, extensibility, and pluggability of Kubernetes. This newest version stabilizes features in 3 key areas, including storage, security, and networking. Notable additions in this release include the introduction of external kubectl credential providers (alpha), the ability to switch DNS service to CoreDNS at install time (beta), and the move of Container Storage Interface (CSI) and persistent local volumes to beta.

Let’s dive into the key features of this release:

Storage - CSI and Local Storage move to beta

This is an impactful release for the Storage Special Interest Group (SIG), marking the culmination of their work on multiple features. The Kubernetes implementation of theContainer Storage Interface (CSI) moves to beta in this release: installing new volume plugins is now as easy as deploying a pod. This in turn enables third-party storage providers to develop their solutions independently outside of the core Kubernetes codebase. This continues the thread of extensibility within the Kubernetes ecosystem.

Durable (non-shared) local storage management progressed to beta in this release, making locally attached (non-network attached) storage available as a persistent volume source. This means higher performance and lower cost for distributed file systems and databases.

This release also includes many updates to Persistent Volumes. Kubernetes can automatically prevent deletion of Persistent Volume Claims that are in use by a pod (beta) and prevent deletion of a Persistent Volume that is bound to a Persistent Volume Claim(beta). This helps ensure that storage API objects are deleted in the correct order.

Security - External credential providers (alpha)

Kubernetes, which is already highly extensible, gains another extension point in 1.10 withexternal kubectl credential providers (alpha). Cloud providers, vendors, and other platform developers can now release binary plugins to handle authentication for specific cloud-provider IAM services, or that integrate with in-house authentication systems that aren’t supported in-tree, such as Active Directory. This complements the Cloud Controller Manager feature added in 1.9.

Networking - CoreDNS as a DNS provider (beta)

The ability to switch the DNS service to CoreDNS atinstall time is now in beta. CoreDNS has fewer moving parts: it’s a single executable and a single process, and supports additional use cases.

Each Special Interest Group (SIG) within the community continues to deliver the most-requested enhancements, fixes, and functionality for their respective specialty areas. For a complete list of inclusions by SIG, please visit therelease notes.

Availability

Kubernetes 1.10 is available for download on GitHub. To get started with Kubernetes, check out these interactive tutorials.

2 Day Features Blog Series

If you’re interested in exploring these features more in depth, check back next week for our 2 Days of Kubernetes series where we’ll highlight detailed walkthroughs of the following features:

Day 1 - Container Storage Interface (CSI) for Kubernetes going Beta Day 2 - Local Persistent Volumes for Kubernetes going Beta

Release team

This release is made possible through the effort of hundreds of individuals who contributed both technical and non-technical content. Special thanks to the release team led by Jaice Singer DuMars, Kubernetes Ambassador for Microsoft. The 10 individuals on the release team coordinate many aspects of the release, from documentation to testing, validation, and feature completeness.

As the Kubernetes community has grown, our release process represents an amazing demonstration of collaboration in open source software development. Kubernetes continues to gain new users at a rapid clip. This growth creates a positive feedback cycle where more contributors commit code creating a more vibrant ecosystem.

Project Velocity

The CNCF has continued refining an ambitious project to visualize the myriad contributions that go into the project. K8s DevStats illustrates the breakdown of contributions from major company contributors, as well as an impressive set of preconfigured reports on everything from individual contributors to pull request lifecycle times. Thanks to increased automation, issue count at the end of the release was only slightly higher than it was at the beginning. This marks a major shift toward issue manageability. With 75,000+ comments, Kubernetes remains one of the most actively discussed projects on GitHub.

User Highlights

According to a recent CNCF survey, more than 49% of Asia-based respondents use Kubernetes in production, with another 49% evaluating it for use in production. Established, global organizations are using Kubernetes in production at massive scale. Recently published user stories from the community include: 1. Huawei, the largest telecommunications equipment manufacturer in the world, moved its internal IT department’s applications to run on Kubernetes. This resulted in the global deployment cycles decreasing from a week to minutes, and the efficiency of application delivery improved by tenfold. 1. Jinjiang Travel International, one of the top 5 largest OTA and hotel companies, use Kubernetes to speed up their software release velocity from hours to just minutes. Additionally, they leverage Kubernetes to increase the scalability and availability of their online workloads. 1. Haufe Group, the Germany-based media and software company, utilized Kubernetes to deliver a new release in half an hour instead of days. The company is also able to scale down to around half the capacity at night, saving 30 percent on hardware costs. 1. BlackRock, the world’s largest asset manager, was able to move quickly using Kubernetes and built an investor research web app from inception to delivery in under 100 days. Is Kubernetes helping your team? Share your story with the community.

Ecosystem Updates

  1. The CNCF is expanding its certification offerings to include a Certified Kubernetes Application Developer exam. The CKAD exam certifies an individual’s ability to design, build, configure, and expose cloud native applications for Kubernetes. The CNCF is looking for beta testers for this new program. More information can be foundhere.
  2. Kubernetes documentation now features user journeys: specific pathways for learning based on who readers are and what readers want to do. Learning Kubernetes is easier than ever for beginners, and more experienced users can find task journeys specific to cluster admins and application developers.
  3. CNCF also offers online training that teaches the skills needed to create and configure a real-world Kubernetes cluster.

KubeCon

The world’s largest Kubernetes gathering, KubeCon + CloudNativeCon is coming to Copenhagen from May 2-4, 2018 and will feature technical sessions, case studies, developer deep dives, salons and more! Check out theschedule of speakers andregister today!

Webinar

Join members of the Kubernetes 1.10 release team on April 10th at 10am PDT to learn about the major features in this release including Local Persistent Volumes and the Container Storage Interface (CSI). Registerhere.

Get Involved

The simplest way to get involved with Kubernetes is by joining one of the many Special Interest Groups (SIGs) that align with your interests. Have something you’d like to broadcast to the Kubernetes community? Share your voice at our weekly community meeting, and through the channels below.

Thank you for your continued feedback and support. 1. Post questions (or answer questions) on Stack Overflow 1. Join the community portal for advocates on K8sPort 1. Follow us on Twitter @Kubernetesio for latest updates 1. Chat with the community on Slack 1. Share your Kubernetesstory.

Blog: Fixing the Subpath Volume Vulnerability in Kubernetes

$
0
0

On March 12, 2018, the Kubernetes Product Security team disclosed CVE-2017-1002101, which allowed containers using subpath volume mounts to access files outside of the volume. This means that a container could access any file available on the host, including volumes for other containers that it should not have access to.

The vulnerability has been fixed and released in the latest Kubernetes patch releases. We recommend that all users upgrade to get the fix. For more details on the impact and how to get the fix, please see the announcement. (Note, some functional regressions were found after the initial fix and are being tracked in issue #61563).

This post presents a technical deep dive on the vulnerability and the solution.

Kubernetes Background

To understand the vulnerability, one must first understand how volume and subpath mounting works in Kubernetes.

Before a container is started on a node, the kubelet volume manager locally mounts all the volumes specified in the PodSpec under a directory for that Pod on the host system. Once all the volumes are successfully mounted, it constructs the list of volume mounts to pass to the container runtime. Each volume mount contains information that the container runtime needs, the most relevant being:

  • Path of the volume in the container
  • Path of the volume on the host (/var/lib/kubelet/pods/<pod uid>/volumes/<volume type>/<volume name>)

When starting the container, the container runtime creates the path in the container root filesystem, if necessary, and then bind mounts it to the provided host path.

Subpath mounts are passed to the container runtime just like any other volume. The container runtime does not distinguish between a base volume and a subpath volume, and handles them the same way. Instead of passing the host path to the root of the volume, Kubernetes constructs the host path by appending the Pod-specified subpath (a relative path) to the base volume’s host path.

For example, here is a spec for a subpath volume mount:

apiVersion: v1
kind: Pod
metadata:
  name: my-pod
spec:
  containers:
  - name: my-container<snip>
    volumeMounts:
    - mountPath: /mnt/data
      name: my-volume
      subPath: dataset1
  volumes:
  - name: my-volume
    emptyDir: {}

In this example, when the Pod gets scheduled to a node, the system will:

  • Set up an EmptyDir volume at /var/lib/kubelet/pods/1234/volumes/kubernetes.io~empty-dir/my-volume
  • Construct the host path for the subpath mount: /var/lib/kubelet/pods/1234/volumes/kubernetes.io~empty-dir/my-volume/ + dataset1
  • Pass the following mount information to the container runtime:
    • Container path: /mnt/data
    • Host path: /var/lib/kubelet/pods/1234/volumes/kubernetes.io~empty-dir/my-volume/dataset1
  • The container runtime bind mounts /mnt/data in the container root filesystem to /var/lib/kubelet/pods/1234/volumes/kubernetes.io~empty-dir/my-volume/dataset1 on the host.
  • The container runtime starts the container.

The Vulnerability

The vulnerability with subpath volumes was discovered by Maxim Ivanov, by making a few observations:

  • Subpath references files or directories that are controlled by the user, not the system.
  • Volumes can be shared by containers that are brought up at different times in the Pod lifecycle, including by different Pods.
  • Kubernetes passes host paths to the container runtime to bind mount into the container.

The basic example below demonstrates the vulnerability. It takes advantage of the observations outlined above by:

  • Using an init container to setup the volume with a symlink.
  • Using a regular container to mount that symlink as a subpath later.
  • Causing kubelet to evaluate the symlink on the host before passing it into the container runtime.
apiVersion: v1
kind: Pod
metadata:
  name: my-pod
spec:
  initContainers:
  - name: prep-symlink
    image: "busybox"
    command: ["bin/sh", "-ec", "ln -s / /mnt/data/symlink-door"]
    volumeMounts:
    - name: my-volume
      mountPath: /mnt/data
  containers:
  - name: my-container
    image: "busybox"
    command: ["/bin/sh", "-ec", "ls /mnt/data; sleep 999999"]
    volumeMounts:
    - mountPath: /mnt/data
      name: my-volume
      subPath: symlink-door
  volumes:
  - name: my-volume
    emptyDir: {}

For this example, the system will:

  • Setup an EmptyDir volume at /var/lib/kubelet/pods/1234/volumes/kubernetes.io~empty-dir/my-volume
  • Pass the following mount information for the init container to the container runtime:
    • Container path: /mnt/data
    • Host path: /var/lib/kubelet/pods/1234/volumes/kubernetes.io~empty-dir/my-volume
  • The container runtime bind mounts /mnt/data in the container root filesystem to /var/lib/kubelet/pods/1234/volumes/kubernetes.io~empty-dir/my-volume on the host.
  • The container runtime starts the init container.
  • The init container creates a symlink inside the container: /mnt/data/symlink-door -> /, and then exits.
  • Kubelet starts to prepare the volume mounts for the normal containers.
  • It constructs the host path for the subpath volume mount: /var/lib/kubelet/pods/1234/volumes/kubernetes.io~empty-dir/my-volume/ + symlink-door.
  • And passes the following mount information to the container runtime:
    • Container path: /mnt/data
    • Host path: /var/lib/kubelet/pods/1234/volumes/kubernetes.io~empty-dir/my-volume/symlink-door
  • The container runtime bind mounts /mnt/data in the container root filesystem to /var/lib/kubelet/pods/1234/volumes/kubernetes.io~empty~dir/my-volume/symlink-door
  • However, the bind mount resolves symlinks, which in this case, resolves to / on the host! Now the container can see all of the host’s filesystem through its mount point /mnt/data.

This is a manifestation of a symlink race, where a malicious user program can gain access to sensitive data by causing a privileged program (in this case, kubelet) to follow a user-created symlink.

It should be noted that init containers are not always required for this exploit, depending on the volume type. It is used in the EmptyDir example because EmptyDir volumes cannot be shared with other Pods, and only created when a Pod is created, and destroyed when the Pod is destroyed. For persistent volume types, this exploit can also be done across two different Pods sharing the same volume.

The Fix

The underlying issue is that the host path for subpaths are untrusted and can point anywhere in the system. The fix needs to ensure that this host path is both:

  • Resolved and validated to point inside the base volume.
  • Not changeable by the user in between the time of validation and when the container runtime bind mounts it.

The Kubernetes product security team went through many iterations of possible solutions before finally agreeing on a design.

Idea 1

Our first design was relatively simple. For each subpath mount in each container:

  • Resolve all the symlinks for the subpath.
  • Validate that the resolved path is within the volume.
  • Pass the resolved path to the container runtime.

However, this design is prone to the classic time-of-check-to-time-of-use (TOCTTOU) problem. In between steps 2) and 3), the user could change the path back to a symlink. The proper solution needs some way to “lock” the path so that it cannot be changed in between validation and bind mounting by the container runtime. All the subsequent ideas use an intermediate bind mount by kubelet to achieve this “lock” step before handing it off to the container runtime. Once a bind mount is performed, the mount source is fixed and cannot be changed.

Idea 2

We went a bit wild with this idea:

  • Create a working directory under the kubelet’s pod directory. Let’s call it dir1.
  • Bind mount the base volume to under the working directory, dir1/volume.
  • Chroot to the working directory dir1.
  • Inside the chroot, bind mount volume/subpath to subpath. This ensures that any symlinks get resolved to inside the chroot environment.
  • Exit the chroot.
  • On the host again, pass the bind mounted dir1/subpath to the container runtime.

While this design does ensure that the symlinks cannot point outside of the volume, it was ultimately rejected due to difficulties of implementing the chroot mechanism in 4) across all the various distros and environments that Kubernetes has to support, including containerized kubelets.

Idea 3

Coming back to earth a little bit, our next idea was to:

  • Bind mount the subpath to a working directory under the kubelet’s pod directory.
  • Get the source of the bind mount, and validate that it is within the base volume.
  • Pass the bind mount to the container runtime.

In theory, this sounded pretty simple, but in reality, 2) was quite difficult to implement correctly. Many scenarios had to be handled where volumes (like EmptyDir) could be on a shared filesystem, on a separate filesystem, on the root filesystem, or not on the root filesystem. NFS volumes ended up handling all bind mounts as a separate mount, instead of as a child to the base volume. There was additional uncertainty about how out-of-tree volume types (that we couldn’t test) would behave.

The Solution

Given the amount of scenarios and corner cases that had to be handled with the previous design, we really wanted to find a solution that was more generic across all volume types. The final design that we ultimately went with was to:

  • Resolve all the symlinks in the subpath.
  • Starting with the base volume, open each path segment one by one, using the openat() syscall, and disallow symlinks. With each path segment, validate that the current path is within the base volume.
  • Bind mount /proc/<kubelet pid>/fd/<final fd> to a working directory under the kubelet’s pod directory. The proc file is a link to the opened file. If that file gets replaced while kubelet still has it open, then the link will still point to the original file.
  • Close the fd and pass the bind mount to the container runtime.

Note that this solution is different for Windows hosts, where the mounting semantics are different than Linux. In Windows, the design is to:

  • Resolve all the symlinks in the subpath.
  • Starting with the base volume, open each path segment one by one with a file lock, and disallow symlinks. With each path segment, validate that the current path is within the base volume.
  • Pass the resolved subpath to the container runtime, and start the container.
  • After the container has started, unlock and close all the files.

Both solutions are able to address all the requirements of:

  • Resolving the subpath and validating that it points to a path inside the base volume.
  • Ensuring that the subpath host path cannot be changed in between the time of validation and when the container runtime bind mounts it.
  • Being generic enough to support all volume types.

Acknowledgements

Special thanks to many folks involved with handling this vulnerability:

  • Maxim Ivanov, who responsibly disclosed the vulnerability to the Kubernetes Product Security team.
  • Kubernetes storage and security engineers from Google, Microsoft, and RedHat, who developed, tested, and reviewed the fixes.
  • Kubernetes test-infra team, for setting up the private build infrastructure
  • Kubernetes patch release managers, for coordinating and handling all the releases.
  • All the production release teams that worked to deploy the fix quickly after release.

If you find a vulnerability in Kubernetes, please follow our responsible disclosure process and let us know; we want to do our best to make Kubernetes secure for all users.

– Michelle Au, Software Engineer, Google; and Jan Šafránek, Software Engineer, Red Hat

Blog: Container Storage Interface (CSI) for Kubernetes Goes Beta

$
0
0

Kubernetes LogoCSI Logo

The Kubernetes implementation of the Container Storage Interface (CSI) is now beta in Kubernetes v1.10. CSI was introduced as alpha in Kubernetes v1.9.

Kubernetes features are generally introduced as alpha and moved to beta (and eventually to stable/GA) over subsequent Kubernetes releases. This process allows Kubernetes developers to get feedback, discover and fix issues, iterate on the designs, and deliver high quality, production grade features.

Why introduce Container Storage Interface in Kubernetes?

Although Kubernetes already provides a powerful volume plugin system that makes it easy to consume different types of block and file storage, adding support for new volume plugins has been challenging. Because volume plugins are currently “in-tree”—volume plugins are part of the core Kubernetes code and shipped with the core Kubernetes binaries—vendors wanting to add support for their storage system to Kubernetes (or even fix a bug in an existing volume plugin) must align themselves with the Kubernetes release process.

With the adoption of the Container Storage Interface, the Kubernetes volume layer becomes truly extensible. Third party storage developers can now write and deploy volume plugins exposing new storage systems in Kubernetes without ever having to touch the core Kubernetes code. This will result in even more options for the storage that backs Kubernetes users’ stateful containerized workloads.

What’s new in Beta?

With the promotion to beta CSI is now enabled by default on standard Kubernetes deployments instead of being opt-in.

The move of the Kubernetes implementation of CSI to beta also means: * Kubernetes is compatible with v0.2 of the CSI spec (instead of v0.1) * There were breaking changes between the CSI spec v0.1 and v0.2, so existing CSI drivers must be updated to be 0.2 compatible before use with Kubernetes 1.10.0+. * Mount propagation, a feature that allows bidirectional mounts between containers and host (a requirement for containerized CSI drivers), has also moved to beta. * The Kubernetes VolumeAttachment object, introduced in v1.9 in the storage v1alpha1 group, has been added to the storage v1beta1 group. * The Kubernetes CSIPersistentVolumeSource object has been promoted to beta. A VolumeAttributes field was added to Kubernetes CSIPersistentVolumeSource object (in alpha this was passed around via annotations). * Node authorizer has been updated to limit access to VolumeAttachment objects from kubelet. * The Kubernetes CSIPersistentVolumeSource object and the CSI external-provisioner have been modified to allow passing of secrets to the CSI volume plugin. * The Kubernetes CSIPersistentVolumeSource has been modified to allow passing in filesystem type (previously always assumed to be ext4). * A new optional call, NodeStageVolume, has been added to the CSI spec, and the Kubernetes CSI volume plugin has been modified to call NodeStageVolume during MountDevice (in alpha this step was a no-op).

How do I deploy a CSI driver on a Kubernetes Cluster?

CSI plugin authors must provide their own instructions for deploying their plugin on Kubernetes.

The Kubernetes-CSI implementation team created a sample hostpath CSI driver. The sample provides a rough idea of what the deployment process for a CSI driver looks like. Production drivers, however, would deploy node components via a DaemonSet and controller components via a StatefulSet rather than a single pod (for example, see the deployment files for the GCE PD driver).

How do I use a CSI Volume in my Kubernetes pod?

Assuming a CSI storage plugin is already deployed on your cluster, you can use it through the familiar Kubernetes storage primitives: PersistentVolumeClaims, PersistentVolumes, and StorageClasses.

CSI is a beta feature in Kubernetes v1.10. Although it is enabled by default, it may require the following flag: * API server binary and kubelet binaries: * --allow-privileged=true * Most CSI plugins will require bidirectional mount propagation, which can only be enabled for privileged pods. Privileged pods are only permitted on clusters where this flag has been set to true (this is the default in some environments like GCE, GKE, and kubeadm).

Dynamic Provisioning

You can enable automatic creation/deletion of volumes for CSI Storage plugins that support dynamic provisioning by creating a StorageClass pointing to the CSI plugin.

The following StorageClass, for example, enables dynamic creation of “fast-storage” volumes by a CSI volume plugin called “com.example.csi-driver”.

kind: StorageClass
apiVersion: storage.k8s.io/v1
metadata:
  name: fast-storage
provisioner: com.example.csi-driver
parameters:
  type: pd-ssd
  csiProvisionerSecretName: mysecret
  csiProvisionerSecretNamespace: mynamespace

New for beta, the default CSI external-provisioner reserves the parameter keys csiProvisionerSecretName and csiProvisionerSecretNamespace. If specified, it fetches the secret and passes it to the CSI driver during provisioning.

Dynamic provisioning is triggered by the creation of a PersistentVolumeClaim object. The following PersistentVolumeClaim, for example, triggers dynamic provisioning using the StorageClass above.

apiVersion: v1
kind: PersistentVolumeClaim
metadata:
  name: my-request-for-storage
spec:
  accessModes:
  - ReadWriteOnce
  resources:
    requests:
      storage: 5Gi
  storageClassName: fast-storage

When volume provisioning is invoked, the parameter type: pd-ssd and the secret any referenced secret(s) are passed to the CSI plugin com.example.csi-driver via a CreateVolume call. In response, the external volume plugin provisions a new volume and then automatically create a PersistentVolume object to represent the new volume. Kubernetes then binds the new PersistentVolume object to the PersistentVolumeClaim, making it ready to use.

If the fast-storage StorageClass is marked as “default”, there is no need to include the storageClassName in the PersistentVolumeClaim, it will be used by default.

Pre-Provisioned Volumes

You can always expose a pre-existing volume in Kubernetes by manually creating a PersistentVolume object to represent the existing volume. The following PersistentVolume, for example, exposes a volume with the name “existingVolumeName” belonging to a CSI storage plugin called “com.example.csi-driver”.

apiVersion: v1
kind: PersistentVolume
metadata:
  name: my-manually-created-pv
spec:
  capacity:
    storage: 5Gi
  accessModes:
    - ReadWriteOnce
  persistentVolumeReclaimPolicy: Retain
  csi:
    driver: com.example.csi-driver
    volumeHandle: existingVolumeName
    readOnly: false
    fsType: ext4
    volumeAttributes:
      foo: bar
    controllerPublishSecretRef:
      name: mysecret1
      namespace: mynamespace
    nodeStageSecretRef:
      name: mysecret2
      namespace: mynamespace
    nodePublishSecretRef
      name: mysecret3
      namespace: mynamespace

Attaching and Mounting

You can reference a PersistentVolumeClaim that is bound to a CSI volume in any pod or pod template.

kind: Pod
apiVersion: v1
metadata:
  name: my-pod
spec:
  containers:
    - name: my-frontend
      image: nginx
      volumeMounts:
      - mountPath: "/var/www/html"
        name: my-csi-volume
  volumes:
    - name: my-csi-volume
      persistentVolumeClaim:
        claimName: my-request-for-storage

When the pod referencing a CSI volume is scheduled, Kubernetes will trigger the appropriate operations against the external CSI plugin (ControllerPublishVolume, NodeStageVolume, NodePublishVolume, etc.) to ensure the specified volume is attached, mounted, and ready to use by the containers in the pod.

For more details please see the CSI implementation design doc and documentation.

How do I write a CSI driver?

CSI Volume Driver deployments on Kubernetes must meet some minimum requirements.

The minimum requirements document also outlines the suggested mechanism for deploying an arbitrary containerized CSI driver on Kubernetes. This mechanism can be used by a Storage Provider to simplify deployment of containerized CSI compatible volume drivers on Kubernetes.

As part of the suggested deployment process, the Kubernetes team provides the following sidecar (helper) containers: * external-attacher * watches Kubernetes VolumeAttachment objects and triggers ControllerPublish and ControllerUnpublish operations against a CSI endpoint * external-provisioner * watches Kubernetes PersistentVolumeClaim objects and triggers CreateVolume and DeleteVolume operations against a CSI endpoint * driver-registrar * registers the CSI driver with kubelet (in the future) and adds the drivers custom NodeId (retrieved via GetNodeID call against the CSI endpoint) to an annotation on the Kubernetes Node API Object * livenessprobe * can be included in a CSI plugin pod to enable the Kubernetes Liveness Probe mechanism

Storage vendors can build Kubernetes deployments for their plugins using these components, while leaving their CSI driver completely unaware of Kubernetes.

Where can I find CSI drivers?

CSI drivers are developed and maintained by third parties. You can find a non-definitive list of some sample and production CSI drivers.

What about FlexVolumes?

As mentioned in the alpha release blog post, FlexVolume plugin was an earlier attempt to make the Kubernetes volume plugin system extensible. Although it enables third party storage vendors to write drivers “out-of-tree”, because it is an exec based API, FlexVolumes requires files for third party driver binaries (or scripts) to be copied to a special plugin directory on the root filesystem of every node (and, in some cases, master) machine. This requires a cluster admin to have write access to the host filesystem for each node and some external mechanism to ensure that the driver file is recreated if deleted, just to deploy a volume plugin.

In addition to being difficult to deploy, Flex did not address the pain of plugin dependencies: Volume plugins tend to have many external requirements (on mount and filesystem tools, for example). These dependencies are assumed to be available on the underlying host OS, which is often not the case.

CSI addresses these issues by not only enabling storage plugins to be developed out-of-tree, but also containerized and deployed via standard Kubernetes primitives.

If you still have questions about in-tree volumes vs CSI vs Flex, please see the Volume Plugin FAQ.

What will happen to the in-tree volume plugins?

Once CSI reaches stability, we plan to migrate most of the in-tree volume plugins to CSI. Stay tuned for more details as the Kubernetes CSI implementation approaches stable.

What are the limitations of beta?

The beta implementation of CSI has the following limitations: * Block volumes are not supported; only file. * CSI drivers must be deployed with the provided external-attacher sidecar plugin, even if they don’t implement ControllerPublishVolume. * Topology awareness is not supported for CSI volumes, including the ability to share information about where a volume is provisioned (zone, regions, etc.) with the Kubernetes scheduler to allow it to make smarter scheduling decisions, and the ability for the Kubernetes scheduler or a cluster administrator or an application developer to specify where a volume should be provisioned. * driver-registrar requires permissions to modify all Kubernetes node API objects which could result in a compromised node gaining the ability to do the same.

What’s next?

Depending on feedback and adoption, the Kubernetes team plans to push the CSI implementation to GA in 1.12.

The team would like to encourage storage vendors to start developing CSI drivers, deploying them on Kubernetes, and sharing feedback with the team via the Kubernetes Slack channel wg-csi, the Google group kubernetes-sig-storage-wg-csi, or any of the standard SIG storage communication channels.

How do I get involved?

This project, like all of Kubernetes, is the result of hard work by many contributors from diverse backgrounds working together.

In addition to the contributors who have been working on the Kubernetes implementation of CSI since alpha: * Bradley Childs (childsb) * Chakravarthy Nelluri (chakri-nelluri) * Jan Šafránek (jsafrane) * Luis Pabón (lpabon) * Saad Ali (saad-ali) * Vladimir Vivien (vladimirvivien)

We offer a huge thank you to the new contributors who stepped up this quarter to help the project reach beta: * David Zhu (davidz627) * Edison Xiang (edisonxiang) * Felipe Musse (musse) * Lin Ml (mlmhl) * Lin Youchong (linyouchong) * Pietro Menna (pietromenna) * Serguei Bezverkhi (sbezverk) * Xing Yang (xing-yang) * Yuquan Ren (NickrenREN)

If you’re interested in getting involved with the design and development of CSI or any part of the Kubernetes Storage system, join the Kubernetes Storage Special Interest Group (SIG). We’re rapidly growing and always welcome new contributors.

Blog: Migrating the Kubernetes Blog

$
0
0

We recently migrated the Kubernetes Blog from the Blogger platform to GitHub. With the change in platform comes a change in URL: formerly at http://blog.kubernetes.io, the blog now resides at https://kubernetes.io/blog.

All existing posts redirect from their former URLs with <rel=canonical> tags, preserving SEO values.

Why and how we migrated the blog

Our primary reasons for migrating were to streamline blog submissions and reviews, and to make the overall blog process faster and more transparent. Blogger’s web interface made it difficult to provide drafts to multiple reviewers without also granting unnecessary access permissions and compromising security. GitHub’s review process offered clear improvements.

We learned from Jim Brikman’s experience during his own site migration away from Blogger.

Our migration was broken into several pull requests, but you can see the work that went into the primary migration PR.

We hope that making blog submissions more accessible will encourage greater community involvement in creating and reviewing blog content.

How to Submit a Blog Post

You can submit a blog post for consideration one of two ways:

If you have a post that you want to remain confidential until your publish date, please submit your post via the Google form. Otherwise, you can choose your submission process based on your comfort level and preferred workflow.

Note: Our workflow hasn’t changed for confidential advance drafts. Additionally, we’ll coordinate publishing for time sensitive posts to ensure that information isn’t released prematurely through an open pull request.

Call for reviewers

The Kubernetes Blog needs more reviewers! If you’re interested in contributing to the Kubernetes project and can participate on a regular, weekly basis, send an introductory email to k8sblog@linuxfoundation.org.

Blog: Local Persistent Volumes for Kubernetes Goes Beta

$
0
0

The Local Persistent Volumes beta feature in Kubernetes 1.10 makes it possible to leverage local disks in your StatefulSets. You can specify directly-attached local disks as PersistentVolumes, and use them in StatefulSets with the same PersistentVolumeClaim objects that previously only supported remote volume types.

Persistent storage is important for running stateful applications, and Kubernetes has supported these workloads with StatefulSets, PersistentVolumeClaims and PersistentVolumes. These primitives have supported remote volume types well, where the volumes can be accessed from any node in the cluster, but did not support local volumes, where the volumes can only be accessed from a specific node. The demand for using local, fast SSDs in replicated, stateful workloads has increased with demand to run more workloads in Kubernetes.

Addressing hostPath challenges

The prior mechanism of accessing local storage through hostPath volumes had many challenges. hostPath volumes were difficult to use in production at scale: operators needed to care for local disk management, topology, and scheduling of individual pods when using hostPath volumes, and could not use many Kubernetes features (like StatefulSets). Existing Helm charts that used remote volumes could not be easily ported to use hostPath volumes. The Local Persistent Volumes feature aims to address hostPath volumes’ portability, disk accounting, and scheduling challenges.

Disclaimer

Before going into details about how to use Local Persistent Volumes, note that local volumes are not suitable for most applications. Using local storage ties your application to that specific node, making your application harder to schedule. If that node or local volume encounters a failure and becomes inaccessible, then that pod also becomes inaccessible. In addition, many cloud providers do not provide extensive data durability guarantees for local storage, so you could lose all your data in certain scenarios.

For those reasons, most applications should continue to use highly available, remotely accessible, durable storage.

Suitable workloads

Some use cases that are suitable for local storage include:

  • Caching of datasets that can leverage data gravity for fast processing
  • Distributed storage systems that shard or replicate data across multiple nodes. Examples include distributed datastores like Cassandra, or distributed file systems like Gluster or Ceph.

Suitable workloads are tolerant of node failures, data unavailability, and data loss. They provide critical, latency-sensitive infrastructure services to the rest of the cluster, and should run with high priority compared to other workloads.

Enabling smarter scheduling and volume binding

An administrator must enable smarter scheduling for local persistent volumes. Before any PersistentVolumeClaims for your local PersistentVolumes are created, a StorageClass must be created with the volumeBindingMode set to “WaitForFirstConsumer”:

kind: StorageClass
apiVersion: storage.k8s.io/v1
metadata:
  name: local-storage
provisioner: kubernetes.io/no-provisioner
volumeBindingMode: WaitForFirstConsumer

This setting tells the PersistentVolume controller to not immediately bind a PersistentVolumeClaim. Instead, the system waits until a Pod that needs to use a volume is scheduled. The scheduler then chooses an appropriate local PersistentVolume to bind to, taking into account the Pod’s other scheduling constraints and policies. This ensures that the initial volume binding is compatible with any Pod resource requirements, selectors, affinity and anti-affinity policies, and more.

Note that dynamic provisioning is not supported in beta. All local PersistentVolumes must be statically created.

Creating a local persistent volume

For this initial beta offering, local disks must first be pre-partitioned, formatted, and mounted on the local node by an administrator. Directories on a shared file system are also supported, but must also be created before use.

Once you set up the local volume, you can create a PersistentVolume for it. In this example, the local volume is mounted at “/mnt/disks/vol1” on node “my-node”:

apiVersion: v1
kind: PersistentVolume
metadata:
  name: example-local-pv
spec:
  capacity:
    storage: 500Gi
  accessModes:
  - ReadWriteOnce
  persistentVolumeReclaimPolicy: Retain
  storageClassName: local-storage
  local:
    path: /mnt/disks/vol1
  nodeAffinity:
    required:
      nodeSelectorTerms:
      - matchExpressions:
        - key: kubernetes.io/hostname
          operator: In
          values:
          - my-node

Note that there’s a new nodeAffinity field in the PersistentVolume object: this is how the Kubernetes scheduler understands that this PersistentVolume is tied to a specific node. nodeAffinity is a required field for local PersistentVolumes.

When local volumes are manually created like this, the only supported persistentVolumeReclaimPolicy is “Retain”. When the PersistentVolume is released from the PersistentVolumeClaim, an administrator must manually clean up and set up the local volume again for reuse.

Automating local volume creation and deletion

Manually creating and cleaning up local volumes is a big administrative burden, so we’ve written a simple local volume manager to automate some of these pieces. It’s available in the external-storage repo as an optional program that you can deploy in your cluster, including instructions and example deployment specs for how to run it.

To use this, the local volumes must still first be set up and mounted on the local node by an administrator. The administrator needs to mount the local volume into a configurable “discovery directory” that the local volume manager recognizes. Directories on a shared file system are supported, but they must be bind-mounted into the discovery directory.

This local volume manager monitors the discovery directory, looking for any new mount points. The manager creates a PersistentVolume object with the appropriate storageClassName, path, nodeAffinity, and capacity for any new mount point that it detects. These PersistentVolume objects can eventually be claimed by PersistentVolumeClaims, and then mounted in Pods.

After a Pod is done using the volume and deletes the PersistentVolumeClaim for it, the local volume manager cleans up the local mount by deleting all files from it, then deleting the PersistentVolume object. This triggers the discovery cycle: a new PersistentVolume is created for the volume and can be reused by a new PersistentVolumeClaim.

Once the administrator initially sets up the local volume mount, this local volume manager takes over the rest of the PersistentVolume lifecycle without any further administrator intervention required.

Using local volumes in a pod

After all that administrator work, how does a user actually mount a local volume into their Pod? Luckily from the user’s perspective, a local volume can be requested in exactly the same way as any other PersistentVolume type: through a PersistentVolumeClaim. Just specify the appropriate StorageClassName for local volumes in the PersistentVolumeClaim object, and the system takes care of the rest!

kind: PersistentVolumeClaim
apiVersion: v1
metadata:
  name: example-local-claim
spec:
  accessModes:
  - ReadWriteOnce
  storageClassName: local-storage
  resources:
    requests:
      storage: 500Gi

Or in a StatefulSet as a volumeClaimTemplate:

kind: StatefulSet
...
 volumeClaimTemplates:
  - metadata:
      name: example-local-claim
    spec:
      accessModes:
      - ReadWriteOnce
      storageClassName: local-storage
      resources:
        requests:
          storage: 500Gi

Documentation

The Kubernetes website provides full documentation for local persistent volumes.

Future enhancements

The local persistent volume beta feature is not complete by far. Some notable enhancements under development:

  • Starting in 1.10, local raw block volumes is available as an alpha feature. This is useful for workloads that need to directly access block devices and manage their own data format.
  • Dynamic provisioning of local volumes using LVM is under design and an alpha implementation will follow in a future release. This will eliminate the current need for an administrator to pre-partition, format and mount local volumes, as long as the workload’s performance requirements can tolerate sharing disks.

Complementary features

Pod priority and preemption is another Kubernetes feature that is complementary to local persistent volumes. When your application uses local storage, it must be scheduled to the specific node where the local volume resides. You can give your local storage workload high priority so if that node ran out of room to run your workload, Kubernetes can preempt lower priority workloads to make room for it.

Pod disruption budget is also very important for those workloads that must maintain quorum. Setting a disruption budget for your workload ensures that it does not drop below quorum due to voluntary disruption events, such as node drains during upgrade.

Pod affinity and anti-affinity ensures that your workloads stay either co-located or spread out across failure domains. If you have multiple local persistent volumes available on a single node, it may be preferable to specify an pod anti-affinity policy to spread your workload across nodes. Note that if you want multiple pods to share the same local persistent volume, you do not need to specify a pod affinity policy. The scheduler understands the locality constraints of the local persistent volume and schedules your pod to the correct node.

Getting involved

If you have feedback for this feature or are interested in getting involved with the design and development, join the Kubernetes Storage Special-Interest-Group (SIG). We’re rapidly growing and always welcome new contributors.

Special thanks to all the contributors from multiple companies that helped bring this feature to beta, including Cheng Xing (verult), David Zhu (davidz627), Deyuan Deng (ddysher), Dhiraj Hedge (dhirajh), Ian Chakeres (ianchakeres), Jan Šafránek (jsafrane), Matthew Wong (wongma7), Michelle Au (msau42), Serguei Bezverkhi (sbezverk), and Yuquan Ren (nickrenren).

Blog: Kubernetes Application Survey 2018 Results

$
0
0

Understanding how people use or want to use Kubernetes can help us shape everything from what we build to how we do it. To help us understand how application developers, application operators, and ecosystem tool developers are using and want to use Kubernetes, the Application Definition Working Group recently performed a survey. The survey focused in on these types of user roles and the features and sub-projects owned by the Kubernetes organization. That included kubectl, Dashboard, Minikube, Helm, the Workloads API, etc.

The results are in and the raw data is now available for everyone.

There is too much data to summarize in a single blog post and we hope people will be able to find useful information by pouring over the data. Here are some of the highlights that caught our attention.

Participation

First, I would like to thank the 380 people who took the survey and provided feedback. We appreciate the time put into to share so much detail.

6.8x Response Increase

In the summer of 2016 we ran a survey on application usage. Kubernetes was much newer and the number of people talking about operating applications was much smaller.

The number of respondents in the past year and 10 months increased at a rate of 6.8 times.

Where Are We In Innovation Lifecycle?

Minikube operating system usage

Minikube is used primarily be people on MacOS and Linux. Yet, according to the 2018 Stack Overflow survey, almost half of developers use Windows as their primary operating system. This is where Minikube would run.

Seeing differences from other data sets is worth looking more deeply at to better understand our audience, where Kubernetes is at, and where it is on the journey it’s headed.

Plenty of Custom Tooling

Custom Tooling

Two thirds of respondents work for organizations developing their own tooling to help with application development and operation. We wondered why this might happen so we asked why as a follow-up question. 44% of people who took the survey told us why they do it.

App Management Tools

Custom Tooling

Only 4 tools were in use by more than 10% of those who took the survey with Helm being in use by 64% of them. Many more tools were used by more than 1% of people including those we directly asked about and the space for people to fill in those we didn’t ask about. The long tail, captured in the survey, contained more than 80 tools in use.

Want To See More?

As the Application Definition Working Group is working through the data we’re putting observations into a Google Slides Document. This is a living document that will continue to grow while we look over and discuss the data.

There is a session at KubeCon where the Application Definition Working Group will be meeting and discussing the survey. This is a session open to anyone in attendance, if you would like to attend.

While this working group is doing analysis and sharing it, we want to encourage others to look at the data and share any insights that might be gained.

Note, the survey questions were generated by the application definition working group with the help of people working on various sub-projects included in the survey. This is the reason some sub-projects have more and varied questions compared to some others. The survey was shared on social media, on mailing lists, in blog posts, in various meetings, and beyond while collecting information for two weeks.


Blog: Kubernetes Community - Top of the Open Source Charts in 2017

$
0
0

2017 was a huge year for Kubernetes, and GitHub’s latest Octoverse report illustrates just how much attention this project has been getting.

Kubernetes, an open source platform for running application containers, provides a consistent interface that enables developers and ops teams to automate the deployment, management, and scaling of a wide variety of applications on just about any infrastructure.

Solving these shared challenges by leveraging a wide community of expertise and industrial experience, as Kubernetes does, helps engineers focus on building their own products at the top of the stack, rather than needlessly duplicating work that now exists as a standard part of the “cloud native” toolkit.

However, achieving these gains via ad-hoc collective organizing is its own unique challenge, one which makes it increasingly difficult to support open source, community-driven efforts through periods of rapid growth.

Read on to find out how the Kubernetes Community has addressed these scaling challenges to reach the top of the charts in GitHub’s 2017 Octoverse report.

Most-Discussed on GitHub

The top two most-discussed repos of 2017 are both based on Kubernetes:

Most Discussed

Of all the open source repositories on GitHub, none received more issue comments than kubernetes/kubernetes. OpenShift, a CNCF certified distribution of Kubernetes, took second place.

Open discussion with ample time for community feedback and review helps build shared infrastructure and establish new standards for cloud native computing.

Most Reviewed on GitHub

Successfully scaling an open source effort’s communications often leads to better coordination and higher-quality feature delivery. The Kubernetes project’s Special Interest Group (SIG) structure has helped it become GitHub’s second most reviewed project:

Most Reviewed

Using SIGs to segment and standardize mechanisms for community participation helps channel more frequent reviews from better-qualified community members.

When managed effectively, active community discussions indicate more than just a highly contentious codebase, or a project with an extensive list of unmet needs.

Scaling a project’s capacity to handle issues and community interactions helps to expand the conversation. Meanwhile, large communities come with more diverse use cases and a larger array of support problems to manage. The Kubernetes SIG organization structure helps to address the challenges of complex communication at scale.

SIG meetings provide focused opportunities for users, maintainers, and specialists from various disciplines to collaborate together in support of this community effort. These investments in organizing help create an environment where it’s easier to prioritize architecture discussion and planning over commit velocity; enabling the project to sustain this kind of scale.

Join the party!

You may already be using solutions that are successfully managed and scaled on Kubernetes. For example, GitHub.com, which hosts Kubernetes’ upstream source code, now runs on Kubernetes as well!

Check out the Kubernetes Contributors’ guide for more information on how to get started as a contributor.

You can also join the weekly Kubernetes Community meeting and consider joining a SIG or two.

Blog: Zero-downtime Deployment in Kubernetes with Jenkins

$
0
0

Ever since we added the Kubernetes Continuous Deploy and Azure Container Service plugins to the Jenkins update center, “How do I create zero-downtime deployments” is one of our most frequently-asked questions. We created a quickstart template on Azure to demonstrate what zero-downtime deployments can look like. Although our example uses Azure, the concept easily applies to all Kubernetes installations.

Rolling Update

Kubernetes supports the RollingUpdate strategy to replace old pods with new ones gradually, while continuing to serve clients without incurring downtime. To perform a RollingUpdate deployment:

  • Set .spec.strategy.type to RollingUpdate (the default value).
  • Set .spec.strategy.rollingUpdate.maxUnavailable and .spec.strategy.rollingUpdate.maxSurge to some reasonable value.
    • maxUnavailable: the maximum number of pods that can be unavailable during the update process. This can be an absolute number or percentage of the replicas count; the default is 25%.
    • maxSurge: the maximum number of pods that can be created over the desired number of pods. Again this can be an absolute number or a percentage of the replicas count; the default is 25%.
  • Configure the readinessProbe for your service container to help Kubernetes determine the state of the pods. Kubernetes will only route the client traffic to the pods with a healthy liveness probe.

We’ll use deployment of the official Tomcat image to demonstrate this:

apiVersion: extensions/v1beta1
kind: Deployment
metadata:
  name: tomcat-deployment-rolling-update
spec:
  replicas: 2
  template:
    metadata:
      labels:
        app: tomcat
        role: rolling-update
    spec:
      containers:
      - name: tomcat-container
        image: tomcat:${TOMCAT_VERSION}
        ports:
        - containerPort: 8080
        readinessProbe:
          httpGet:
            path: /
            port: 8080
  strategy:
    type: RollingUpdate
    rollingUp      maxSurge: 50%

If the Tomcat running in the current deployments is version 7, we can replace ${TOMCAT_VERSION} with 8 and apply this to the Kubernetes cluster. With the Kubernetes Continuous Deploy or the Azure Container Service plugin, the value can be fetched from an environment variable which eases the deployment process.

Behind the scenes, Kubernetes manages the update like so:

Deployment Process

  • Initially, all pods are running Tomcat 7 and the frontend Service routes the traffic to these pods.
  • During the rolling update, Kubernetes takes down some Tomcat 7 pods and creates corresponding new Tomcat 8 pods. It ensures:
    • at most maxUnavailable pods in the desired Pods can be unavailable, that is, at least (replicas - maxUnavailable) pods should be serving the client traffic, which is 2-1=1 in our case.
    • at most maxSurge more pods can be created during the update process, that is 2*50%=1 in our case.
  • One Tomcat 7 pod is taken down, and one Tomcat 8 pod is created. Kubernetes will not route the traffic to any of them because their readiness probe is not yet successful.
  • When the new Tomcat 8 pod is ready as determined by the readiness probe, Kubernetes will start routing the traffic to it. This means during the update process, users may see both the old service and the new service.
  • The rolling update continues by taking down Tomcat 7 pods and creating Tomcat 8 pods, and then routing the traffic to the ready pods.
  • Finally, all pods are on Tomcat 8.

The Rolling Update strategy ensures we always have some Ready backend pods serving client requests, so there’s no service downtime. However, some extra care is required: - During the update, both the old pods and new pods may serve the requests. Without well defined session affinity in the Service layer, a user may be routed to the new pods and later back to the old pods. - This also requires you to maintain well-defined forward and backward compatibility for both data and the API, which can be challenging. - It may take a long time before a pod is ready for traffic after it is started. There may be a long window of time where the traffic is served with less backend pods than usual. Generally, this should not be a problem as we tend to do production upgrades when the service is less busy. But this will also extend the time window for issue 1. - We cannot do comprehensive tests for the new pods being created. Moving application changes from dev / QA environments to production can represent a persistent risk of breaking existing functionality. The readiness probe can do some work to check readiness, however, it should be a lightweight task that can be run periodically, and not suitable to be used as an entry point to start the complete tests.

Blue/green Deployment

Blue/green deployment quoted from TechTarget

A blue/green deployment is a change management strategy for releasing software code. Blue/green deployments, which may also be referred to as A/B deployments require two identical hardware environments that are configured exactly the same way. While one environment is active and serving end users, the other environment remains idle.

Container technology offers a stand-alone environment to run the desired service, which makes it super easy to create identical environments as required in the blue/green deployment. The loosely coupled Services - ReplicaSets, and the label/selector-based service routing in Kubernetes make it easy to switch between different backend environments. With these techniques, the blue/green deployments in Kubernetes can be done as follows:

  • Before the deployment, the infrastructure is prepared like so:
    • Prepare the blue deployment and green deployment with TOMCAT_VERSION=7 and TARGET_ROLE set to blue or green respectively.
apiVersion: extensions/v1beta1
kind: Deployment
metadata:
  name: tomcat-deployment-${TARGET_ROLE}
spec:
  replicas: 2
  template:
    metadata:
      labels:
        app: tomcat
        role: ${TARGET_ROLE}
    spec:
      containers:
      - name: tomcat-container
        image: tomcat:${TOMCAT_VERSION}
        ports:
        - containerPort: 8080
        readinessProbe:
          httpGet:
            path: /
            port: 8080
  • Prepare the public service endpoint, which initially routes to one of the backend environments, say TARGET_ROLE=blue.
kind: Service
apiVersion: v1
metadata:
  name: tomcat-service
  labels:
    app: tomcat
    role: ${TARGET_ROLE}
    env: prod
spec:
  type: LoadBalancer
  selector:
    app: tomcat
    role: ${TARGET_ROLE}
  ports:
    - port: 80
      targetPort: 8080
  • Optionally, prepare a test endpoint so that we can visit the backend environments for testing. They are similar to the public service endpoint, but they are intended to be accessed internally by the dev/ops team only.
kind: Service
apiVersion: v1
metadata:
  name: tomcat-test-${TARGET_ROLE}
  labels:
    app: tomcat
    role: test-${TARGET_ROLE}
spec:
  type: LoadBalancer
  selector:
    app: tomcat
    role: ${TARGET_ROLE}
  ports:
    - port: 80
      targetPort: 8080
  • Update the application in the inactive environment, say green environment. Set TARGET_ROLE=green and TOMCAT_VERSION=8 in the deployment config to update the green environment.
  • Test the deployment via the tomcat-test-green test endpoint to ensure the green environment is ready to serve client traffic.
  • Switch the frontend Service routing to the green environment by updating the Service config with TARGET_ROLE=green.
  • Run additional tests on the public endpoint to ensure it is working properly.
  • Now the blue environment is idle and we can:
    • leave it with the old application so that we can roll back if there’s issue with the new application
    • update it to make it a hot backup of the active environment
    • reduce its replica count to save the occupied resources

Resources

As compared to Rolling Update, the blue/green up* The public service is either routed to the old applications, or new applications, but never both at the same time. * The time it takes for the new pods to be ready does not affect the public service quality, as the traffic will only be routed to the new pods when all of them are tested to be ready. * We can do comprehensive tests on the new environment before it serves any public traffic. Just keep in mind this is in production, and the tests should not pollute live application data.

Jenkins Automation

Jenkins provides easy-to-setup workflow to automate your deployments. With Pipeline support, it is flexible to build the zero-downtime deployment workflow, and visualize the deployment steps. To facilitate the deployment process for Kubernetes resources, we published the Kubernetes Continuous Deploy and the Azure Container Service plugins built based on the kubernetes-client. You can deploy the resource to Azure Kubernetes Service (AKS) or the general Kubernetes clusters without the need of kubectl, and it supports variable substitution in the resource configuration so you can deploy environment-specific resources to the clusters without updating the resource config. We created a Jenkins Pipeline to demonstrate the blue/green deployment to AKS. The flow is like the following:

Jenkins Pipeline

  • Pre-clean: clean workspace.
  • SCM: pulling code from the source control management system.
  • Prepare Image: prepare the application docker images and upload them to some Docker repository.
  • Check Env: determine the active and inactive environment, which drives the following deployment.
  • Deploy: deploy the new application resource configuration to the inactive environment. With the Azure Container Service plugin, this can be done with: acsDeploy azureCredentialsId: 'stored-azure-credentials-id', configFilePaths: "glob/path/to/*/resource-config-*.yml", containerService: "aks-name | AKS", resourceGroupName: "resource-group-name", enableConfigSubstitution: true
  • Verify Staged: verify the deployment to the inactive environment to ensure it is working properly. Again, note this is in the production environment, so be careful not to pollute live application data during tests.
  • Confirm: Optionally, send email notifications for manual user approval to proceed with the actual environment switch.
  • Switch: Switch the frontend service endpoint routing to the inactive environment. This is just another service deployment to the AKS Kubernetes cluster.
  • Verify Prod: verify the frontend service endpoint is working properly with the new environment.
  • Post-clean: do some post clean on the temporary files.

For the Rolling Update strategy, simply deploy the deployment configuration to the Kubernetes cluster, which is a simple, single step.

Put It All Together

We built a quickstart template on Azure to demonstrate how we can do the zero-downtime deployment to AKS (Kubernetes) with Jenkins. Go to Jenkins Blue-Green Deployment on Kubernetes and click the button Deploy to Azure to get the working demo. This template will provision:

  • An AKS cluster, with the following resources:
    • Two similar deployments representing the environments “blue” and “green”. Both are initially set up with the tomcat:7 image.
    • Two test endpoint services (tomcat-test-blue and tomcat-test-green), which are connected to the corresponding deployments, and can be used to test if the deployments are ready for production use.
    • A production service endpoint (tomcat-service) which represents the public endpoint that the users will access. Initially it is routing to the “blue” environment.
  • A Jenkins master running on an Ubuntu 16.04 VM, with the Azure service principal credentials configured. The Jenkins instance has two sample jobs:
    • AKS Kubernetes Rolling Update Deployment pipeline to demonstrate the Rolling Update deployment to AKS.
    • AKS Kubernetes Blue/green Deployment pipeline to demonstrate the blue/green deployment to AKS.
    • We didn’t include the email confirmation step in the quickstart template. To add that, you need to configure the email SMTP server details in the Jenkins system configuration, and then add a Pipeline stage before Switch: stage('Confirm') { mail (to: 'to@example.com', subject: "Job '${env.JOB_NAME}' (${env.BUILD_NUMBER}) is waiting for input", body: "Please go to ${env.BUILD_URL}.") input 'Ready to go?' } Follow the Steps to setup the resources and you can try it out by start the Jenkins build jobs.

Blog: Developing on Kubernetes

$
0
0

Authors: Michael Hausenblas (Red Hat), Ilya Dmitrichenko (Weaveworks)

How do you develop a Kubernetes app? That is, how do you write and test an app that is supposed to run on Kubernetes? This article focuses on the challenges, tools and methods you might want to be aware of to successfully write Kubernetes apps alone or in a team setting.

We’re assuming you are a developer, you have a favorite programming language, editor/IDE, and a testing framework available. The overarching goal is to introduce minimal changes to your current workflow when developing the app for Kubernetes. For example, if you’re a Node.js developer and are used to a hot-reload setup—that is, on save in your editor the running app gets automagically updated—then dealing with containers and container images, with container registries, Kubernetes deployments, triggers, and more can not only be overwhelming but really take all the fun out if it.

In the following, we’ll first discuss the overall development setup, then review tools of the trade, and last but not least do a hands-on walkthrough of three exemplary tools that allow for iterative, local app development against Kubernetes.

Where to run your cluster?

As a developer you want to think about where the Kubernetes cluster you’re developing against runs as well as where the development environment sits. Conceptually there are four development modes:

Dev Modes

A number of tools support pure offline development including Minikube, Docker for Mac/Windows, Minishift, and the ones we discuss in detail below. Sometimes, for example, in a microservices setup where certain microservices already run in the cluster, a proxied setup (forwarding traffic into and from the cluster) is preferable and Telepresence is an example tool in this category. The live mode essentially means you’re building and/or deploying against a remote cluster and, finally, the pure online mode means both your development environment and the cluster are remote, as this is the case with, for example, Eclipse Che or Cloud 9. Let’s now have a closer look at the basics of offline development: running Kubernetes locally.

Minikube is a popular choice for those who prefer to run Kubernetes in a local VM. More recently Docker for Mac and Windows started shipping Kubernetes as an experimental package (in the “edge” channel). Some reasons why you may want to prefer using Minikube over the Docker desktop option are:

  • You already have Minikube installed and running
  • You prefer to wait until Docker ships a stable package
  • You’re a Linux desktop user
  • You are a Windows user who doesn’t have Windows 10 Pro with Hyper-V

Running a local cluster allows folks to work offline and that you don’t have to pay for using cloud resources. Cloud provider costs are often rather affordable and free tiers exists, however some folks prefer to avoid having to approve those costs with their manager as well as potentially incur unexpected costs, for example, when leaving cluster running over the weekend.

Some developers prefer to use a remote Kubernetes cluster, and this is usually to allow for larger compute and storage capacity and also enable collaborative workflows more easily. This means it’s easier for you to pull in a colleague to help with debugging or share access to an app in the team. Additionally, for some developers it can be critical to mirror production environment as closely as possible, especially when it comes down to external cloud services, say, proprietary databases, object stores, message queues, external load balancer, or mail delivery systems.

In summary, there are good reasons for you to develop against a local cluster as well as a remote one. It very much depends on in which phase you are: from early prototyping and/or developing alone to integrating a set of more stable microservices.

Now that you have a basic idea of the options around the runtime environment, let’s move on to how to iteratively develop and deploy your app.

The tools of the trade

We are now going to review tooling allowing you to develop apps on Kubernetes with the focus on having minimal impact on your existing workflow. We strive to provide an unbiased description including implications of using each of the tools in general terms.

Note that this is a tricky area since even for established technologies such as, for example, JSON vs YAML vs XML or REST vs gRPC vs SOAP a lot depends on your background, your preferences and organizational settings. It’s even harder to compare tooling in the Kubernetes ecosystem as things evolve very rapidly and new tools are announced almost on a weekly basis; during the preparation of this post alone, for example, Gitkube and Watchpod came out. To cover these new tools as well as related, existing tooling such as Weave Flux and OpenShift’s S2I we are planning a follow-up blog post to the one you’re reading.

Draft

Draft aims to help you get started deploying any app to Kubernetes. It is capable of applying heuristics as to what programming language your app is written in and generates a Dockerfile along with a Helm chart. It then runs the build for you and deploys resulting image to the target cluster via the Helm chart. It also allows user to setup port forwarding to localhost very easily.

Implications:

  • User can customise the chart and Dockerfile templates however they like, or even create a custom pack (with Dockerfile, the chart and more) for future use
  • It’s not very simple to guess how just any app is supposed to be built, in some cases user may need to tweak Dockerfile and the Helm chart that Draft generates
  • With Draft version 0.12.0 or older, every time user wants to test a change, they need to wait for Draft to copy the code to the cluster, then run the build, push the image and release updated chart; this can timely, but it results in an image being for every single change made by the user (whether it was committed to git or not)
  • As of Draft version 0.12.0, builds are executed locally
  • User doesn’t have an option to choose something other than Helm for deployment
  • It can watch local changes and trigger deployments, but this feature is not enabled by default
  • It allows developer to use either local or remote Kubernetes cluster
  • Deploying to production is up to the user, Draft authors recommend their other project – Brigade
  • Can be used instead of Skaffold, and along the side of Squash

More info:

Skaffold

Skaffold is a tool that aims to provide portability for CI integrations with different build system, image registry and deployment tools. It is different from Draft, yet somewhat comparable. It has a basic capability for generating manifests, but it’s not a prominent feature. Skaffold is extendible and lets user pick tools for use in each of the steps in building and deploying their app.

Implications:

  • Modular by design
  • Works independently of CI vendor, user doesn’t need Docker or Kubernetes plugin
  • Works without CI as such, i.e. from the developer’s laptop
  • It can watch local changes and trigger deployments
  • It allows developer to use either local or remote Kubernetes cluster
  • It can be used to deploy to production, user can configure how exactly they prefer to do it and provide different kind of pipeline for each target environment
  • Can be used instead of Draft, and along the side with most other tools

More info:

Squash

Squash consists of a debug server that is fully integrated with Kubernetes, and a IDE plugin. It allows you to insert breakpoints and do all the fun stuff you are used to doing when debugging an application using an IDE. It bridges IDE debugging experience with your Kubernetes cluster by allowing you to attach the debugger to a pod running in your Kubernetes cluster.

Implications:

  • Can be used independently of other tools you chose
  • Requires a privileged DaemonSet
  • Integrates with popular IDEs
  • Supports Go, Python, Node.js, Java and gdb
  • User must ensure application binaries inside the container image are compiled with debug symbols
  • Can be used in combination with any other tools described here
  • It can be used with either local or remote Kubernetes cluster

More info:

Telepresence

Telepresence connects containers running on developer’s workstation with a remote Kubernetes cluster using a two-way proxy and emulates in-cluster environment as well as provides access to config maps and secrets. It aims to improve iteration time for container app development by eliminating the need for deploying app to the cluster and leverages local container to abstract network and filesystem interface in order to make it appear as if the app was running in the cluster.

Implications:

  • It can be used independently of other tools you chose
  • Using together with Squash is possible, although Squash would have to be used for pods in the cluster, while conventional/local debugger would need to be used for debugging local container that’s connected to the cluster via Telepresence
  • Telepresence imposes some network latency
  • It provides connectivity via a side-car process - sshuttle, which is based on SSH
  • More intrusive dependency injection mode with LD_PRELOAD/DYLD_INSERT_LIBRARIES is also available
  • It is most commonly used with a remote Kubernetes cluster, but can be used with a local one also

More info:

Ksync

Ksync synchronizes application code (and configuration) between your local machine and the container running in Kubernetes, akin to what oc rsync does in OpenShift. It aims to improve iteration time for app development by eliminating build and deployment steps.

Implications:

  • It bypasses container image build and revision control
  • Compiled language users have to run builds inside the pod (TBC)
  • Two-way sync – remote files are copied to local directory
  • Container is restarted each time remote filesystem is updated
  • No security features – development only
  • Utilizes Syncthing, a Go library for peer-to-peer sync
  • Requires a privileged DaemonSet running in the cluster
  • Node has to use Docker with overlayfs2 – no other CRI implementations are supported at the time of writing

More info:

Hands-on walkthroughs

The app we will be using for the hands-on walkthroughs of the tools in the following is a simple stock market simulator, consisting of two microservices:

  • The stock-gen microservice is written in Go and generates stock data randomly and exposes it via HTTP endpoint /stockdata. ‎* A second microservice, stock-con is a Node.js app that consumes the stream of stock data from stock-gen and provides an aggregation in form of a moving average via the HTTP endpoint /average/$SYMBOL as well as a health-check endpoint at /healthz.

Overall, the default setup of the app looks as follows:

Default Setup

In the following we’ll do a hands-on walkthrough for a representative selection of tools discussed above: ksync, Minikube with local build, as well as Skaffold. For each of the tools we do the following:

  • Set up the respective tool incl. preparations for the deployment and local consumption of the stock-con microservice.
  • Perform a code update, that is, change the source code of the /healthz endpoint in the stock-con microservice and observe the updates.

Note that for the target Kubernetes cluster we’ve been using Minikube locally, but you can also a remote cluster for ksync and Skaffold if you want to follow along.

Walkthrough: ksync

As a preparation, install ksync and then carry out the following steps to prepare the development setup:

$ mkdir -p $(pwd)/ksync
$ kubectl create namespace dok
$ ksync init -n dok

With the basic setup completed we’re ready to tell ksync’s local client to watch a certain Kubernetes namespace and then we create a spec to define what we want to sync (the directory $(pwd)/ksync locally with /app in the container). Note that target pod is specified via the selector parameter:

$ ksync watch -n dok
$ ksync create -n dok --selector=app=stock-con $(pwd)/ksync /app
$ ksync get -n dok

Now we deploy the stock generator and the stock consumer microservice:

$ kubectl -n=dok apply \
      -f https://raw.githubusercontent.com/kubernauts/dok-example-us/master/stock-gen/app.yaml
$ kubectl -n=dok apply \
      -f https://raw.githubusercontent.com/kubernauts/dok-example-us/master/stock-con/app.yaml

Once both deployments are created and the pods are running, we forward the stock-con service for local consumption (in a separate terminal session):

$ kubectl get -n dok po --selector=app=stock-con  \
                     -o=custom-columns=:metadata.name --no-headers |  \
                     xargs -IPOD kubectl -n dok port-forward POD 9898:9898

With that we should be able to consume the stock-con service from our local machine; we do this by regularly checking the response of the healthz endpoint like so (in a separate terminal session):

$ watch curl localhost:9898/healthz

Now change the code in the ksync/stock-condirectory, for example update the /healthz endpoint code in service.js by adding a field to the JSON response and observe how the pod gets updated and the response of the curl localhost:9898/healthz command changes. Overall you should have something like the following in the end:

Preview

Walkthrough: Minikube with local build

For the following you will need to have Minikube up and running and we will leverage the Minikube-internal Docker daemon for building images, locally. As a preparation, do the following

$ git clone https://github.com/kubernauts/dok-example-us.git && cd dok-example-us
$ eval $(minikube docker-env)
$ kubectl create namespace dok

Now we deploy the stock generator and the stock consumer microservice:

$ kubectl -n=dok apply -f stock-gen/app.yaml
$ kubectl -n=dok apply -f stock-con/app.yaml

Once both deployments are created and the pods are running, we forward the stock-con service for local consumption (in a separate terminal session) and check the response of the healthz endpoint:

$ kubectl get -n dok po --selector=app=stock-con  \
                     -o=custom-columns=:metadata.name --no-headers |  \
                     xargs -IPOD kubectl -n dok port-forward POD 9898:9898 &
$ watch curl localhost:9898/healthz

Now change the code in the stock-condirectory, for example, update the /healthz endpoint code in service.js by adding a field to the JSON response. Once you’re done with your code update, the last step is to build a new container image and kick off a new deployment like shown below:

$ docker build -t stock-con:dev -f Dockerfile .
$ kubectl -n dok set image deployment/stock-con *=stock-con:dev

Overall you should have something like the following in the end:

Local Preview

Walkthrough: Skaffold

To perform this walkthrough you first need to install Skaffold. Once that is done, you can do the following steps to prepare the development setup:

$ git clone https://github.com/kubernauts/dok-example-us.git && cd dok-example-us
$ kubectl create namespace dok

Now we deploy the stock generator (but not the stock consumer microservice, that is done via Skaffold):

$ kubectl -n=dok apply -f stock-gen/app.yaml

Note that initially we experienced an authentication error when doing skaffold dev and needed to apply a fix as described in Issue 322. Essentially it means changing the content of ~/.docker/config.json to:

{"auths": {}
}

Next, we had to patch stock-con/app.yaml slightly to make it work with Skaffold:

Add a namespace field to both the stock-con deployment and the service with the value of dok. Change the image field of the container spec to quay.io/mhausenblas/stock-con since Skaffold manages the container image tag on the fly.

The resulting app.yaml file stock-con looks as follows:

apiVersion: apps/v1beta1
kind: Deployment
metadata:
  labels:
    app: stock-con
  name: stock-con
  namespace: dok
spec:
  replicas: 1
  template:
    metadata:
      labels:
        app: stock-con
    spec:
      containers:
      - name: stock-con
        image: quay.io/mhausenblas/stock-con
        env:
        - name: DOK_STOCKGEN_HOSTNAME
          value: stock-gen
        - name: DOK_STOCKGEN_PORT
          value: "9999"
        ports:
        - containerPort: 9898
          protocol: TCP
        livenessProbe:
          initialDelaySeconds: 2
          periodSeconds: 5
          httpGet:
            path: /healthz
            port: 9898
        readinessProbe:
          initialDelaySeconds: 2
          periodSeconds: 5
          httpGet:
            path: /healthz
            port: 9898
---
apiVersion: v1
kind: Service
metadata:
  labels:
    app: stock-con
  name: stock-con
  namespace: dok
spec:
  type: ClusterIP
  ports:
  - name: http
    port: 80
    protocol: TCP
    targetPort: 9898
  selector:
    app: stock-con

The final step before we can start development is to configure Skaffold. So, create a file skaffold.yaml in the stock-con/ directory with the following content:

apiVersion: skaffold/v1alpha2
kind: Config
build:
  artifacts:
  - imageName: quay.io/mhausenblas/stock-con
    workspace: .
    docker: {}
  local: {}
deploy:
  kubectl:
    manifests:
      - app.yaml

Now we’re ready to kick off the development. For that execute the following in the stock-con/ directory:

$ skaffold dev

Above command triggers a build of the stock-con image and then a deployment. Once the pod of the stock-con deployment is running, we again forward the stock-con service for local consumption (in a separate terminal session) and check the response of the healthz endpoint:

$ kubectl get -n dok po --selector=app=stock-con  \                     -o=custom-columns=:metadata.name --no-headers |  \                     xargs -IPOD kubectl -n dok port-forward POD 9898:9898 &
$ watch curl localhost:9898/healthz

If you now change the code in the stock-condirectory, for example, by updating the /healthz endpoint code in service.js by adding a field to the JSON response, you should see Skaffold noticing the change and create a new image as well as deploy it. The resulting screen would look something like this:

Skaffold Preview

By now you should have a feeling how different tools enable you to develop apps on Kubernetes and if you’re interested to learn more about tools and or methods, check out the following resources:

With that we wrap up this post on how to go about developing apps on Kubernetes, we hope you learned something and if you have feedback and/or want to point out a tool that you found useful, please let us know via Twitter: Ilya and Michael.

Blog: Current State of Policy in Kubernetes

$
0
0

Kubernetes has grown dramatically in its impact to the industry; and with rapid growth, we are beginning to see variations across components in how they define and apply policies.

Currently, policy related components could be found in identity services, networking services, storage services, multi-cluster federation, RBAC and many other areas, with different degree of maturity and also different motivations for specific problems. Within each component, some policies are extensible while others are not. The languages used by each project to express intent vary based on the original authors and experience. Driving consistent views of policies across the entire domain is a daunting task.

Adoption of Kubernetes in regulated industries will also drive the need to ensure that a deployed cluster confirms with various legal requirements, such as PCI, HIPPA, or GDPR. Each of these compliance standards enforces a certain level of privacy around user information, data, and isolation.

The core issues with the current Kubernetes policy implementations are identified as follows:

  • Lack of big picture across the platform
  • Lack of coordination and common language among different policy components
  • Lack of consistency for extensible policy creation across the platform.
    • There are areas where policy components are extensible, and there are also areas where strict end-to-end solutions are enforced. No consensus is established on the preference to a extensible and pluggable architecture.
  • Lack of consistent auditability across the Kubernetes architecture of policies which are created, modified, or disabled as well as the actions performed on behalf of the policies which are applied.

Forming Kubernetes Policy WG

We have established a new WG to directly address these issues. We intend to provide an overall architecture that describes both the current policy related implementations as well as future policy related proposals in Kubernetes. Through a collaborative method, we want to present both dev and end user a universal view of policy in Kubernetes.

We are not seeking to redefine and replace existing implementations which have been reached by thorough discussion and consensus. Rather to establish a summarized review of current implementation and addressing gaps to address broad end to end scenarios as defined in our initial design proposal.

Kubernetes Policy WG has been focusing on the design proposal document and using the weekly meeting for discussions among WG members. The design proposal outlines the background and motivation of why we establish the WG, the concrete use cases from which the gaps/requirement analysis is deduced, the overall architecture and the container policy interface proposal.

Key Policy Scenarios in Kubernetes

Among several use cases the workgroup has brainstormed, eventually three major scenario stands out.

The first one is about legislation/regulation compliance which requires the Kubernetes clusters conform to. The compliance scenario takes GDPR as an legislation example and the suggested policy architecture out of the discussion is to have a datapolicy controller responsible for the auditing.

The second scenario is about capacity leasing, or multi-tenant quota in traditional IaaS concept, which deals with when a large enterprise want to delegate the resource control to various Lines Of Business it has, how the Kubernetes cluster should be configured to have a policy driven mechanism to enforce the quota system. The ongoing multi-tenant controller design proposed in the multi-tenancy working group could be an ideal enforcement point for the quota policy controller, which in turn might take a look at kube-arbitrator for inspiration.

The last scenario is about cluster policy which refers to the general security and resource oriented policy control. Luster policy will involve both cluster level and namespace level policy control as well as enforcement, and there is a proposal called Kubernetes Security Profile that is under development by the Policy WG member to provide a PoC for this use case.

Kubernetes Policy Architecture

Building upon the three scenarios, the WG is now working on three concrete proposals together with sig-arch, sig-auth and other related projects. Besides the Kubernetes security profile proposal aiming at the cluster policy use case, we also have the scheduling policy proposal which partially targets the capacity leasing use case and the topology service policy proposal which deals with affinity based upon service requirement and enforcement on routing level.

When these concrete proposals got clearer the WG will be able to provide a high level Kubernetes policy architecture as part of the motivation of the establishment of the Policy WG.

Towards Cloud Native Policy Driven Architecture

Policy is definitely something goes beyond Kubernetes and applied to a broader cloud native context. Our work in the Kubernetes Policy WG will provide the foundation of building a CNCF wide policy architecture, with the integration of Kubernetes and various other cloud native components such as open policy agent, Istio, Envoy, SPIFEE/SPIRE and so forth. The Policy WG has already collaboration with the CNCF SAFE WG (in-forming) team, and will work on more alignments to make sure a community driven cloud native policy architecture design.

Authors: Zhipeng Huang, Torin Sandall, Michael Elder, Erica Von Buelow, Khalid Ahmed, Yisui Hu

Blog: Announcing Kubeflow 0.1

$
0
0

Since Last We Met

Since the initial announcement of Kubeflow at the last KubeCon+CloudNativeCon, we have been both surprised and delighted by the excitement for building great ML stacks for Kubernetes. In just over five months, the Kubeflow project now has:

  • 70+ contributors
  • 20+ contributing organizations
  • 15 repositories
  • 3100+ GitHub stars
  • 700+ commits

and already is among the top 2% of GitHub projects ever.

People are excited to chat about Kubeflow as well! The Kubeflow community has also held meetups, talks and public sessions all around the world with thousands of attendees. With all this help, we’ve started to make substantial in every step of ML, from building your first model all the way to building a production-ready, high-scale deployments. At the end of the day, our mission remains the same: we want to let data scientists and software engineers focus on the things they do well by giving them an easy-to-use, portable and scalable ML stack.

Introducing Kubeflow 0.1

Today, we’re proud to announce the availability of Kubeflow 0.1, which provides a minimal set of packages to begin developing, training and deploying ML. In just a few commands, you can get:

  • Jupyter Hub - for collaborative & interactive training
  • A TensorFlow Training Controller with native distributed training
  • A TensorFlow Serving for hosting
  • Argo for workflows
  • SeldonCore for complex inference and non TF models
  • Ambassador for Reverse Proxy
  • Wiring to make it work on any Kubernetes anywhere

To get started, it’s just as easy as it always has been:

# Create a namespace for kubeflow deployment
NAMESPACE=kubeflow
kubectl create namespace ${NAMESPACE}
VERSION=v0.1.3

# Initialize a ksonnet app. Set the namespace for it's default environment.
APP_NAME=my-kubeflow
ks init ${APP_NAME}
cd ${APP_NAME}
ks env set default --namespace ${NAMESPACE}

# Install Kubeflow components
ks registry add kubeflow github.com/kubeflow/kubeflow/tree/${VERSION}/kubeflow
ks pkg install kubeflow/core@${VERSION}
ks pkg install kubeflow/tf-serving@${VERSION}
ks pkg install kubeflow/tf-job@${VERSION}

# Create templates for core components
ks generate kubeflow-core kubeflow-core

# Deploy Kubeflow
ks apply default -c kubeflow-core

And thats it! JupyterHub is deployed so we can now use Jupyter to begin developing models. Once we have python code to build our model we can build a docker image and train our model using our TFJob operator by running commands like the following:

ks generate tf-job my-tf-job --name=my-tf-job --image=gcr.io/my/image:latest
ks apply default -c my-tf-job

We could then deploy the model by doing

ks generate tf-serving ${MODEL_COMPONENT} --name=${MODEL_NAME}
ks param set ${MODEL_COMPONENT} modelPath ${MODEL_PATH}
ks apply ${ENV} -c ${MODEL_COMPONENT}

Within just a few commands, data scientists and software engineers can now create even complicated ML solutions and focus on what they do best: answering business critical questions.

Community Contributions

It’d be impossible to have gotten where we are without enormous help from everyone in the community. Some specific contributions that we want to highlight include:

It’s difficult to overstate how much the community has helped bring all these projects (and more) to fruition. Just a few of the contributing companies include: Alibaba Cloud, Ant Financial, Caicloud, Canonical, Cisco, Datawire, Dell, Github, Google, Heptio, Huawei, Intel, Microsoft, Momenta, One Convergence, Pachyderm, Project Jupyter, Red Hat, Seldon, Uber and Weaveworks.

Learning More

If you’d like to try out Kubeflow, we have a number of options for you:

  1. You can use sample walkthroughs hosted on Katacoda
  2. You can follow a guided tutorial with existing models from the examples repository. These include the Github Issue Summarization, MNIST and Reinforcement Learning with Agents.
  3. You can start a cluster on your own and try your own model. Any Kubernetes conformant cluster will support Kubeflow including those from contributors Caicloud, Canonical, Google, Heptio, Mesosphere, Microsoft, IBM, Red Hat/Openshift and Weaveworks.

There were also a number of sessions at KubeCon + CloudNativeCon EU 2018 covering Kubeflow. The links to the talks are here; the associated videos will be posted in the coming days.

What’s Next?

Our next major release will be 0.2 coming this summer. In it, we expect to land the following new features:

  • Simplified setup via a bootstrap container
  • Improved accelerator integration
  • Support for more ML frameworks, e.g., Spark ML, XGBoost, sklearn
  • Autoscaled TF Serving
  • Programmatic data transforms, e.g., tf.transform

But the most important feature is the one we haven’t heard yet. Please tell us! Some options for making your voice heard include:

Thank you for all your support so far!Jeremy Lewi & David Aronchick Google

Blog: Docs are Migrating from Jekyll to Hugo

$
0
0

Author: Zach Corleissen (CNCF)

Changing the site framework

After nearly a year of investigating how to enable multilingual support for Kubernetes docs, we’ve decided to migrate the site’s static generator from Jekyll to Hugo.

What does the Hugo migration mean for users and contributors?

Things will break

Hugo’s Markdown parser is differently strict than Jekyll’s. As a consequence, some Markdown formatting that rendered fine in Jekyll now produces some unexpected results: strange left nav ordering, vanishing tutorials, and broken links, among others.

If you encounter any site weirdness or broken formatting, please open an issue. You can see the list of issues that are specific to Hugo migration.

Multilingual support is coming

Our initial search focused on finding a language selector that would play well with Jekyll. The projects we found weren’t well-supported, and a prototype of one plugin made it clear that a Jekyll implementation would create technical debt that drained resources away from the quality of the docs.

We chose Hugo after months of research and conversations with other open source translation projects. (Special thanks to Andreas Jaeger and his experience at OpenStack). Hugo’s multilingual support is built in and easy.

Pain now, relief later

Another advantage of Hugo is that build performance scales well at size. At 250+ pages, the Kubernetes site’s build times suffered significantly with Jekyll. We’re excited about removing the barrier to contribution created by slow site build times.

Again, if you encounter any broken, missing, or unexpected content, please open an issue and let us know.

Blog: Gardener - The Kubernetes Botanist

$
0
0

Authors: Rafael Franzke (SAP), Vasu Chandrasekhara (SAP)

Today, Kubernetes is the natural choice for running software in the Cloud. More and more developers and corporations are in the process of containerizing their applications, and many of them are adopting Kubernetes for automated deployments of their Cloud Native workloads.

There are many Open Source tools which help in creating and updating single Kubernetes clusters. However, the more clusters you need the harder it becomes to operate, monitor, manage, and keep all of them alive and up-to-date.

And that is exactly what project “Gardener” focuses on. It is not just another provisioning tool, but it is rather designed to manage Kubernetes clusters as a service. It provides Kubernetes-conformant clusters on various cloud providers and the ability to maintain hundreds or thousands of them at scale. At SAP, we face this heterogeneous multi-cloud & on-premise challenge not only in our own platform, but also encounter the same demand at all our larger and smaller customers implementing Kubernetes & Cloud Native.

Inspired by the possibilities of Kubernetes and the ability to self-host, the foundation of Gardener is Kubernetes itself. While self-hosting, as in, to run Kubernetes components inside Kubernetes is a popular topic in the community, we apply a special pattern catering to the needs of operating a huge number of clusters with minimal total cost of ownership. We take an initial Kubernetes cluster (called “seed” cluster) and seed the control plane components (such as the API server, scheduler, controller-manager, etcd and others) of an end-user cluster as simple Kubernetes pods. In essence, the focus of the seed cluster is to deliver a robust Control-Plane-as-a-Service at scale. Following our botanical terminology, the end-user clusters when ready to sprout are called “shoot” clusters. Considering network latency and other fault scenarios, we recommend a seed cluster per cloud provider and region to host the control planes of the many shoot clusters.

Overall, this concept of reusing Kubernetes primitives already simplifies deployment, management, scaling & patching/updating of the control plane. Since it builds upon highly available initial seed clusters, we can evade multiple quorum number of master node requirements for shoot cluster control planes and reduce waste/costs. Furthermore, the actual shoot cluster consists only of worker nodes for which full administrative access to the respective owners could be granted, thereby structuring a necessary separation of concerns to deliver a higher level of SLO. The architectural role & operational ownerships are thus defined as following (cf. Figure 1):

  • Kubernetes as a Service provider owns, operates, and manages the garden and the seed clusters. They represent parts of the required landscape/infrastructure.
  • The control planes of the shoot clusters are run in the seed and, consequently, within the separate security domain of the service provider.
  • The shoot clusters’ machines are run under the ownership of and in the cloud provider account and the environment of the customer, but still managed by the Gardener.
  • For on-premise or private cloud scenarios the delegation of ownership & management of the seed clusters (and the IaaS) is feasible.

Gardener architecture

Figure 1 Technical Gardener landscape with components.

The Gardener is developed as an aggregated API server and comes with a bundled set of controllers. It runs inside another dedicated Kubernetes cluster (called “garden” cluster) and it extends the Kubernetes API with custom resources. Most prominently, the Shoot resource allows a description of the entire configuration of a user’s Kubernetes cluster in a declarative way. Corresponding controllers will, just like native Kubernetes controllers, watch these resources and bring the world’s actual state to the desired state (resulting in create, reconcile, update, upgrade, or delete operations.) The following example manifest shows what needs to be specified:

apiVersion: garden.sapcloud.io/v1beta1
kind: Shoot
metadata:
  name: dev-eu1
  namespace: team-a
spec:
  cloud:
    profile: aws
    region: us-east-1
    secretBindingRef:
      name: team-a-aws-account-credentials
    aws:
      machineImage:
        ami: ami-34237c4d
        name: CoreOS
      networks:
        vpc:
          cidr: 10.250.0.0/16
        ...
      workers:
      - name: cpu-pool
        machineType: m4.xlarge
        volumeType: gp2
        volumeSize: 20Gi
        autoScalerMin: 2
        autoScalerMax: 5
  dns:
    provider: aws-route53
    domain: dev-eu1.team-a.example.com
  kubernetes:
    version: 1.10.2
  backup:
    ...
  maintenance:
    ...
  addons:
    cluster-autoscaler:
      enabled: true
    ...

Once sent to the garden cluster, Gardener will pick it up and provision the actual shoot. What is not shown above is that each action will enrich the Shoot’s status field indicating whether an operation is currently running and recording the last error (if there was any) and the health of the involved components. Users are able to configure and monitor their cluster’s state in true Kubernetes style. Our users have even written their own custom controllers watching & mutating these Shoot resources.

Technical deep dive

The Gardener implements a Kubernetes inception approach; thus, it leverages Kubernetes capabilities to perform its operations. It provides a couple of controllers (cf. [A]) watching Shoot resources whereas the main controller is responsible for the standard operations like create, update, and delete. Another controller named “shoot care” is performing regular health checks and garbage collections, while a third’s (“shoot maintenance”) tasks are to cover actions like updating the shoot’s machine image to the latest available version.

For every shoot, Gardener creates a dedicated Namespace in the seed with appropriate security policies and within it pre-creates the later required certificates managed as Secrets.

etcd

The backing data store etcd (cf. [B]) of a Kubernetes cluster is deployed as a StatefulSet with one replica and a PersistentVolume(Claim). Embracing best practices, we run another etcd shard-instance to store Events of a shoot. Anyway, the main etcd pod is enhanced with a sidecar validating the data at rest and taking regular snapshots which are then efficiently backed up to an object store. In case etcd’s data is lost or corrupt, the sidecar restores it from the latest available snapshot. We plan to develop incremental/continuous backups to avoid discrepancies (in case of a recovery) between a restored etcd state and the actual state [1].

Kubernetes control plane

As already mentioned above, we have put the other Kubernetes control plane components into native Deployments and run them with the rolling update strategy. By doing so, we can not only leverage the existing deployment and update capabilities of Kubernetes, but also its monitoring and liveliness proficiencies. While the control plane itself uses in-cluster communication, the API Servers’ Service is exposed via a load balancer for external communication (cf. [C]). In order to uniformly generate the deployment manifests (mainly depending on both the Kubernetes version and cloud provider), we decided to utilize Helm charts whereas Gardener leverages only Tillers rendering capabilities, but deploys the resulting manifests directly without running Tiller at all [2].

Infrastructure preparation

One of the first requirements when creating a cluster is a well-prepared infrastructure on the cloud provider side including networks and security groups. In our current provider specific in-tree implementation of Gardener (called the “Botanist”), we employ Terraform to accomplish this task. Terraform provides nice abstractions for the major cloud providers and implements capabilities like parallelism, retry mechanisms, dependency graphs, idempotency, and more. However, we found that Terraform is challenging when it comes to error handling and it does not provide a technical interface to extract the root cause of an error. Currently, Gardener generates a Terraform script based on the shoot specification and stores it inside a ConfigMap in the respective namespace of the seed cluster. The Terraformer component then runs as a Job (cf. [D]), executes the mounted Terraform configuration, and writes the produced state back into another ConfigMap. Using the Job primitive in this manner helps to inherit its retry logic and achieve fault tolerance against temporary connectivity issues or resource constraints. Moreover, Gardener only needs to access the Kubernetes API of the seed cluster to submit the Job for the underlying IaaS. This design is important for private cloud scenarios in which typically the IaaS API is not exposed publicly.

Machine controller manager

What is required next are the nodes to which the actual workload of a cluster is to be scheduled. However, Kubernetes offers no primitives to request nodes forcing a cluster administrator to use external mechanisms. The considerations include the full lifecycle, beginning with initial provisioning and continuing with providing security fixes, and performing health checks and rolling updates. While we started with instantiating static machines or utilizing instance templates of the cloud providers to create the worker nodes, we concluded (also from our previous production experience with running a cloud platform) that this approach requires extensive effort. During discussions at KubeCon 2017, we recognized that the best way, of course, to manage cluster nodes is to again apply core Kubernetes concepts and to teach the system to self-manage the nodes/machines it runs. For that purpose, we developed the machine controller manager (cf. [E]) which extends Kubernetes with MachineDeployment, MachineClass, MachineSet& Machine resources and enables declarative management of (virtual) machines from within the Kubernetes context just like Deployments, ReplicaSets& Pods. We reused code from existing Kubernetes controllers and just needed to abstract a few IaaS/cloud provider specific methods for creating, deleting, and listing machines in dedicated drivers. When comparing Pods and Machines a subtle difference becomes evident: creating virtual machines directly results in costs, and if something unforeseen happens, these costs can increase very quickly. To safeguard against such rampage, the machine controller manager comes with a safety controller that terminates orphaned machines and freezes the rollout of MachineDeployments and MachineSets beyond certain thresholds and time-outs. Furthermore, we leverage the existing official cluster-autoscaler already including the complex logic of determining which node pool to scale out or down. Since its cloud provider interface is well-designed, we enabled the autoscaler to directly modify the number of replicas in the respective MachineDeployment resource when triggering to scale out or down.

Addons

Besides providing a properly setup control plane, every Kubernetes cluster requires a few system components to work. Usually, that’s the kube-proxy, an overlay network, a cluster DNS, and an ingress controller. Apart from that, Gardener allows to order optional add-ons configurable by the user (in the shoot resource definition), e.g. Heapster, the Kubernetes Dashboard, or Cert-Manager. Again, the Gardener renders the manifests for all these components via Helm charts (partly adapted and curated from the upstream charts repository). However, these resources are managed in the shoot cluster and can thus be tweaked by users with full administrative access. Hence, Gardener ensures that these deployed resources always match the computed/desired configuration by utilizing an existing watch dog, the kube-addon-manager (cf. [F]).

Network air gap

While the control plane of a shoot cluster runs in a seed managed & supplied by your friendly platform-provider, the worker nodes are typically provisioned in a separate cloud provider (billing) account of the user. Typically, these worker nodes are placed into private networks [3] to which the API Server in the seed control plane establishes direct communication, using a simple VPN solution based on ssh (cf. [G]). We have recently migrated the SSH-based implementation to an OpenVPN-based implementation which significantly increased the network bandwidth.

Monitoring & Logging

Monitoring, alerting, and logging are crucial to supervise clusters and keep them healthy so as to avoid outages and other issues. Prometheus has become the most used monitoring system in the Kubernetes domain. Therefore, we deploy a central Prometheus instance into the garden namespace of every seed. It collects metrics from all the seed’s kubelets including those for all pods running in the seed cluster. In addition, next to every control plane a dedicated tenant Prometheus instance is provisioned for the shoot itself (cf. [H]). It gathers metrics for its own control plane as well as for the pods running on the shoot’s worker nodes. The former is done by fetching data from the central Prometheus’ federation endpoint and filtering for relevant control plane pods of the particular shoot. Other than that, Gardener deploys two kube-state-metrics instances, one responsible for the control plane and one for the workload, exposing cluster-level metrics to enrich the data. The node exporter provides more detailed node statistics. A dedicated tenant Grafana dashboard displays the analytics and insights via lucid dashboards. We also defined alerting rules for critical events and employed the AlertManager to send emails to operators and support teams in case any alert is fired.

[1] This is also the reason for not supporting point-in-time recovery. There is no reliable infrastructure reconciliation implemented in Kubernetes so far. Thus, restoring from an old backup without refreshing the actual workload and state of the concerned cluster would generally not be of much help.

[2] The most relevant criteria for this decision was that Tiller requires a port-forward connection for communication which we experienced to be too unstable and error-prone for our automated use case. Nevertheless, we are looking forward to Helm v3 hopefully interacting with Tiller using CustomResourceDefinitions.

[3] Gardener offers to either create & prepare these networks with the Terraformer or it can be instructed to reuse pre-existing networks.

Usability and Interaction

Despite requiring only the familiar kubectl command line tool for managing all of Gardener, we provide a central dashboard for comfortable interaction. It enables users to easily keep track of their clusters’ health, and operators to monitor, debug, and analyze the clusters they are responsible for. Shoots are grouped into logical projects in which teams managing a set of clusters can collaborate and even track issues via an integrated ticket system (e.g. GitHub Issues). Moreover, the dashboard helps users to add & manage their infrastructure account secrets and to view the most relevant data of all their shoot clusters in one place while being independent from the cloud provider they are deployed to.

Gardener architecture

Figure 2 Animated Gardener dashboard.

More focused on the duties of developers and operators, the Gardener command line client gardenctl simplifies administrative tasks by introducing easy higher-level abstractions with simple commands that help condense and multiplex information & actions from/to large amounts of seed and shoot clusters.

$ gardenctl ls shoots
projects:
- project: team-a
  shoots:
  - dev-eu1
  - prod-eu1

$ gardenctl target shoot prod-eu1
[prod-eu1]

$ gardenctl show prometheus
NAME           READY     STATUS    RESTARTS   AGE       IP              NODE
prometheus-0   3/3       Running   0          106d      10.241.241.42   ip-10-240-7-72.eu-central-1.compute.internal

URL: https://user:password@p.prod-eu1.team-a.seed.aws-eu1.example.com

Outlook and future plans

The Gardener is already capable of managing Kubernetes clusters on AWS, Azure, GCP, OpenStack [4]. Actually, due to the fact that it relies only on Kubernetes primitives, it nicely connects to private cloud or on-premise requirements. The only difference from Gardener’s point of view would be the quality and scalability of the underlying infrastructure - the lingua franca of Kubernetes ensures strong portability guarantees for our approach.

Nevertheless, there are still challenges ahead. We are probing a possibility to include an option to create a federation control plane delegating to multiple shoot clusters in this Open Source project. In the previous sections we have not explained how to bootstrap the garden and the seed clusters themselves. You could indeed use any production ready cluster provisioning tool or the cloud providers’ Kubernetes as a Service offering. We have built an uniform tool called Kubify based on Terraform and reused many of the mentioned Gardener components. We envision the required Kubernetes infrastructure to be able to be spawned in its entirety by an initial bootstrap Gardener and are already discussing how we could achieve that.

Another important topic we are focusing on is disaster recovery. When a seed cluster fails, the user’s static workload will continue to operate. However, administrating the cluster won’t be possible anymore. We are considering to move control planes of the shoots hit by a disaster to another seed. Conceptually, this approach is feasible and we already have the required components in place to implement that, e.g. automated etcd backup and restore. The contributors for this project not only have a mandate for developing Gardener for production, but most of us even run it in true DevOps mode as well. We completely trust the Kubernetes concepts and are committed to follow the “eat your own dog food” approach.

In order to enable a more independent evolution of the Botanists, which contain the infrastructure provider specific parts of the implementation, we plan to describe well-defined interfaces and factor out the Botanists into their own components. This is similar to what Kubernetes is currently doing with the cloud-controller-manager. Currently, all the cloud specifics are part of the core Gardener repository presenting a soft barrier to extending or supporting new cloud providers.

When taking a look at how the shoots are actually provisioned, we need to gain more experience on how really large clusters with thousands of nodes and pods (or more) behave. Potentially, we will have to deploy e.g. the API server and other components in a scaled-out fashion for large clusters to spread the load. Fortunately, horizontal pod autoscaling based on custom metrics from Prometheus will make this relatively easy with our setup. Additionally, the feedback from teams who run production workloads on our clusters, is that Gardener should support with prearranged Kubernetes QoS. Needless to say, our aspiration is going to be the integration and contribution to the vision of Kubernetes Autopilot.

[4] Prototypes already validated CTyun & Aliyun.

Gardener is open source

The Gardener project is developed as Open Source and hosted on GitHub: https://github.com/gardener

SAP is working on Gardener since mid 2017 and is focused on building up a project that can easily be evolved and extended. Consequently, we are now looking for further partners and contributors to the project. As outlined above, we completely rely on Kubernetes primitives, add-ons, and specifications and adapt its innovative Cloud Native approach. We are looking forward to aligning with and contributing to the Kubernetes community. In fact, we envision contributing the complete project to the CNCF.

At the moment, an important focus on collaboration with the community is the Cluster API working group within the SIG Cluster Lifecycle founded a few months ago. Its primary goal is the definition of a portable API representing a Kubernetes cluster. That includes the configuration of control planes and the underlying infrastructure. The overlap of what we have already in place with Shoot and Machine resources compared to what the community is working on is striking. Hence, we joined this working group and are actively participating in their regular meetings, trying to contribute back our learnings from production. Selfishly, it is also in our interest to shape a robust API.

If you see the potential of the Gardener project then please learn more about it on GitHub and help us make Gardener even better by asking questions, engaging in discussions, and by contributing code. Also, try out our quick start setup.

We are looking forward to seeing you there!


Blog: Getting to Know Kubevirt

$
0
0

Author: Jason Brooks (Red Hat)

Once you’ve become accustomed to running Linux container workloads on Kubernetes, you may find yourself wishing that you could run other sorts of workloads on your Kubernetes cluster. Maybe you need to run an application that isn’t architected for containers, or that requires a different version of the Linux kernel – or an all together different operating system – than what’s available on your container host.

These sorts of workloads are often well-suited to running in virtual machines (VMs), and KubeVirt, a virtual machine management add-on for Kubernetes, is aimed at allowing users to run VMs right alongside containers in the their Kubernetes or OpenShift clusters.

KubeVirt extends Kubernetes by adding resource types for VMs and sets of VMs through Kubernetes’ Custom Resource Definitions API (CRD). KubeVirt VMs run within regular Kubernetes pods, where they have access to standard pod networking and storage, and can be managed using standard Kubernetes tools such as kubectl.

Running VMs with Kubernetes involves a bit of an adjustment compared to using something like oVirt or OpenStack, and understanding the basic architecture of KubeVirt is a good place to begin.

In this post, we’ll talk about some of the components that are involved in KubeVirt at a high level. The components we’ll check out are CRDs, the KubeVirt virt-controller, virt-handler and virt-launcher components, libvirt, storage, and networking.

KubeVirt Components

Kubevirt Components

Custom Resource Definitions

Kubernetes resources are endpoints in the Kubernetes API that store collections of related API objects. For instance, the built-in pods resource contains a collection of Pod objects. The Kubernetes Custom Resource Definition API allows users to extend Kubernetes with additional resources by defining new objects with a given name and schema. Once you’ve applied a custom resource to your cluster, the Kubernetes API server serves and handles the storage of your custom resource.

KubeVirt’s primary CRD is the VirtualMachine (VM) resource, which contains a collection of VM objects inside the Kubernetes API server. The VM resource defines all the properties of the Virtual machine itself, such as the machine and CPU type, the amount of RAM and vCPUs, and the number and type of NICs available in the VM.

virt-controller

The virt-controller is a Kubernetes Operator that’s responsible for cluster-wide virtualization functionality. When new VM objects are posted to the Kubernetes API server, the virt-controller takes notice and creates the pod in which the VM will run. When the pod is scheduled on a particular node, the virt-controller updates the VM object with the node name, and hands off further responsibilities to a node-specific KubeVirt component, the virt-handler, an instance of which runs on every node in the cluster.

virt-handler

Like the virt-controller, the virt-handler is also reactive, watching for changes to the VM object, and performing all necessary operations to change a VM to meet the required state. The virt-handler references the VM specification and signals the creation of a corresponding domain using a libvirtd instance in the VM’s pod. When a VM object is deleted, the virt-handler observes the deletion and turns off the domain.

virt-launcher

For every VM object one pod is created. This pod’s primary container runs the virt-launcher KubeVirt component. The main purpose of the virt-launcher Pod is to provide the cgroups and namespaces which will be used to host the VM process.

virt-handler signals virt-launcher to start a VM by passing the VM’s CRD object to virt-launcher. virt-launcher then uses a local libvirtd instance within its container to start the VM. From there virt-launcher monitors the VM process and terminates once the VM has exited.

If the Kubernetes runtime attempts to shutdown the virt-launcher pod before the VM has exited, virt-launcher forwards signals from Kubernetes to the VM process and attempts to hold off the termination of the pod until the VM has shutdown successfully.

# kubectl get pods

NAME                                   READY     STATUS        RESTARTS   AGE
virt-controller-7888c64d66-dzc9p   1/1       Running   0          2h
virt-controller-7888c64d66-wm66x   0/1       Running   0          2h
virt-handler-l2xkt                 1/1       Running   0          2h
virt-handler-sztsw                 1/1       Running   0          2h
virt-launcher-testvm-ephemeral-dph94   2/2       Running       0          2h

libvirtd

An instance of libvirtd is present in every VM pod. virt-launcher uses libvirtd to manage the life-cycle of the VM process.

Storage and Networking

KubeVirt VMs may be configured with disks, backed by volumes.

Persistent Volume Claim volumes make Kubernetes persistent volume available as disks directly attached to the VM. This is the primary way to provide KubeVirt VMs with persistent storage. Currently, persistent volumes must be iscsi block devices, although work is underway to enable file-based pv disks.

Ephemeral Volumes are a local copy on write images that use a network volume as a read-only backing store. KubeVirt dynamically generates the ephemeral images associated with a VM when the VM starts, and discards the ephemeral images when the VM stops. Currently, ephemeral volumes must be backed by pvc volumes.

Registry Disk volumes reference docker image that embed a qcow or raw disk. As the name suggests, these volumes are pulled from a container registry. Like regular ephemeral container images, data in these volumes persists only while the pod lives.

CloudInit NoCloud volumes provide VMs with a cloud-init NoCloud user-data source, which is added as a disk to the VM, where it’s available to provide configuration details to guests with cloud-init installed. Cloud-init details can be provided in clear text, as base64 encoded UserData files, or via Kubernetes secrets.

In the example below, a Registry Disk is configured to provide the image from which to boot the VM. A cloudInit NoCloud volume, paired with an ssh-key stored as clear text in the userData field, is provided for authentication with the VM:

apiVersion: kubevirt.io/v1alpha1
kind: VirtualMachine
metadata:
  name: myvm
spec:
  terminationGracePeriodSeconds: 5
  domain:
    resources:
      requests:
        memory: 64M
    devices:
      disks:
      - name: registrydisk
        volumeName: registryvolume
        disk:
          bus: virtio
      - name: cloudinitdisk
        volumeName: cloudinitvolume
        disk:
          bus: virtio
  volumes:
    - name: registryvolume
      registryDisk:
        image: kubevirt/cirros-registry-disk-demo:devel
    - name: cloudinitvolume
      cloudInitNoCloud:
        userData: |
          ssh-authorized-keys:
            - ssh-rsa AAAAB3NzaK8L93bWxnyp test@test.com

Just as with regular Kubernetes pods, basic networking functionality is made available automatically to each KubeVirt VM, and particular TCP or UDP ports can be exposed to the outside world using regular Kubernetes services. No special network configuration is required.

Getting Involved

KubeVirt development is accelerating, and the project is eager for new contributors. If you’re interested in getting involved, check out the project’s open issues and check out the project calendar.

If you need some help or want to chat you can connect to the team via freenode IRC in #kubevirt, or on the KubeVirt mailing list. User documentation is available at https://kubevirt.gitbooks.io/user-guide/.

Blog: Kubernetes Containerd Integration Goes GA

$
0
0

Kubernetes Containerd Integration Goes GA

Authors: Lantao Liu, Software Engineer, Google and Mike Brown, Open Source Developer Advocate, IBM

In a previous blog - Containerd Brings More Container Runtime Options for Kubernetes, we introduced the alpha version of the Kubernetes containerd integration. With another 6 months of development, the integration with containerd is now generally available! You can now use containerd 1.1 as the container runtime for production Kubernetes clusters!

Containerd 1.1 works with Kubernetes 1.10 and above, and supports all Kubernetes features. The test coverage of containerd integration on Google Cloud Platform in Kubernetes test infrastructure is now equivalent to the Docker integration (See: test dashboard).

We’re very glad to see containerd rapidly grow to this big milestone. Alibaba Cloud started to use containerd actively since its first day, and thanks to the simplicity and robustness emphasise, make it a perfect container engine running in our Serverless Kubernetes product, which has high qualification on performance and stability. No doubt, containerd will be a core engine of container era, and continue to driving innovation forward.

— Xinwei, Staff Engineer in Alibaba Cloud

Architecture Improvements

The Kubernetes containerd integration architecture has evolved twice. Each evolution has made the stack more stable and efficient.

Containerd 1.0 - CRI-Containerd (end of life)

cri-containerd architecture

For containerd 1.0, a daemon called cri-containerd was required to operate between Kubelet and containerd. Cri-containerd handled the Container Runtime Interface (CRI) service requests from Kubelet and used containerd to manage containers and container images correspondingly. Compared to the Docker CRI implementation (dockershim), this eliminated one extra hop in the stack.

However, cri-containerd and containerd 1.0 were still 2 different daemons which interacted via grpc. The extra daemon in the loop made it more complex for users to understand and deploy, and introduced unnecessary communication overhead.

Containerd 1.1 - CRI Plugin (current)

containerd architecture

In containerd 1.1, the cri-containerd daemon is now refactored to be a containerd CRI plugin. The CRI plugin is built into containerd 1.1, and enabled by default. Unlike cri-containerd, the CRI plugin interacts with containerd through direct function calls. This new architecture makes the integration more stable and efficient, and eliminates another grpc hop in the stack. Users can now use Kubernetes with containerd 1.1 directly. The cri-containerd daemon is no longer needed.

Performance

Improving performance was one of the major focus items for the containerd 1.1 release. Performance was optimized in terms of pod startup latency and daemon resource usage.

The following results are a comparison between containerd 1.1 and Docker 18.03 CE. The containerd 1.1 integration uses the CRI plugin built into containerd; and the Docker 18.03 CE integration uses the dockershim.

The results were generated using the Kubernetes node performance benchmark, which is part of Kubernetes node e2e test. Most of the containerd benchmark data is publicly accessible on the node performance dashboard.

Pod Startup Latency

The “105 pod batch startup benchmark” results show that the containerd 1.1 integration has lower pod startup latency than Docker 18.03 CE integration with dockershim (lower is better).

latency

CPU and Memory

At the steady state, with 105 pods, the containerd 1.1 integration consumes less CPU and memory overall compared to Docker 18.03 CE integration with dockershim. The results vary with the number of pods running on the node, 105 is chosen because it is the current default for the maximum number of user pods per node.

As shown in the figures below, compared to Docker 18.03 CE integration with dockershim, the containerd 1.1 integration has 30.89% lower kubelet cpu usage, 68.13% lower container runtime cpu usage, 11.30% lower kubelet resident set size (RSS) memory usage, 12.78% lower container runtime RSS memory usage.

cpumemory

crictl

Container runtime command-line interface (CLI) is a useful tool for system and application troubleshooting. When using Docker as the container runtime for Kubernetes, system administrators sometimes login to the Kubernetes node to run Docker commands for collecting system and/or application information. For example, one may use docker ps and docker inspect to check application process status, docker images to list images on the node, and docker info to identify container runtime configuration, etc.

For containerd and all other CRI-compatible container runtimes, e.g. dockershim, we recommend using crictl as a replacement CLI over the Docker CLI for troubleshooting pods, containers, and container images on Kubernetes nodes.

crictl is a tool providing a similar experience to the Docker CLI for Kubernetes node troubleshooting and crictl works consistently across all CRI-compatible container runtimes. It is hosted in the kubernetes-incubator/cri-tools repository and the current version is v1.0.0-beta.1. crictl is designed to resemble the Docker CLI to offer a better transition experience for users, but it is not exactly the same. There are a few important differences, explained below.

Limited Scope - crictl is a Troubleshooting Tool

The scope of crictl is limited to troubleshooting, it is not a replacement to docker or kubectl. Docker’s CLI provides a rich set of commands, making it a very useful development tool. But it is not the best fit for troubleshooting on Kubernetes nodes. Some Docker commands are not useful to Kubernetes, such as docker network and docker build; and some may even break the system, such as docker rename. crictl provides just enough commands for node troubleshooting, which is arguably safer to use on production nodes.

Kubernetes Oriented

crictl offers a more kubernetes-friendly view of containers. Docker CLI lacks core Kubernetes concepts, e.g. pod and namespace, so it can’t provide a clear view of containers and pods. One example is that docker ps shows somewhat obscure, long Docker container names, and shows pause containers and application containers together:

docker ps

However, pause containers are a pod implementation detail, where one pause container is used for each pod, and thus should not be shown when listing containers that are members of pods.

crictl, by contrast, is designed for Kubernetes. It has different sets of commands for pods and containers. For example, crictl pods lists pod information, and crictl ps only lists application container information. All information is well formatted into table columns.

crictl podscrictl ps

As another example, crictl pods includes a –namespace option for filtering pods by the namespaces specified in Kubernetes.

crictl pods filter

For more details about how to use crictl with containerd:

What about Docker Engine?

“Does switching to containerd mean I can’t use Docker Engine anymore?” We hear this question a lot, the short answer is NO.

Docker Engine is built on top of containerd. The next release of Docker Community Edition (Docker CE) will use containerd version 1.1. Of course, it will have the CRI plugin built-in and enabled by default. This means users will have the option to continue using Docker Engine for other purposes typical for Docker users, while also being able to configure Kubernetes to use the underlying containerd that came with and is simultaneously being used by Docker Engine on the same node. See the architecture figure below showing the same containerd being used by Docker Engine and Kubelet:

docker-ce

Since containerd is being used by both Kubelet and Docker Engine, this means users who choose the containerd integration will not just get new Kubernetes features, performance, and stability improvements, they will also have the option of keeping Docker Engine around for other use cases.

A containerd namespace mechanism is employed to guarantee that Kubelet and Docker Engine won’t see or have access to containers and images created by each other. This makes sure they won’t interfere with each other. This also means that:

  • Users won’t see Kubernetes created containers with the docker ps command. Please use crictl ps instead. And vice versa, users won’t see Docker CLI created containers in Kubernetes or with crictl ps command. The crictl create and crictl runp commands are only for troubleshooting. Manually starting pod or container with crictl on production nodes is not recommended.
  • Users won’t see Kubernetes pulled images with the docker images command. Please use the crictl images command instead. And vice versa, Kubernetes won’t see images created by docker pull, docker load or docker build commands. Please use the crictl pull command instead, and ctr cri load if you have to load an image.

Summary

  • Containerd 1.1 natively supports CRI. It can be used directly by Kubernetes.
  • Containerd 1.1 is production ready.
  • Containerd 1.1 has good performance in terms of pod startup latency and system resource utilization.
  • crictl is the CLI tool to talk with containerd 1.1 and other CRI-conformant container runtimes for node troubleshooting.
  • The next stable release of Docker CE will include containerd 1.1. Users have the option to continue using Docker for use cases not specific to Kubernetes, and configure Kubernetes to use the same underlying containerd that comes with Docker.

We’d like to thank all the contributors from Google, IBM, Docker, ZTE, ZJU and many other individuals who made this happen!

For a detailed list of changes in the containerd 1.1 release, please see the release notes here: https://github.com/containerd/containerd/releases/tag/v1.1.0

Try it out

To setup a Kubernetes cluster using containerd as the container runtime:

  • For a production quality cluster on GCE brought up with kube-up.sh, see here.
  • For a multi-node cluster installer and bring up steps using ansible and kubeadm, see here.
  • For creating a cluster from scratch on Google Cloud, see Kubernetes the Hard Way.
  • For a custom installation from release tarball, see here.
  • To install using LinuxKit on a local VM, see here.

Contribute

The containerd CRI plugin is an open source github project within containerd https://github.com/containerd/cri. Any contributions in terms of ideas, issues, and/or fixes are welcome. The getting started guide for developers is a good place to start for contributors.

Community

The project is developed and maintained jointly by members of the Kubernetes SIG-Node community and the containerd community. We’d love to hear feedback from you. To join the communities:

Blog: Introducing kustomize; Template-free Configuration Customization for Kubernetes

$
0
0

Authors: Jeff Regan (Google), Phil Wittrock (Google)

If you run a Kubernetes environment, chances are you’ve customized a Kubernetes configuration — you’ve copied some API object YAML files and editted them to suit your needs.

But there are drawbacks to this approach — it can be hard to go back to the source material and incorporate any improvements that were made to it. Today Google is announcing kustomize, a command-line tool contributed as a subproject of SIG-CLI. The tool provides a new, purely declarative approach to configuration customization that adheres to and leverages the familiar and carefully designed Kubernetes API.

Here’s a common scenario. Somewhere on the internet you find someone’s Kubernetes configuration for a content management system. It’s a set of files containing YAML specifications of Kubernetes API objects. Then, in some corner of your own company you find a configuration for a database to back that CMS — a database you prefer because you know it well.

You want to use these together, somehow. Further, you want to customize the files so that your resource instances appear in the cluster with a label that distinguishes them from a colleague’s resources who’s doing the same thing in the same cluster. You also want to set appropriate values for CPU, memory and replica count.

Additionally, you’ll want multiple variants of the entire configuration: a small variant (in terms of computing resources used) devoted to testing and experimentation, and a much larger variant devoted to serving outside users in production. Likewise, other teams will want their own variants.

This raises all sorts of questions. Do you copy your configuration to multiple locations and edit them independently? What if you have dozens of development teams who need slightly different variations of the stack? How do you maintain and upgrade the aspects of configuration that they share in common? Workflows using kustomize provide answers to these questions.

Customization is reuse

Kubernetes configurations aren’t code (being YAML specifications of API objects, they are more strictly viewed as data), but configuration lifecycle has many similarities to code lifecycle.

You should keep configurations in version control. Configuration owners aren’t necessarily the same set of people as configuration users. Configurations may be used as parts of a larger whole. Users will want to reuse configurations for different purposes.

One approach to configuration reuse, as with code reuse, is to simply copy it all and customize the copy. As with code, severing the connection to the source material makes it difficult to benefit from ongoing improvements to the source material. Taking this approach with many teams or environments, each with their own variants of a configuration, makes a simple upgrade intractable.

Another approach to reuse is to express the source material as a parameterized template. A tool processes the template—executing any embedded scripting and replacing parameters with desired values—to generate the configuration. Reuse comes from using different sets of values with the same template. The challenge here is that the templates and value files are not specifications of Kubernetes API resources. They are, necessarily, a new thing, a new language, that wraps the Kubernetes API. And yes, they can be powerful, but bring with them learning and tooling costs. Different teams want different changes—so almost every specification that you can include in a YAML file becomes a parameter that needs a value. As a result, the value sets get large, since all parameters (that don’t have trusted defaults) must be specified for replacement. This defeats one of the goals of reuse—keeping the differences between the variants small in size and easy to understand in the absence of a full resource declaration.

A new option for configuration customization

Compare that to kustomize, where the tool’s behavior is determined by declarative specifications expressed in a file called kustomization.yaml.

The kustomize program reads the file and the Kubernetes API resource files it references, then emits complete resources to standard output. This text output can be further processed by other tools, or streamed directly to kubectl for application to a cluster.

For example, if a file called kustomization.yaml containing

   commonLabels:
     app: hello
   resources:
   - deployment.yaml
   - configMap.yaml
   - service.yaml

is in the current working directory, along with the three resource files it mentions, then running

kustomize build

emits a YAML stream that includes the three given resources, and adds a common label app: hello to each resource.

Similarly, you can use a commonAnnotations field to add an annotation to all resources, and a namePrefix field to add a common prefix to all resource names. This trivial yet common customization is just the beginning.

A more common use case is that you’ll need multiple variants of a common set of resources, e.g., a development, staging and production variant.

For this purpose, kustomize supports the idea of anoverlay and a base. Both are represented by a kustomization file. The base declares things that the variants share in common (both resources and a common customization of those resources), and the overlays declare the differences.

Here’s a file system layout to manage a staging andproduction variant of a given cluster app:

   someapp/├── base/
   │   ├── kustomization.yaml
   │   ├── deployment.yaml
   │   ├── configMap.yaml
   │   └── service.yaml
   └── overlays/
      ├── production/
      │   └── kustomization.yaml
      │   ├── replica_count.yaml
      └── staging/
          ├── kustomization.yaml
          └── cpu_count.yaml

The file someapp/base/kustomization.yaml specifies the common resources and common customizations to those resources (e.g., they all get some label, name prefix and annotation).

The contents ofsomeapp/overlays/production/kustomization.yaml could be

   commonLabels:
    env: production
   bases:
   - ../../base
   patches:
   - replica_count.yaml

This kustomization specifies a patch filereplica_count.yaml, which could be:

   apiVersion: apps/v1
   kind: Deployment
   metadata:
     name: the-deployment
   spec:
     replicas: 100

A patch is a partial resource declaration, in this case a patch of the deployment insomeapp/base/deployment.yaml, modifying only thereplicas count to handle production traffic.

The patch, being a partial deployment spec, has a clear context and purpose and can be validated even if it’s read in isolation from the remaining configuration. It’s not just a context free {parameter name, value} tuple.

To create the resources for the production variant, run

kustomize build someapp/overlays/production

The result is printed to stdout as a set of complete resources, ready to be applied to a cluster. A similar command defines the staging environment.

In summary

With kustomize, you can manage an arbitrary number of distinctly customized Kubernetes configurations using only Kubernetes API resource files. Every artifact that kustomize uses is plain YAML and can be validated and processed as such. kustomize encourages a fork/modify/rebase workflow.

To get started, try the hello world example. For discussion and feedback, join the mailing list oropen an issue. Pull requests are welcome.

Blog: Say Hello to Discuss Kubernetes

$
0
0

Author: Jorge Castro (Heptio)

Communication is key when it comes to engaging a community of over 35,000 people in a global and remote environment. Keeping track of everything in the Kubernetes community can be an overwhelming task. On one hand we have our official resources, like Stack Overflow, GitHub, and the mailing lists, and on the other we have more ephemeral resources like Slack, where you can hop in, chat with someone, and then go on your merry way.

Slack is great for casual and timely conversations and keeping up with other community members, but communication can’t be easily referenced in the future. Plus it can be hard to raise your hand in a room filled with 35,000 participants and find a voice. Mailing lists are useful when trying to reach a specific group of people with a particular ask and want to keep track of responses on the thread, but can be daunting with a large amount of people. Stack Overflow and GitHub are ideal for collaborating on projects or questions that involve code and need to be searchable in the future, but certain topics like “What’s your favorite CI/CD tool” or “Kubectl tips and tricks” are offtopic there.

While our current assortment of communication channels are valuable in their own rights, we found that there was still a gap between email and real time chat. Across the rest of the web, many other open source projects like Docker, Mozilla, Swift, Ghost, and Chef have had success building communities on top of Discourse, an open source discussion platform. So what if we could use this tool to bring our discussions together under a modern roof, with an open API, and perhaps not let so much of our information fade into the ether? There’s only one way to find out: Welcome to discuss.kubernetes.io

discuss_screenshot

Right off the bat we have categories that users can browse. Checking and posting in these categories allow users to participate in things they might be interested in without having to commit to subscribing to a list. Granular notification controls allow the users to subscribe to just the category or tag they want, and allow for responding to topics via email.

Ecosystem partners and developers now have a place where they can announce projects that they’re working on to users without wondering if it would be offtopic on an official list. We can make this place be not just about core Kubernetes, but about the hundreds of wonderful tools our community is building.

This new community forum gives people a place to go where they can discuss Kubernetes, and a sounding board for developers to make announcements of things happening around Kubernetes, all while being searchable and easily accessible to a wider audience.

Hop in and take a look. We’re just getting started, so you might want to begin by introducing yourself and then browsing around. Apps are also available for Android and iOS.

Blog: 4 Years of K8s

$
0
0

Author: Joe Beda (CTO and Founder, Heptio)

On June 6, 2014 I checked in the first commit of what would become the public repository for Kubernetes. Many would assume that is where the story starts. It is the beginning of history, right? But that really doesn’t tell the whole story.

k8s_first_commit

The cast leading up to that commit was large and the success for Kubernetes since then is owed to an ever larger cast.

Kubernetes was built on ideas that had been proven out at Google over the previous ten years with Borg. And Borg, itself, owed its existence to even earlier efforts at Google and beyond.

Concretely, Kubernetes started as some prototypes from Brendan Burns combined with ongoing work from me and Craig McLuckie to better align the internal Google experience with the Google Cloud experience. Brendan, Craig, and I really wanted people to use this, so we made the case to build out this prototype as an open source project that would bring the best ideas from Borg out into the open.

After we got the nod, it was time to actually build the system. We took Brendan’s prototype (in Java), rewrote it in Go, and built just enough to get the core ideas across. By this time the team had grown to include Ville Aikas, Tim Hockin, Brian Grant, Dawn Chen and Daniel Smith. Once we had something working, someone had to sign up to clean things up to get it ready for public launch. That ended up being me. Not knowing the significance at the time, I created a new repo, moved things over, and checked it in. So while I have the first public commit to the repo, there was work underway well before that.

The version of Kubernetes at that point was really just a shadow of what it was to become. The core concepts were there but it was very raw. For example, Pods were called Tasks. That was changed a day before we went public. All of this led up to the public announcement of Kubernetes on June 10th, 2014 in a keynote from Eric Brewer at the first DockerCon. You can watch that video here:

But, however raw, that modest start was enough to pique the interest of a community that started strong and has only gotten stronger. Over the past four years Kubernetes has exceeded the expectations of all of us that were there early on. We owe the Kubernetes community a huge debt. The success the project has seen is based not just on code and technology but also the way that an amazing group of people have come together to create something special. The best expression of this is the set of Kubernetes values that Sarah Novotny helped curate.

Here is to another 4 years and beyond! 🎉🎉🎉

Blog: Dynamic Ingress in Kubernetes

$
0
0

Author: Richard Li (Datawire)

Kubernetes makes it easy to deploy applications that consist of many microservices, but one of the key challenges with this type of architecture is dynamically routing ingress traffic to each of these services. One approach is Ambassador, a Kubernetes-native open source API Gateway built on the Envoy Proxy. Ambassador is designed for dynamic environment where services may come and go frequently.

Ambassador is configured using Kubernetes annotations. Annotations are used to configure specific mappings from a given Kubernetes service to a particular URL. A mapping can include a number of annotations for configuring a route. Examples include rate limiting, protocol, cross-origin request sharing, traffic shadowing, and routing rules.

A Basic Ambassador Example

Ambassador is typically installed as a Kubernetes deployment, and is also available as a Helm chart. To configure Ambassador, create a Kubernetes service with the Ambassador annotations. Here is an example that configures Ambassador to route requests to /httpbin/ to the public httpbin.org service:

apiVersion: v1
kind: Service
metadata:
  name: httpbin
  annotations:
    getambassador.io/config: |
      ---
      apiVersion: ambassador/v0
      kind:  Mapping
      name:  httpbin_mapping
      prefix: /httpbin/
      service: httpbin.org:80
      host_rewrite: httpbin.org
spec:
  type: ClusterIP
  ports:
    - port: 80

A mapping object is created with a prefix of /httpbin/ and a service name of httpbin.org. The host_rewrite annotation specifies that the HTTP host header should be set to httpbin.org.

Kubeflow

Kubeflow provides a simple way to easily deploy machine learning infrastructure on Kubernetes. The Kubeflow team needed a proxy that provided a central point of authentication and routing to the wide range of services used in Kubeflow, many of which are ephemeral in nature.

kubeflow

Kubeflow architecture, pre-Ambassador

Service configuration

With Ambassador, Kubeflow can use a distributed model for configuration. Instead of a central configuration file, Ambassador allows each service to configure its route in Ambassador via Kubernetes annotations. Here is a simplified example configuration:

---
apiVersion: ambassador/v0
kind:  Mapping
name: tfserving-mapping-test-post
prefix: /models/test/
rewrite: /model/test/:predict
method: POST
service: test.kubeflow:8000

In this example, the “test” service uses Ambassador annotations to dynamically configure a route to the service, triggered only when the HTTP method is a POST, and the annotation also specifies a rewrite rule.

Kubeflow and Ambassador

kubeflow-ambassador

With Ambassador, Kubeflow manages routing easily with Kubernetes annotations. Kubeflow configures a single ingress object that directs traffic to Ambassador, then creates services with Ambassador annotations as needed to direct traffic to specific backends. For example, when deploying TensorFlow services, Kubeflow creates and and annotates a K8s service so that the model will be served at https:///models//. Kubeflow can also use the Envoy Proxy to do the actual L7 routing. Using Ambassador, Kubeflow takes advantage of additional routing configuration like URL rewriting and method-based routing.

If you’re interested in using Ambassador with Kubeflow, the standard Kubeflow install automatically installs and configures Ambassador.

If you’re interested in using Ambassador as an API Gateway or Kubernetes ingress solution for your non-Kubeflow services, check out the Getting Started with Ambassador guide.

Blog: Kubernetes 1.11: In-Cluster Load Balancing and CoreDNS Plugin Graduate to General Availability

$
0
0

Author: Kubernetes 1.11 Release Team

We’re pleased to announce the delivery of Kubernetes 1.11, our second release of 2018!

Today’s release continues to advance maturity, scalability, and flexibility of Kubernetes, marking significant progress on features that the team has been hard at work on over the last year. This newest version graduates key features in networking, opens up two major features from SIG-API Machinery and SIG-Node for beta testing, and continues to enhance storage features that have been a focal point of the past two releases. The features in this release make it increasingly possible to plug any infrastructure, cloud or on-premise, into the Kubernetes system.

Notable additions in this release include two highly-anticipated features graduating to general availability: IPVS-based In-Cluster Load Balancing and CoreDNS as a cluster DNS add-on option, which means increased scalability and flexibility for production applications.

Let’s dive into the key features of this release:

IPVS-Based In-Cluster Service Load Balancing Graduates to General Availability

In this release, IPVS-based in-cluster service load balancing has moved to stable. IPVS (IP Virtual Server) provides high-performance in-kernel load balancing, with a simpler programming interface than iptables. This change delivers better network throughput, better programming latency, and higher scalability limits for the cluster-wide distributed load-balancer that comprises the Kubernetes Service model. IPVS is not yet the default but clusters can begin to use it for production traffic.

CoreDNS Promoted to General Availability

CoreDNS is now available as a cluster DNS add-on option, and is the default when using kubeadm. CoreDNS is a flexible, extensible authoritative DNS server and directly integrates with the Kubernetes API. CoreDNS has fewer moving parts than the previous DNS server, since it’s a single executable and a single process, and supports flexible use cases by creating custom DNS entries. It’s also written in Go making it memory-safe. You can learn more about CoreDNS here.

Dynamic Kubelet Configuration Moves to Beta

This feature makes it possible for new Kubelet configurations to be rolled out in a live cluster. Currently, Kubelets are configured via command-line flags, which makes it difficult to update Kubelet configurations in a running cluster. With this beta feature, users can configure Kubelets in a live cluster via the API server.

Custom Resource Definitions Can Now Define Multiple Versions

Custom Resource Definitions are no longer restricted to defining a single version of the custom resource, a restriction that was difficult to work around. Now, with this beta feature, multiple versions of the resource can be defined. In the future, this will be expanded to support some automatic conversions; for now, this feature allows custom resource authors to “promote with safe changes, e.g. v1beta1 to v1,” and to create a migration path for resources which do have changes.

Custom Resource Definitions now also support “status” and “scale” subresources, which integrate with monitoring and high-availability frameworks. These two changes advance the ability to run cloud-native applications in production using Custom Resource Definitions.

Enhancements to CSI

Container Storage Interface (CSI) has been a major topic over the last few releases. After moving to beta in 1.10, the 1.11 release continues enhancing CSI with a number of features. The 1.11 release adds alpha support for raw block volumes to CSI, integrates CSI with the new kubelet plugin registration mechanism, and makes it easier to pass secrets to CSI plugins.

New Storage Features

Support for online resizing of Persistent Volumes has been introduced as an alpha feature. This enables users to increase the size of PVs without having to terminate pods and unmount volume first. The user will update the PVC to request a new size and kubelet will resize the file system for the PVC.

Support for dynamic maximum volume count has been introduced as an alpha feature. This new feature enables in-tree volume plugins to specify the maximum number of volumes that can be attached to a node and allows the limit to vary depending on the type of node. Previously, these limits were hard coded or configured via an environment variable.

The StorageObjectInUseProtection feature is now stable and prevents the removal of both Persistent Volumes that are bound to a Persistent Volume Claim, and Persistent Volume Claims that are being used by a pod. This safeguard will help prevent issues from deleting a PV or a PVC that is currently tied to an active pod.

Each Special Interest Group (SIG) within the community continues to deliver the most-requested enhancements, fixes, and functionality for their respective specialty areas. For a complete list of inclusions by SIG, please visit the release notes.

Availability

Kubernetes 1.11 is available for download on GitHub. To get started with Kubernetes, check out these interactive tutorials.

You can also install 1.11 using Kubeadm. Version 1.11.0 will be available as Deb and RPM packages, installable using the Kubeadm cluster installer sometime on June 28th.

4 Day Features Blog Series

If you’re interested in exploring these features more in depth, check back in two weeks for our 4 Days of Kubernetes series where we’ll highlight detailed walkthroughs of the following features:

Release team

This release is made possible through the effort of hundreds of individuals who contributed both technical and non-technical content. Special thanks to the release team led by Josh Berkus, Kubernetes Community Manager at Red Hat. The 20 individuals on the release team coordinate many aspects of the release, from documentation to testing, validation, and feature completeness.

As the Kubernetes community has grown, our release process represents an amazing demonstration of collaboration in open source software development. Kubernetes continues to gain new users at a rapid clip. This growth creates a positive feedback cycle where more contributors commit code creating a more vibrant ecosystem. Kubernetes has over 20,000 individual contributors to date and an active community of more than 40,000 people.

Project Velocity

The CNCF has continued refining DevStats, an ambitious project to visualize the myriad contributions that go into the project. K8s DevStats illustrates the breakdown of contributions from major company contributors, as well as an impressive set of preconfigured reports on everything from individual contributors to pull request lifecycle times. On average, 250 different companies and over 1,300 individuals contribute to Kubernetes each month. Check out DevStats to learn more about the overall velocity of the Kubernetes project and community.

User Highlights

Established, global organizations are using Kubernetes in production at massive scale. Recently published user stories from the community include:

Is Kubernetes helping your team? Share your story with the community.

Ecosystem Updates

  • The CNCF recently expanded its certification offerings to include a Certified Kubernetes Application Developer exam. The CKAD exam certifies an individual’s ability to design, build, configure, and expose cloud native applications for Kubernetes. More information can be found here.
  • The CNCF recently added a new partner category, Kubernetes Training Partners (KTP). KTPs are a tier of vetted training providers who have deep experience in cloud native technology training. View partners and learn more here.
  • CNCF also offers online training that teaches the skills needed to create and configure a real-world Kubernetes cluster.
  • Kubernetes documentation now features user journeys: specific pathways for learning based on who readers are and what readers want to do. Learning Kubernetes is easier than ever for beginners, and more experienced users can find task journeys specific to cluster admins and application developers.

KubeCon

The world’s largest Kubernetes gathering, KubeCon + CloudNativeCon is coming to Shanghai from November 14-15, 2018 and Seattle from December 11-13, 2018. This conference will feature technical sessions, case studies, developer deep dives, salons and more! The CFP for both event is currently open. Submit your talk and register today!

Webinar

Join members of the Kubernetes 1.11 release team on July 31st at 10am PDT to learn about the major features in this release including In-Cluster Load Balancing and the CoreDNS Plugin. Register here.

Get Involved

The simplest way to get involved with Kubernetes is by joining one of the many Special Interest Groups (SIGs) that align with your interests. Have something you’d like to broadcast to the Kubernetes community? Share your voice at our weekly community meeting, and through the channels below.

Thank you for your continued feedback and support.


Blog: Airflow on Kubernetes (Part 1): A Different Kind of Operator

$
0
0

Author: Daniel Imberman (Bloomberg LP)

Introduction

As part of Bloomberg’s continued commitment to developing the Kubernetes ecosystem, we are excited to announce the Kubernetes Airflow Operator; a mechanism for Apache Airflow, a popular workflow orchestration framework to natively launch arbitrary Kubernetes Pods using the Kubernetes API.

What Is Airflow?

Apache Airflow is one realization of the DevOps philosophy of “Configuration As Code.” Airflow allows users to launch multi-step pipelines using a simple Python object DAG (Directed Acyclic Graph). You can define dependencies, programmatically construct complex workflows, and monitor scheduled jobs in an easy to read UI.

Airflow DAGsAirflow UI

Why Airflow on Kubernetes?

Since its inception, Airflow’s greatest strength has been its flexibility. Airflow offers a wide range of integrations for services ranging from Spark and HBase, to services on various cloud providers. Airflow also offers easy extensibility through its plug-in framework. However, one limitation of the project is that Airflow users are confined to the frameworks and clients that exist on the Airflow worker at the moment of execution. A single organization can have varied Airflow workflows ranging from data science pipelines to application deployments. This difference in use-case creates issues in dependency management as both teams might use vastly different libraries for their workflows.

To address this issue, we’ve utilized Kubernetes to allow users to launch arbitrary Kubernetes pods and configurations. Airflow users can now have full power over their run-time environments, resources, and secrets, basically turning Airflow into an “any job you want” workflow orchestrator.

The Kubernetes Operator

Before we move any further, we should clarify that an Operator in Airflow is a task definition. When a user creates a DAG, they would use an operator like the “SparkSubmitOperator” or the “PythonOperator” to submit/monitor a Spark job or a Python function respectively. Airflow comes with built-in operators for frameworks like Apache Spark, BigQuery, Hive, and EMR. It also offers a Plugins entrypoint that allows DevOps engineers to develop their own connectors.

Airflow users are always looking for ways to make deployments and ETL pipelines simpler to manage. Any opportunity to decouple pipeline steps, while increasing monitoring, can reduce future outages and fire-fights. The following is a list of benefits provided by the Airflow Kubernetes Operator:

  • Increased flexibility for deployments:
    Airflow’s plugin API has always offered a significant boon to engineers wishing to test new functionalities within their DAGs. On the downside, whenever a developer wanted to create a new operator, they had to develop an entirely new plugin. Now, any task that can be run within a Docker container is accessible through the exact same operator, with no extra Airflow code to maintain.

  • Flexibility of configurations and dependencies: For operators that are run within static Airflow workers, dependency management can become quite difficult. If a developer wants to run one task that requires SciPy and another that requires NumPy, the developer would have to either maintain both dependencies within all Airflow workers or offload the task to an external machine (which can cause bugs if that external machine changes in an untracked manner). Custom Docker images allow users to ensure that the tasks environment, configuration, and dependencies are completely idempotent.

  • Usage of kubernetes secrets for added security: Handling sensitive data is a core responsibility of any DevOps engineer. At every opportunity, Airflow users want to isolate any API keys, database passwords, and login credentials on a strict need-to-know basis. With the Kubernetes operator, users can utilize the Kubernetes Vault technology to store all sensitive data. This means that the Airflow workers will never have access to this information, and can simply request that pods be built with only the secrets they need.

Architecture

Airflow Architecture

The Kubernetes Operator uses the Kubernetes Python Client to generate a request that is processed by the APIServer (1). Kubernetes will then launch your pod with whatever specs you’ve defined (2). Images will be loaded with all the necessary environment variables, secrets and dependencies, enacting a single command. Once the job is launched, the operator only needs to monitor the health of track logs (3). Users will have the choice of gathering logs locally to the scheduler or to any distributed logging service currently in their Kubernetes cluster.

Using the Kubernetes Operator

A Basic Example

The following DAG is probably the simplest example we could write to show how the Kubernetes Operator works. This DAG creates two pods on Kubernetes: a Linux distro with Python and a base Ubuntu distro without it. The Python pod will run the Python request correctly, while the one without Python will report a failure to the user. If the Operator is working correctly, the passing-task pod should complete, while the failing-task pod returns a failure to the Airflow webserver.

fromairflowimport DAGfromdatetimeimport datetime, timedeltafromairflow.contrib.operators.kubernetes_pod_operatorimport KubernetesPodOperatorfromairflow.operators.dummy_operatorimport DummyOperator


default_args = {'owner': 'airflow','depends_on_past': False,'start_date': datetime.utcnow(),'email': ['airflow@example.com'],'email_on_failure': False,'email_on_retry': False,'retries': 1,'retry_delay': timedelta(minutes=5)
}

dag = DAG('kubernetes_sample', default_args=default_args, schedule_interval=timedelta(minutes=10))


start = DummyOperator(task_id='run_this_first', dag=dag)

passing = KubernetesPodOperator(namespace='default',
                          image="Python:3.6",
                          cmds=["Python","-c"],
                          arguments=["print('hello world')"],
                          labels={"foo": "bar"},
                          name="passing-test",
                          task_id="passing-task",
                          get_logs=True,
                          dag=dag
                          )

failing = KubernetesPodOperator(namespace='default',
                          image="ubuntu:1604",
                          cmds=["Python","-c"],
                          arguments=["print('hello world')"],
                          labels={"foo": "bar"},
                          name="fail",
                          task_id="failing-task",
                          get_logs=True,
                          dag=dag
                          )

passing.set_upstream(start)
failing.set_upstream(start)

Basic DAG Run

But how does this relate to my workflow?

While this example only uses basic images, the magic of Docker is that this same DAG will work for any image/command pairing you want. The following is a recommended CI/CD pipeline to run production-ready code on an Airflow DAG.

1: PR in github

Use Travis or Jenkins to run unit and integration tests, bribe your favorite team-mate into PR’ing your code, and merge to the master branch to trigger an automated CI build.

2: CI/CD via Jenkins -> Docker Image

Generate your Docker images and bump release version within your Jenkins build.

3: Airflow launches task

Finally, update your DAGs to reflect the new release version and you should be ready to go!

production_task = KubernetesPodOperator(namespace='default',# image="my-production-job:release-1.0.1", <-- old release
                          image="my-production-job:release-1.0.2",
                          cmds=["Python","-c"],
                          arguments=["print('hello world')"],
                          name="fail",
                          task_id="failing-task",
                          get_logs=True,
                          dag=dag
                          )

Launching a test deployment

Since the Kubernetes Operator is not yet released, we haven’t released an official helm chart or operator (however both are currently in progress). However, we are including instructions for a basic deployment below and are actively looking for foolhardy beta testers to try this new feature. To try this system out please follow these steps:

Step 1: Set your kubeconfig to point to a kubernetes cluster

Step 2: Clone the Airflow Repo:

Run git clone https://github.com/apache/incubator-airflow.git to clone the official Airflow repo.

Step 3: Run

To run this basic deployment, we are co-opting the integration testing script that we currently use for the Kubernetes Executor (which will be explained in the next article of this series). To launch this deployment, run these three commands:

sed -ie "s/KubernetesExecutor/LocalExecutor/g" scripts/ci/kubernetes/kube/configmaps.yaml
./scripts/ci/kubernetes/Docker/build.sh
./scripts/ci/kubernetes/kube/deploy.sh

Before we move on, let’s discuss what these commands are doing:

sed -ie “s/KubernetesExecutor/LocalExecutor/g” scripts/ci/kubernetes/kube/configmaps.yaml

The Kubernetes Executor is another Airflow feature that allows for dynamic allocation of tasks as idempotent pods. The reason we are switching this to the LocalExecutor is simply to introduce one feature at a time. You are more then welcome to skip this step if you would like to try the Kubernetes Executor, however we will go into more detail in a future article.

./scripts/ci/kubernetes/Docker/build.sh

This script will tar the Airflow master source code build a Docker container based on the Airflow distribution

./scripts/ci/kubernetes/kube/deploy.sh

Finally, we create a full Airflow deployment on your cluster. This includes Airflow configs, a postgres backend, the webserver + scheduler, and all necessary services between. One thing to note is that the role binding supplied is a cluster-admin, so if you do not have that level of permission on the cluster, you can modify this at scripts/ci/kubernetes/kube/airflow.yaml

Step 4: Log into your webserver

Now that your Airflow instance is running let’s take a look at the UI! The UI lives in port 8080 of the Airflow pod, so simply run

WEB=$(kubectl get pods -o go-template --template '{{range .items}}{{.metadata.name}}{{"\n"}}{{end}}' | grep "airflow" | head -1)
kubectl port-forward $WEB 8080:8080

Now the Airflow UI will exist on http://localhost:8080. To log in simply enter airflow/airflow and you should have full access to the Airflow web UI.

Step 5: Upload a test document

To modify/add your own DAGs, you can use kubectl cp to upload local files into the DAG folder of the Airflow scheduler. Airflow will then read the new DAG and automatically upload it to its system. The following command will upload any local file into the correct directory:

kubectl cp <local file> <namespace>/<pod>:/root/airflow/dags -c scheduler

Step 6: Enjoy!

So when will I be able to use this?

While this feature is still in the early stages, we hope to see it released for wide release in the next few months.

Get Involved

This feature is just the beginning of multiple major efforts to improves Apache Airflow integration into Kubernetes. The Kubernetes Operator has been merged into the 1.10 release branch of Airflow (the executor in experimental mode), along with a fully k8s native scheduler called the Kubernetes Executor (article to come). These features are still in a stage where early adopters/contributers can have a huge influence on the future of these features.

For those interested in joining these efforts, I’d recommend checkint out these steps:

  • Join the airflow-dev mailing list at dev@airflow.apache.org.
  • File an issue in Apache Airflow JIRA
  • Join our SIG-BigData meetings on Wednesdays at 10am PST.
  • Reach us on slack at #sig-big-data on kubernetes.slack.com

Special thanks to the Apache Airflow and Kubernetes communities, particularly Grant Nicholas, Ben Goldberg, Anirudh Ramanathan, Fokko Dreisprong, and Bolke de Bruin, for your awesome help on these features as well as our future efforts.

Blog: IPVS-Based In-Cluster Load Balancing Deep Dive

$
0
0

Author: Jun Du(Huawei), Haibin Xie(Huawei), Wei Liang(Huawei)

Editor’s note: this post is part of a series of in-depth articles on what’s new in Kubernetes 1.11

Introduction

Per the Kubernetes 1.11 release blog post , we announced that IPVS-Based In-Cluster Service Load Balancing graduates to General Availability. In this blog, we will take you through a deep dive of the feature.

What Is IPVS?

IPVS (IP Virtual Server) is built on top of the Netfilter and implements transport-layer load balancing as part of the Linux kernel.

IPVS is incorporated into the LVS (Linux Virtual Server), where it runs on a host and acts as a load balancer in front of a cluster of real servers. IPVS can direct requests for TCP- and UDP-based services to the real servers, and make services of the real servers appear as virtual services on a single IP address. Therefore, IPVS naturally supports Kubernetes Service.

Why IPVS for Kubernetes?

As Kubernetes grows in usage, the scalability of its resources becomes more and more important. In particular, the scalability of services is paramount to the adoption of Kubernetes by developers/companies running large workloads.

Kube-proxy, the building block of service routing has relied on the battle-hardened iptables to implement the core supported Service types such as ClusterIP and NodePort. However, iptables struggles to scale to tens of thousands of Services because it is designed purely for firewalling purposes and is based on in-kernel rule lists.

Even though Kubernetes already support 5000 nodes in release v1.6, the kube-proxy with iptables is actually a bottleneck to scale the cluster to 5000 nodes. One example is that with NodePort Service in a 5000-node cluster, if we have 2000 services and each services have 10 pods, this will cause at least 20000 iptable records on each worker node, and this can make the kernel pretty busy.

On the other hand, using IPVS-based in-cluster service load balancing can help a lot for such cases. IPVS is specifically designed for load balancing and uses more efficient data structures (hash tables) allowing for almost unlimited scale under the hood.

IPVS-based Kube-proxy

Parameter Changes

Parameter: –proxy-mode In addition to existing userspace and iptables modes, IPVS mode is configured via --proxy-mode=ipvs. It implicitly uses IPVS NAT mode for service port mapping.

Parameter: –ipvs-scheduler

A new kube-proxy parameter has been added to specify the IPVS load balancing algorithm, with the parameter being --ipvs-scheduler. If it’s not configured, then round-robin (rr) is the default value.

  • rr: round-robin
  • lc: least connection
  • dh: destination hashing
  • sh: source hashing
  • sed: shortest expected delay
  • nq: never queue

In the future, we can implement Service specific scheduler (potentially via annotation), which has higher priority and overwrites the value.

Parameter: --cleanup-ipvs Similar to the --cleanup-iptables parameter, if true, cleanup IPVS configuration and IPTables rules that are created in IPVS mode.

Parameter: --ipvs-sync-period Maximum interval of how often IPVS rules are refreshed (e.g. ‘5s’, ‘1m’). Must be greater than 0.

Parameter: --ipvs-min-sync-period Minimum interval of how often the IPVS rules are refreshed (e.g. ‘5s’, ‘1m’). Must be greater than 0.

Parameter: --ipvs-exclude-cidrs A comma-separated list of CIDR’s which the IPVS proxier should not touch when cleaning up IPVS rules because IPVS proxier can’t distinguish kube-proxy created IPVS rules from user original IPVS rules. If you are using IPVS proxier with your own IPVS rules in the environment, this parameter should be specified, otherwise your original rule will be cleaned.

Design Considerations

IPVS Service Network Topology

When creating a ClusterIP type Service, IPVS proxier will do the following three things:

  • Make sure a dummy interface exists in the node, defaults to kube-ipvs0
  • Bind Service IP addresses to the dummy interface
  • Create IPVS virtual servers for each Service IP address respectively

Here comes an example:

# kubectl describe svc nginx-service
Name:			nginx-service
...
Type:			ClusterIP
IP:			    10.102.128.4
Port:			http	3080/TCP
Endpoints:		10.244.0.235:8080,10.244.1.237:8080
Session Affinity:	None

# ip addr
...
73: kube-ipvs0: <BROADCAST,NOARP> mtu 1500 qdisc noop state DOWN qlen 1000
    link/ether 1a:ce:f5:5f:c1:4d brd ff:ff:ff:ff:ff:ff
    inet 10.102.128.4/32 scope global kube-ipvs0
       valid_lft forever preferred_lft forever

# ipvsadm -ln
IP Virtual Server version 1.2.1 (size=4096)
Prot LocalAddress:Port Scheduler Flags
  -> RemoteAddress:Port           Forward Weight ActiveConn InActConn     
TCP  10.102.128.4:3080 rr
  -> 10.244.0.235:8080            Masq    1      0          0         
  -> 10.244.1.237:8080            Masq    1      0          0   

Please note that the relationship between a Kubernetes Service and IPVS virtual servers is 1:N. For example, consider a Kubernetes Service that has more than one IP address. An External IP type Service has two IP addresses - ClusterIP and External IP. Then the IPVS proxier will create 2 IPVS virtual servers - one for Cluster IP and another one for External IP. The relationship between a Kubernetes Endpoint (each IP+Port pair) and an IPVS virtual server is 1:1.

Deleting of a Kubernetes service will trigger deletion of the corresponding IPVS virtual server, IPVS real servers and its IP addresses bound to the dummy interface.

Port Mapping

There are three proxy modes in IPVS: NAT (masq), IPIP and DR. Only NAT mode supports port mapping. Kube-proxy leverages NAT mode for port mapping. The following example shows IPVS mapping Service port 3080 to Pod port 8080.

TCP  10.102.128.4:3080 rr
  -> 10.244.0.235:8080            Masq    1      0          0         
  -> 10.244.1.237:8080            Masq    1      0       

Session Affinity

IPVS supports client IP session affinity (persistent connection). When a Service specifies session affinity, the IPVS proxier will set a timeout value (180min=10800s by default) in the IPVS virtual server. For example:

# kubectl describe svc nginx-service
Name:			nginx-service
...
IP:			    10.102.128.4
Port:			http	3080/TCP
Session Affinity:	ClientIP

# ipvsadm -ln
IP Virtual Server version 1.2.1 (size=4096)
Prot LocalAddress:Port Scheduler Flags
  -> RemoteAddress:Port           Forward Weight ActiveConn InActConn
TCP  10.102.128.4:3080 rr persistent 10800

Iptables & Ipset in IPVS Proxier

IPVS is for load balancing and it can’t handle other workarounds in kube-proxy, e.g. packet filtering, hairpin-masquerade tricks, SNAT, etc.

IPVS proxier leverages iptables in the above scenarios. Specifically, ipvs proxier will fall back on iptables in the following 4 scenarios:

  • kube-proxy start with –masquerade-all=true
  • Specify cluster CIDR in kube-proxy startup
  • Support Loadbalancer type service
  • Support NodePort type service

However, we don’t want to create too many iptables rules. So we adopt ipset for the sake of decreasing iptables rules. The following is the table of ipset sets that IPVS proxier maintains:

set namemembersusage
KUBE-CLUSTER-IPAll Service IP + portmasquerade for cases that masquerade-all=true or clusterCIDR specified
KUBE-LOOP-BACKAll Service IP + port + IPmasquerade for resolving hairpin issue
KUBE-EXTERNAL-IPService External IP + portmasquerade for packets to external IPs
KUBE-LOAD-BALANCERLoad Balancer ingress IP + portmasquerade for packets to Load Balancer type service
KUBE-LOAD-BALANCER-LOCALLoad Balancer ingress IP + port with externalTrafficPolicy=localaccept packets to Load Balancer with externalTrafficPolicy=local
KUBE-LOAD-BALANCER-FWLoad Balancer ingress IP + port with loadBalancerSourceRangesDrop packets for Load Balancer type Service with loadBalancerSourceRanges specified
KUBE-LOAD-BALANCER-SOURCE-CIDRLoad Balancer ingress IP + port + source CIDRaccept packets for Load Balancer type Service with loadBalancerSourceRanges specified
KUBE-NODE-PORT-TCPNodePort type Service TCP portmasquerade for packets to NodePort(TCP)
KUBE-NODE-PORT-LOCAL-TCPNodePort type Service TCP port with externalTrafficPolicy=localaccept packets to NodePort Service with externalTrafficPolicy=local
KUBE-NODE-PORT-UDPNodePort type Service UDP portmasquerade for packets to NodePort(UDP)
KUBE-NODE-PORT-LOCAL-UDPNodePort type service UDP port with externalTrafficPolicy=localaccept packets to NodePort Service with externalTrafficPolicy=local

In general, for IPVS proxier, the number of iptables rules is static, no matter how many Services/Pods we have.

Run kube-proxy in IPVS Mode

Currently, local-up scripts, GCE scripts, and kubeadm support switching IPVS proxy mode via exporting environment variables (KUBE_PROXY_MODE=ipvs) or specifying flag (--proxy-mode=ipvs). Before running IPVS proxier, please ensure IPVS required kernel modules are already installed.

ip_vs
ip_vs_rr
ip_vs_wrr
ip_vs_sh
nf_conntrack_ipv4

Finally, for Kubernetes v1.10, feature gate SupportIPVSProxyMode is set to true by default. For Kubernetes v1.11, the feature gate is entirely removed. However, you need to enable --feature-gates=SupportIPVSProxyMode=true explicitly for Kubernetes before v1.10.

Get Involved

The simplest way to get involved with Kubernetes is by joining one of the many Special Interest Groups (SIGs) that align with your interests. Have something you’d like to broadcast to the Kubernetes community? Share your voice at our weekly community meeting, and through the channels below.

Thank you for your continued feedback and support. Post questions (or answer questions) on Stack Overflow Join the community portal for advocates on K8sPort Follow us on Twitter @Kubernetesio for latest updates Chat with the community on Slack Share your Kubernetes story

Blog: Meet Our Contributors - Monthly Streaming YouTube Mentoring Series

$
0
0

Author: Paris Pittman (Google)

meet_our_contributors

July 11th at 2:30pm and 8pm UTC kicks off our next installment of Meet Our Contributors YouTube series. This month is special: members of the steering committee will be on to answer any and all questions from the community on the first 30 minutes of the 8pm UTC session. More on submitting questions below.

Meet Our Contributors was created to give an opportunity to new and current contributors alike to get time in front of our upstream community to ask questions that you would typically ask a mentor. We have 3-6 contributors on each session (an AM and PM session depending on where you are in the world!) answer questions live on a YouTube stream. If you miss it, don’t stress, the recording is up after it’s over. Check out a past episode here.

As you can imagine, the questions span broadly from introductory - “what’s a SIG?” to more advanced - “why’s my test flaking?” You’ll also hear growth related advice questions such as “what’s my best path to becoming an approver?” We’re happy to do a live code/docs review or explain part of the codebase as long as we have a few days notice.

We answer at least 10 questions per session and have helped 500+ people to date. This is a scalable mentoring initiative that makes it easy for all parties to share information, get advice, and get going with what they are trying to accomplish. We encourage you to submit questions for our next session:

  • Join the Kubernetes Slack channel - #meet-our-contributors - to ask your question or for more detailed information. DM paris@ if you would like to remain anonymous.
  • Twitter works, too, with the hashtag #k8smoc

If you are contributor reading this that has wanted to mentor but just can’t find the time - this is for you! Reach out to us.

You can join us live on June 6th at 2:30pm and 8pm UTC, and every first Wednesday of the month, on the Kubernetes Community live stream. We look forward to seeing you there!

Blog: CoreDNS GA for Kubernetes Cluster DNS

$
0
0

Author: John Belamaric (Infoblox)

Editor’s note: this post is part of a series of in-depth articles on what’s new in Kubernetes 1.11

Introduction

In Kubernetes 1.11, CoreDNS has reached General Availability (GA) for DNS-based service discovery, as an alternative to the kube-dns addon. This means that CoreDNS will be offered as an option in upcoming versions of the various installation tools. In fact, the kubeadm team chose to make it the default option starting with Kubernetes 1.11.

DNS-based service discovery has been part of Kubernetes for a long time with the kube-dns cluster addon. This has generally worked pretty well, but there have been some concerns around the reliability, flexibility and security of the implementation.

CoreDNS is a general-purpose, authoritative DNS server that provides a backwards-compatible, but extensible, integration with Kubernetes. It resolves the issues seen with kube-dns, and offers a number of unique features that solve a wider variety of use cases.

In this article, you will learn about the differences in the implementations of kube-dns and CoreDNS, and some of the helpful extensions offered by CoreDNS.

Implemenation differences

In kube-dns, several containers are used within a single pod: kubedns, dnsmasq, and sidecar. The kubedns container watches the Kubernetes API and serves DNS records based on the Kubernetes DNS specification, dnsmasq provides caching and stub domain support, and sidecar provides metrics and health checks.

This setup leads to a few issues that have been seen over time. For one, security vulnerabilities in dnsmasq have led to the need for a security-patch release of Kubernetes in the past. Additionally, because dnsmasq handles the stub domains, but kubedns handles the External Services, you cannot use a stub domain in an external service, which is very limiting to that functionality (see dns#131).

All of these functions are done in a single container in CoreDNS, which is running a process written in Go. The different plugins that are enabled replicate (and enhance) the functionality found in kube-dns.

Configuring CoreDNS

In kube-dns, you can modify a ConfigMap to change the behavior of your service discovery. This allows the addition of features such as serving stub domains, modifying upstream nameservers, and enabling federation.

In CoreDNS, you similarly can modify the ConfigMap for the CoreDNS Corefile to change how service discovery works. This Corefile configuration offers many more options than you will find in kube-dns, since it is the primary configuration file that CoreDNS uses for configuration of all of its features, even those that are not Kubernetes related.

When upgrading from kube-dns to CoreDNS using kubeadm, your existing ConfigMap will be used to generate the customized Corefile for you, including all of the configuration for stub domains, federation, and upstream nameservers. See Using CoreDNS for Service Discovery for more details.

Bug fixes and enhancements

There are several open issues with kube-dns that are resolved in CoreDNS, either in default configuration or with some customized configurations.

Metrics

The functional behavior of the default CoreDNS configuration is the same as kube-dns. However, one difference you need to be aware of is that the published metrics are not the same. In kube-dns, you get separate metrics for dnsmasq and kubedns (skydns). In CoreDNS there is a completely different set of metrics, since it is all a single process. You can find more details on these metrics on the CoreDNS Prometheus plugin page.

Some special features

The standard CoreDNS Kubernetes configuration is designed to be backwards compatible with the prior kube-dns behavior. But with some configuration changes, CoreDNS can allow you to modify how the DNS service discovery works in your cluster. A number of these features are intended to still be compliant with the Kubernetes DNS specification; they enhance functionality but remain backward compatible. Since CoreDNS is notonly made for Kubernetes, but is instead a general-purpose DNS server, there are many things you can do beyond that specification.

Pods verified mode

In kube-dns, pod name records are “fake”. That is, any “a-b-c-d.namespace.pod.cluster.local” query will return the IP address “a.b.c.d”. In some cases, this can weaken the identity guarantees offered by TLS. So, CoreDNS offers a “pods verified” mode, which will only return the IP address if there is a pod in the specified namespace with that IP address.

Endpoint names based on pod names

In kube-dns, when using a headless service, you can use an SRV request to get a list of all endpoints for the service:

dnstools# host -t srv headless
headless.default.svc.cluster.local has SRV record 10 33 0 6234396237313665.headless.default.svc.cluster.local.
headless.default.svc.cluster.local has SRV record 10 33 0 6662363165353239.headless.default.svc.cluster.local.
headless.default.svc.cluster.local has SRV record 10 33 0 6338633437303230.headless.default.svc.cluster.local.
dnstools#

However, the endpoint DNS names are (for practical purposes) random. In CoreDNS, by default, you get endpoint DNS names based upon the endpoint IP address:

dnstools# host -t srv headless
headless.default.svc.cluster.local has SRV record 0 25 443 172-17-0-14.headless.default.svc.cluster.local.
headless.default.svc.cluster.local has SRV record 0 25 443 172-17-0-18.headless.default.svc.cluster.local.
headless.default.svc.cluster.local has SRV record 0 25 443 172-17-0-4.headless.default.svc.cluster.local.
headless.default.svc.cluster.local has SRV record 0 25 443 172-17-0-9.headless.default.svc.cluster.local.

For some applications, it is desirable to have the pod name for this, rather than the pod IP address (see for example kubernetes#47992 and coredns#1190). To enable this in CoreDNS, you specify the “endpoint_pod_names” option in your Corefile, which results in this:

dnstools# host -t srv headless
headless.default.svc.cluster.local has SRV record 0 25 443 headless-65bb4c479f-qv84p.headless.default.svc.cluster.local.
headless.default.svc.cluster.local has SRV record 0 25 443 headless-65bb4c479f-zc8lx.headless.default.svc.cluster.local.
headless.default.svc.cluster.local has SRV record 0 25 443 headless-65bb4c479f-q7lf2.headless.default.svc.cluster.local.
headless.default.svc.cluster.local has SRV record 0 25 443 headless-65bb4c479f-566rt.headless.default.svc.cluster.local.

Autopath

CoreDNS also has a special feature to improve latency in DNS requests for external names. In Kubernetes, the DNS search path for pods specifies a long list of suffixes. This enables the use of short names when requesting services in the cluster - for example, “headless” above, rather than “headless.default.svc.cluster.local”. However, when requesting an external name - “infoblox.com”, for example - several invalid DNS queries are made by the client, requiring a roundtrip from the client to kube-dns each time (actually to dnsmasq and then to kubedns, since negative caching is disabled):

  • infoblox.com.default.svc.cluster.local -> NXDOMAIN
  • infoblox.com.svc.cluster.local -> NXDOMAIN
  • infoblox.com.cluster.local -> NXDOMAIN
  • infoblox.com.your-internal-domain.com -> NXDOMAIN
  • infoblox.com -> returns a valid record

In CoreDNS, an optional feature called autopath can be enabled that will cause this search path to be followedin the server. That is, CoreDNS will figure out from the source IP address which namespace the client pod is in, and it will walk this search list until it gets a valid answer. Since the first 3 of these are resolved internally within CoreDNS itself, it cuts out all of the back and forth between the client and server, reducing latency.

A few other Kubernetes specific features

In CoreDNS, you can use standard DNS zone transfer to export the entire DNS record set. This is useful for debugging your services as well as importing the cluster zone into other DNS servers.

You can also filter by namespaces or a label selector. This can allow you to run specific CoreDNS instances that will only server records that match the filters, exposing only a limited set of your services via DNS.

Extensibility

In addition to the features described above, CoreDNS is easily extended. It is possible to build custom versions of CoreDNS that include your own features. For example, this ability has been used to extend CoreDNS to do recursive resolution with the unbound plugin, to server records directly from a database with the pdsql plugin, and to allow multiple CoreDNS instances to share a common level 2 cache with the redisc plugin.

Many other interesting extensions have been added, which you will find on the External Plugins page of the CoreDNS site. One that is really interesting for Kubernetes and Istio users is the kubernetai plugin, which allows a single CoreDNS instance to connect to multiple Kubernetes clusters and provide service discovery across all of them.

What’s Next?

CoreDNS is an independent project, and as such is developing many features that are not directly related to Kubernetes. However, a number of these will have applications within Kubernetes. For example, the upcoming integration with policy engines will allow CoreDNS to make intelligent choices about which endpoint to return when a headless service is requested. This could be used to route traffic to a local pod, or to a more responsive pod. Many other features are in development, and of course as an open source project, we welcome you to suggest and contribute your own features!

The features and differences described above are a few examples. There is much more you can do with CoreDNS. You can find out more on the CoreDNS Blog.

Get involved with CoreDNS

CoreDNS is an incubated CNCF project.

We’re most active on Slack (and Github):

More resources can be found:

Blog: Dynamic Kubelet Configuration

$
0
0

Author: Michael Taufen (Google)

Editor’s note: this post is part of a series of in-depth articles on what’s new in Kubernetes 1.11

Why Dynamic Kubelet Configuration?

Kubernetes provides API-centric tooling that significantly improves workflows for managing applications and infrastructure. Most Kubernetes installations, however, run the Kubelet as a native process on each host, outside the scope of standard Kubernetes APIs.

In the past, this meant that cluster administrators and service providers could not rely on Kubernetes APIs to reconfigure Kubelets in a live cluster. In practice, this required operators to either ssh into machines to perform manual reconfigurations, use third-party configuration management automation tools, or create new VMs with the desired configuration already installed, then migrate work to the new machines. These approaches are environment-specific and can be expensive.

Dynamic Kubelet configuration gives cluster administrators and service providers the ability to reconfigure Kubelets in a live cluster via Kubernetes APIs.

What is Dynamic Kubelet Configuration?

Kubernetes v1.10 made it possible to configure the Kubelet via a beta config file API. Kubernetes already provides the ConfigMap abstraction for storing arbitrary file data in the API server.

Dynamic Kubelet configuration extends the Node object so that a Node can refer to a ConfigMap that contains the same type of config file. When a Node is updated to refer to a new ConfigMap, the associated Kubelet will attempt to use the new configuration.

How does it work?

Dynamic Kubelet configuration provides the following core features:

  • Kubelet attempts to use the dynamically assigned configuration.
  • Kubelet “checkpoints” configuration to local disk, enabling restarts without API server access.
  • Kubelet reports assigned, active, and last-known-good configuration sources in the Node status.
  • When invalid configuration is dynamically assigned, Kubelet automatically falls back to a last-known-good configuration and reports errors in the Node status.

To use the dynamic Kubelet configuration feature, a cluster administrator or service provider will first post a ConfigMap containing the desired configuration, then set each Node.Spec.ConfigSource.ConfigMap reference to refer to the new ConfigMap. Operators can update these references at their preferred rate, giving them the ability to perform controlled rollouts of new configurations.

Each Kubelet watches its associated Node object for changes. When the Node.Spec.ConfigSource.ConfigMap reference is updated, the Kubelet will “checkpoint” the new ConfigMap by writing the files it contains to local disk. The Kubelet will then exit, and the OS-level process manager will restart it. Note that if the Node.Spec.ConfigSource.ConfigMap reference is not set, the Kubelet uses the set of flags and config files local to the machine it is running on.

Once restarted, the Kubelet will attempt to use the configuration from the new checkpoint. If the new configuration passes the Kubelet’s internal validation, the Kubelet will update Node.Status.Config to reflect that it is using the new configuration. If the new configuration is invalid, the Kubelet will fall back to its last-known-good configuration and report an error in Node.Status.Config.

Note that the default last-known-good configuration is the combination of Kubelet command-line flags with the Kubelet’s local configuration file. Command-line flags that overlap with the config file always take precedence over both the local configuration file and dynamic configurations, for backwards-compatibility.

See the following diagram for a high-level overview of a configuration update for a single Node:

kubelet-diagram

How can I learn more?

Please see the official tutorial at https://kubernetes.io/docs/tasks/administer-cluster/reconfigure-kubelet/, which contains more in-depth details on user workflow, how a configuration becomes “last-known-good,” how the Kubelet “checkpoints” config, and possible failure modes.

Blog: Resizing Persistent Volumes using Kubernetes

$
0
0

Author: Hemant Kumar (Red Hat)

Editor’s note: this post is part of a series of in-depth articles on what’s new in Kubernetes 1.11

In Kubernetes v1.11 the persistent volume expansion feature is being promoted to beta. This feature allows users to easily resize an existing volume by editing the PersistentVolumeClaim (PVC) object. Users no longer have to manually interact with the storage backend or delete and recreate PV and PVC objects to increase the size of a volume. Shrinking persistent volumes is not supported.

Volume expansion was introduced in v1.8 as an Alpha feature, and versions prior to v1.11 required enabling the feature gate, ExpandPersistentVolumes, as well as the admission controller, PersistentVolumeClaimResize (which prevents expansion of PVCs whose underlying storage provider does not support resizing). In Kubernetes v1.11+, both the feature gate and admission controller are enabled by default.

Although the feature is enabled by default, a cluster admin must opt-in to allow users to resize their volumes. Kubernetes v1.11 ships with volume expansion support for the following in-tree volume plugins: AWS-EBS, GCE-PD, Azure Disk, Azure File, Glusterfs, Cinder, Portworx, and Ceph RBD. Once the admin has determined that volume expansion is supported for the underlying provider, they can make the feature available to users by setting the allowVolumeExpansion field to true in their StorageClass object(s). Only PVCs created from that StorageClass will be allowed to trigger volume expansion.

~> cat standard.yaml
apiVersion: storage.k8s.io/v1
kind: StorageClass
metadata:
  name: standard
parameters:
  type: pd-standard
provisioner: kubernetes.io/gce-pd
allowVolumeExpansion: true
reclaimPolicy: Delete

Any PVC created from this StorageClass can be edited (as illustrated below) to request more space. Kubernetes will interpret a change to the storage field as a request for more space, and will trigger automatic volume resizing.

PVC StorageClass

File System Expansion

Block storage volume types such as GCE-PD, AWS-EBS, Azure Disk, Cinder, and Ceph RBD typically require a file system expansion before the additional space of an expanded volume is usable by pods. Kubernetes takes care of this automatically whenever the pod(s) referencing your volume are restarted.

Network attached file systems (like Glusterfs and Azure File) can be expanded without having to restart the referencing Pod, because these systems do not require special file system expansion.

File system expansion must be triggered by terminating the pod using the volume. More specifically:

  • Edit the PVC to request more space.
  • Once underlying volume has been expanded by the storage provider, then the PersistentVolume object will reflect the updated size and the PVC will have the FileSystemResizePending condition.

You can verify this by running kubectl get pvc <pvc_name> -o yaml

~> kubectl get pvc myclaim -o yaml
apiVersion: v1
kind: PersistentVolumeClaim
metadata:
  name: myclaim
  namespace: default
  uid: 02d4aa83-83cd-11e8-909d-42010af00004
spec:
  accessModes:
  - ReadWriteOnce
  resources:
    requests:
      storage: 14Gi
  storageClassName: standard
  volumeName: pvc-xxx
status:
  capacity:
    storage: 9G
  conditions:
  - lastProbeTime: null
    lastTransitionTime: 2018-07-11T14:51:10Z
    message: Waiting for user to (re-)start a pod to finish file system resize of
      volume on node.
    status: "True"
    type: FileSystemResizePending
  phase: Bound
  • Once the PVC has the condition FileSystemResizePending then pod that uses the PVC can be restarted to finish file system resizing on the node. Restart can be achieved by deleting and recreating the pod or by scaling down the deployment and then scaling it up again.
  • Once file system resizing is done, the PVC will automatically be updated to reflect new size.

Any errors encountered while expanding file system should be available as events on pod.

Online File System Expansion

Kubernetes v1.11 also introduces an alpha feature called online file system expansion. This feature enables file system expansion while a volume is still in-use by a pod. Because this feature is alpha, it requires enabling the feature gate, ExpandInUsePersistentVolumes. It is supported by the in-tree volume plugins GCE-PD, AWS-EBS, Cinder, and Ceph RBD. When this feature is enabled, pod referencing the resized volume do not need to be restarted. Instead, the file system will automatically be resized while in use as part of volume expansion. File system expansion does not happen until a pod references the resized volume, so if no pods referencing the volume are running file system expansion will not happen.

How can I learn more?

Check out additional documentation on this feature here: http://k8s.io/docs/concepts/storage/persistent-volumes.

Blog: How the sausage is made: the Kubernetes 1.11 release interview, from the Kubernetes Podcast

$
0
0

Author: Craig Box (Google)

At KubeCon EU, my colleague Adam Glick and I were pleased to announce the Kubernetes Podcast from Google. In this weekly conversation, we focus on all the great things that are happening in the world of Kubernetes and Cloud Native. From the news of the week, to interviews with people in the community, we help you stay up to date on everything Kubernetes.

We recently had the pleasure of speaking to the release manager for Kubernetes 1.11, Josh Berkus from Red Hat, and the release manager for the upcoming 1.12, Tim Pepper from VMware.

In this conversation we learned about the release process, the impact of quarterly releases on end users, and how Kubernetes is like baking.

I encourage you to listen to the podcast version if you have a commute, or a dog to walk. If you like what you hear, we encourage you to subscribe! In case you’re short on time, or just want to browse quickly, we are delighted to share the transcript with you.


CRAIG BOX: First of all, congratulations both, and thank you.

JOSH BERKUS: Well, thank you. Congratulations for me, because my job is done.

[LAUGHTER]

Congratulations and sympathy for Tim.

[LAUGH]

TIM PEPPER: Thank you, and I guess thank you?

[LAUGH]

ADAM GLICK: For those that don’t know a lot about the process, why don’t you help people understand — what is it like to be the release manager? What’s the process that a release goes through to get to the point when everyone just sees, OK, it’s released — 1.11 is available? What does it take to get up to that?

JOSH BERKUS: We have a quarterly release cycle. So every three months, we’re releasing. And ideally and fortunately, this is actually now how we are doing things. Somewhere around two, three weeks before the previous release, somebody volunteers to be the release lead. That person is confirmed by SIG Release. So far, we’ve never had more than one volunteer, so there hasn’t been really a fight about it.

And then that person starts working with others to put together a team called the release team. Tim’s just gone through this with Stephen Augustus and picking out a whole bunch of people. And then after or a little before— probably after, because we want to wait for the retrospective from the previous release— the release lead then sets a schedule for the upcoming release, as in when all the deadlines will be.

And this is a thing, because we’re still tinkering with relative deadlines, and how long should code freeze be, and how should we track features? Because we don’t feel that we’ve gotten down that sort of cadence perfectly yet. I mean, like, we’ve done pretty well, but we don’t feel like we want to actually set [in stone], this is the schedule for each and every release.

Also, we have to adjust the schedule because of holidays, right? Because you can’t have the code freeze deadline starting on July 4 or in the middle of design or sometime else when we’re going to have a large group of contributors who are out on vacation.

TIM PEPPER: This is something I’ve had to spend some time looking at, thinking about 1.12. Going back to early June as we were tinkering with the code freeze date, starting to think about, well, what are the implications going to be on 1.12? When would these things start falling on the calendar? And then also for 1.11, we had one complexity. If we slipped the release past this week, we start running into the US 4th of July holiday, and we’re not likely to get a lot done.

So much of a slip would mean slipping into the middle of July before we’d really know that we were successfully triaging things. And worst case maybe, we’re quite a bit later into July.

So instead of quarterly with a three-month sort of cadence, well, maybe we’ve accidentally ended up chopping out one month out of the next release or pushing it quite a bit into the end of the year. And that made the deliberation around things quite complex, but thankfully this week, everything’s gone smoothly in the end.

CRAIG BOX: All the releases so far have been one quarter — they’ve been a 12-week release cycle, give or take. Is that something that you think will continue going forward, or is the release team thinking about different ways they could run releases?

TIM PEPPER: The whole community is thinking about this. There are voices who’d like the cadence to be faster, and there are voices who’d like it to be shorter. And there’s good arguments for both.

ADAM GLICK: Because it’s interesting. It sounds like it is a date-driven release cycle versus a feature-driven release cycle.

JOSH BERKUS: Yeah, certainly. I really honestly think everybody in the world of software recognizes that feature-driven release cycles just don’t work. And a big part of the duties of the release team collectively— several members of the team do this— is yanking things out of the release that are not ready. And the hard part of that is figuring out which things aren’t ready, right? Because the person who’s working on it tends to be super optimistic about what they can get done and what they can get fixed before the deadline.

ADAM GLICK: Of course.

TIM PEPPER: And this is one of the things I think that’s useful about the process we have in place on the release team for having shadows who spend some time on the release team, working their way up into more of a lead position and gaining some experience, starting to get some exposure to see that optimism and see the processes for vetting.

And it’s even an overstatement to say the process. Just see the way that we build the intuition for how to vet and understand and manage the risk, and really go after and chase things down proactively and early to get resolution in a timely way versus continuing to just all be optimistic and letting things maybe languish and put a release at risk.

CRAIG BOX: I’ve been reading this week about the introduction of feature branches to Kubernetes. The new server-side apply feature, for example, is being built in a branch so that it didn’t have to be half-built in master and then ripped out again as the release approached, if the feature wasn’t ready. That seems to me like something that’s a normal part of software development? Is there a reason it’s taken so long to bring that to core Kubernetes?

JOSH BERKUS: I don’t actually know the history of why we’re not using feature branches. I mean, the reason why we’re not using feature branches pervasively now is that we have to transition from a different system. And I’m not really clear on how we adopted that linear development system. But it’s certainly something we discussed on the release team, because there were issues of features that we thought were going to be ready, and then developed major problems. And we’re like, if we have to back this out, that’s going to be painful. And we did actually have to back one feature out, which involved not pulling out a Git commit, but literally reversing the line changes, which is really not how you want to be doing things.

CRAIG BOX: No.

TIM PEPPER: The other big benefit, I think, to the release branches if they are well integrated with the CI system for continuous integration and testing, you really get the feedback, and you can demonstrate, this set of stuff is ready. And then you can do deferred commitment on the master branch. And what comes in to a particular release on the timely cadence that users are expecting is stuff that’s ready. You don’t have potentially destabilizing things, because you can get a lot more proof and evidence of readiness.

ADAM GLICK: What are you looking at in terms of the tool chain that you’re using to do this? You mentioned a couple of things, and I know it’s obviously run through GitHub. But I imagine you have a number of other tools that you’re using in order to manage the release, to make sure that you understand what’s ready, what’s not. You mentioned balancing between people who are very optimistic about the feature they’re working on making it in versus the time-driven deadline, and balancing those two. Is that just a manual process, or do you have a set of tools that help you do that?

JOSH BERKUS: Well, there’s code review, obviously. So just first of all, process was somebody wants to actually put in a feature, commit, or any kind of merge really, right? So that has to be assigned to one of the SIGs, one of these Special Interest Groups. Possibly more than one, depending on what areas it touches.

And then two generally overlapping groups of people have to approve that. One would be the SIG that it’s assigned to, and the second would be anybody represented in the OWNERS files in the code tree of the directories which get touched.

Now sometimes those are the same group of people. I’d say often, actually. But sometimes they’re not completely the same group of people, because sometimes you’re making a change to the network, but that also happens to touch GCP support and OpenStack support, and so they need to review it as well.

So the first part is the human part, which is a bunch of other people need to look at this. And possibly they’re going to comment “Hey. This is a really weird way to do this. Do you have a reason for it?”

Then the second part of it is the automated testing that happens, the automated acceptance testing that happens via webhook on there. And actually, one of the things that we did that was a significant advancement in this release cycle— and by we, I actually mean not me, but the great folks at SIG Scalability did— was add an additional acceptance test that does a mini performance test.

Because one of the problems we’ve had historically is our major performance tests are large and take a long time to run, and so by the time we find out that we’re failing the performance tests, we’ve already accumulated, you know, 40, 50 commits. And so now we’re having to do git bisect to find out which of those commits actually caused the performance regression, which can make them very slow to address.

And so adding that performance pre-submit, the performance acceptance test really has helped stabilize performance in terms of new commits. So then we have that level of testing that you have to get past.

And then when we’re done with that level of testing, we run a whole large battery of larger tests— end-to-end tests, performance tests, upgrade and downgrade tests. And one of the things that we’ve added recently and we’re integrating to the process something called conformance tests. And the conformance test is we’re testing whether or not you broke backwards compatibility, because it’s obviously a big deal for Kubernetes users if you do that when you weren’t intending to.

One of the busiest roles in the release team is a role called CI Signal. And it’s that person’s job just to watch all of the tests for new things going red and then to try to figure out why they went red and bring it to people’s attention.

ADAM GLICK: I’ve often heard what you’re referring to kind of called a breaking change, because it breaks the existing systems that are running. How do you identify those to people so when they see, hey, there’s a new version of Kubernetes out there, I want to try it out, is that just going to release notes? Or is there a special way that you identify breaking changes as opposed to new features?

JOSH BERKUS: That goes into release notes. I mean, keep in mind that one of the things that happens with Kubernetes’ features is we go through this alpha, beta, general availability phase, right? So a feature’s alpha for a couple of releases and then becomes beta for a release or two, and then it becomes generally available. And part of the idea of having this that may require a feature to go through that cycle for a year or more before its general availability is by the time it’s general availability, we really want it to be, we are not going to change the API for this.

However, stuff happens, and we do occasionally have to do those. And so far, our main way to identify that to people actually is in the release notes. If you look at the current release notes, there are actually two things in there right now that are sort of breaking changes.

One of them is the bit with priority and preemption in that preemption being on by default now allows badly behaved users of the system to cause trouble in new ways. I’d actually have to look at the release notes to see what the second one was…

TIM PEPPER: The JSON capitalization case sensitivity.

JOSH BERKUS: Right. Yeah. And that was one of those cases where you have to break backwards compatibility, because due to a library switch, we accidentally enabled people using JSON in a case-insensitive way in certain APIs, which was never supposed to be the case. But because we didn’t have a specific test for that, we didn’t notice that we’d done it.

And so for three releases, people could actually shove in malformed JSON, and Kubernetes would accept it. Well, we have to fix that now. But that does mean that there are going to be users out in the field who have malformed JSON in their configuration management that is now going to break.

CRAIG BOX: But at least the good news is Kubernetes was always outputting correct formatted JSON during this period, I understand.

JOSH BERKUS: Mm-hmm.

TIM PEPPER: I think that also kind of reminds of one of the other areas— so kind of going back to the question of, well, how do you share word of breaking changes? Well, one of the ways you do that is to have as much quality CI that you can to catch these things that are important. Give the feedback to the developer who’s making the breaking change, such that they don’t make the breaking change. And then you don’t actually have to communicate it out to users.

So some of this is bound to happen, because you always have test escapes. But it’s also a reminder of the need to ensure that you’re also really building and maintaining your test cases and the quality and coverage of your CI system over time.

ADAM GLICK: What do you mean when you say test escapes?

TIM PEPPER: So I guess it’s a term in the art, but for those who aren’t familiar with it, you have intended behavior that wasn’t covered by test, and as a result, an unintended change happens to that. And instead of your intended behavior being shipped, you’re shipping something else.

JOSH BERKUS: The JSON change is a textbook example of this, which is we were testing that the API would continue to accept correct JSON. We were not testing adequately that it wouldn’t accept incorrect JSON.

TIM PEPPER: A test escape, another way to think of it as you shipped a bug because there was not a test case highlighting the possibility of the bug.

ADAM GLICK: It’s the classic, we tested to make sure the feature worked. We didn’t test to make sure that breaking things didn’t work.

TIM PEPPER: It’s common for us to focus on “I’ve created this feature and I’m testing the positive cases”. And this also comes to thinking about things like secure by default and having a really robust system. A harder piece of engineering often is to think about the failure cases and really actively manage those well.

JOSH BERKUS: I had a conversation with a contributor recently where it became apparent that that contributor had never worked on a support team, because their conception of a badly behaved user was, like, a hacker, right? An attacker who comes from outside.

And I’m like, no, no, no. You’re stable of badly behaved users is your own staff. You know, they will do bad things, not necessarily intending to do bad things, but because they’re trying to take a shortcut. And that is actually your primary concern in terms of preventing breaking the system.

CRAIG BOX: Josh, what was your preparation to be release manager for 1.11?

JOSH BERKUS: I was on the release team for two cycles, plus I was kind of auditing the release team for half a cycle before that. So in 1.9, I originally joined to be the shadow for bug triage, except I ended up not being the shadow, because the person who was supposed to be the lead for bug triage then dropped out. Then I ended up being the bug triage lead, and had to kind of improvise it because there wasn’t documentation on what was involved in the role at the time.

And then I was bug triage lead for a second cycle, for the 1.10 cycle, and then took over as release lead for the cycle. And one of the things on my to-do list is to update the requirements to be release lead, because we actually do have written requirements, and to say that the expectation now is that you spend at least two cycles on the release team, one of them either as a lead or as a shadow to the release lead.

CRAIG BOX: And is bug triage lead just what it sounds like?

JOSH BERKUS: Yeah. Pretty much. There’s more tracking involved than triage. Part of it is just deficiencies in tooling, something we’re looking to address. But things like GitHub API limitations make it challenging to build automated tools that help us intelligently track issues. And we are actually working with GitHub on that. Like, they’ve been helpful. It’s just, they have their own scaling problems.

But then beyond that, you know, a lot of that, it’s what you would expect it to be in terms of what triage says, right? Which is looking at every issue and saying, first of all, is this a real issue? Second, is it a serious issue? Third, who needs to address this?

And that’s a lot of the work, because for anybody who is a regular contributor to Kubernetes, the number of GitHub notifications that they receive per day means that most of us turn our GitHub notifications off.

CRAIG BOX: Indeed.

JOSH BERKUS: Because it’s just this fire hose. And as a result, when somebody really needs to pay attention to something right now, that generally requires a human to go and track them down by email or Slack or whatever they prefer. Twitter in some cases. I’ve done that. And say, hey. We really need you to look at this issue, because it’s about to hold up the beta release.

ADAM GLICK: When you look at the process that you’re doing now, what are the changes that are coming in the future that will make the release process even better and easier?

JOSH BERKUS: Well, we just went through this whole retro, and I put in some recommendations for things. Obviously, some additional automation, which I’m going to be looking at doing now that I’m cycling off of the release team for a quarter and can actually look at more longer term goals, will help, particularly now that we’ve addressed actually some of our GitHub data flow issues.

Beyond that, I put in a whole bunch of recommendations in the retro, but it’s actually up to Tim which recommendations he’s going to try to implement. So I’ll let him [comment].

TIM PEPPER: I think one of the biggest changes that happened in the 1.11 cycle is this emphasis on trying to keep our continuous integration test status always green. That is huge for software development and keeping velocity. If you have this more, I guess at this point antiquated notion of waterfall development, where you do feature development for a while and are accepting of destabilization, and somehow later you’re going to come back and spend a period on stabilization and fixing, that really elongates the feedback loop for developers.

And they don’t realize what was broken, and the problems become much more complex to sort out as time goes by. One, developers aren’t thinking about what it was that they’d been working on anymore. They’ve lost the context to be able to efficiently solve the problem.

But then you start also getting interactions. Maybe a bug was introduced, and other people started working around it or depending on it, and you get complex dependencies then that are harder to fix. And when you’re trying to do that type of complex resolution late in the cycle, it becomes untenable over time. So I think continuing on that and building on it, I’m seeing a little bit more focus on test cases and meaningful test coverage. I think that’s a great cultural change to have happening.

And maybe because I’m following Josh into this role from a bug triage position and in his mentions earlier of just the communications and tracking involved with that versus triage, I do have a bit of a concern that at times, email and Slack are relatively quiet. Some of the SIG meeting notes are a bit sparse or YouTube videos slow to upload. So the general artifacts around choice making I think is an area where we need a little more rigor. So I’m hoping to see some of that.

And that can be just as subtle as commenting on issues like, hey, this commit doesn’t say what it’s doing. And for that reason on the release team, we can’t assess its risk versus value. So could you give a little more information here? Things like that that give more information both to the release team and the development community as well, because this is open source. And to collaborate, you really do need to communicate in depth.

CRAIG BOX: Speaking of cultural changes, professional baker to Kubernetes’ release lead sounds like quite a journey.

JOSH BERKUS: There was a lot of stuff in between.

CRAIG BOX: Would you say there are a lot of similarities?

JOSH BERKUS: You know, believe it or not, there actually are similarities. And here’s where it’s similar, because I was actually thinking about this earlier. So when I was a professional baker, one of the things that I had to do was morning pastry. Like, I was actually in charge of doing several other things for custom orders, but since I had to come to work at 3:00 AM anyway— which also distressingly has similarities with some of this process. Because I had to come to work at 3:00 AM anyway, one of my secondary responsibilities was traying the morning pastry.

And one of the parts of that is you have this great big gas-fired oven with 10 rotating racks in it that are constantly rotating. Like, you get things in and out in the oven by popping them in and out while the racks are moving. That takes a certain amount of skill. You get burn marks on your wrists for your first couple of weeks of work. And then different pastries require a certain number of rotations to be done.

And there’s a lot of similarities to the release cadence, because what you’re doing is you’re popping something in the oven or you’re seeing something get kicked off, and then you have a certain amount of time before you need to check on it or you need to pull it out. And you’re doing that in parallel with a whole bunch of other things. You know, with 40 other trays.

CRAIG BOX: And with presumably a bunch of colleagues who are all there at the same time.

JOSH BERKUS: Yeah. And the other thing is that these deadlines are kind of absolute, right? You can’t say, oh, well, I was reading a magazine article, and I didn’t have time to pull that tray out. It’s too late. The pastry is burned, and you’re going to have to throw it away, and they’re not going to have enough pastry in the front case for the morning rush. And the customers are not interested in your excuses for that.

So from that perspective, from the perspective of saying, hey, we have a bunch of things that need to happen in parallel, they have deadlines and those deadlines are hard deadlines, there it’s actually fairly similar.

CRAIG BOX: Tim, do you have any other history that helped get you to where you are today?

TIM PEPPER: I think in some ways I’m more of a traditional journey. I’ve got a computer engineering bachelor’s degree. But I’m also maybe a bit of an outlier. In the late ‘90s, I found a passion for open source and Linux. Maybe kind of an early adopter, early believer in that.

And was working in the industry in the Bay Area for a while. Got involved in the Silicon Valley and Bay Area Linux users groups a bit, and managed to find work as a Linux sysadmin, and then doing device driver and kernel work and on up into distro. So that was all kind of standard in a way. And then I also did some other work around hardware enablement, high-performance computing, non-uniform memory access. Things that are really, really systems work.

And then about three years ago, my boss was really bending my ear and trying to get me to work on this cloud-related project. And that just felt so abstract and different from the low-level bits type of stuff that I’d been doing.

But kind of grudgingly, I eventually came around to the realization that the cloud is interesting, and it’s so much more complex than local machine-only systems work, the type of things that I’d been doing before. It’s massively distributed and you have a high-latency, low-reliability interconnect on all the nodes in the distributed network. So it’s wildly complex engineering problems that need solved.

And so that got me interested. Started working then on this open source orchestrator for virtual machines and containers. It was written in Go and was having a lot of fun. But it wasn’t Kubernetes, and it was becoming clear that Kubernetes was taking off. So about a year ago, I made the deliberate choice to move over to Kubernetes work.

ADAM GLICK: Previously, Josh, you spoke a little bit about your preparation for becoming a release manager. For other folks that are interested in getting involved in the community and maybe getting involved in release management, should they follow the same path that you did? Or what are ways that would be good for them to get involved? And for you, Tim, how you’ve approached the preparation for taking on the next release.

JOSH BERKUS: The great thing with the release team is that we have this formal mentorship path. And it’s fast, right? That’s the advantage of releasing quarterly, right? Is that within six months, you can go from joining the team as a shadow to being the release lead if you have the time. And you know, by the time you work your way up to release time, you better have support from your boss about this, because you’re going to end up spending a majority of your work time towards the end of the release on release management.

So the answer is to sign up to look when we’re getting into the latter half of release cycle, to sign up as a shadow. Or at the beginning of a release cycle, to sign up as a shadow. Some positions actually can reasonably use more than one shadow. There’s some position that just require a whole ton of legwork like release notes. And as a result, could actually use more than one shadow meaningfully. So there’s probably still places where people could sign up for 1.12. Is that true, Tim?

TIM PEPPER: Definitely. I think— gosh, right now we have 34 volunteers on the release team, which is—

ADAM GLICK: Wow.

JOSH BERKUS: OK. OK. Maybe not then.

[LAUGH]

TIM PEPPER: It’s potentially becoming a lot of cats to herd. But I think even outside of that formal volunteering to be a named shadow, anybody is welcome to show up to the release team meetings, follow the release team activities on Slack, start understanding how the process works. And really, this is the case all across open source. It doesn’t even have to be the release team. If you’re passionate about networking, start following what SIG Network is doing. It’s the same sort of path, I think, into any area on the project.

Each of the SIGs [has] a channel. So it would be #SIG-whatever the name is. [In our] case, #SIG-Release.

I’d also maybe give a plug for a talk I did at KubeCon in Copenhagen this spring, talking about how the release team specifically can be a path for new contributors coming in. And had some ideas and suggestions there for newcomers.

CRAIG BOX: There’s three questions in the Google SRE postmortem template that I really like. And I’m sure you will have gone through these in the retrospective process as you released 1.11, so I’d like to ask them now one at a time.

First of all, what went well?

JOSH BERKUS: Two things, I think, really improved things, both for contributors and for the release team. Thing number one was putting a strong emphasis on getting the test grid green well ahead of code freeze.

TIM PEPPER: Definitely.

JOSH BERKUS: Now partly that went well because we had a spectacular CI lead, Aish Sundar, who’s now in training to become the release lead.

TIM PEPPER: And I’d count that partly as one of the “Where were you lucky?” areas. We happened upon a wonderful person who just popped up and volunteered.

JOSH BERKUS: Yes. And then but part of that was also that we said, hey. You know, we’re not going to do what we’ve done before which is not really care about these tests until code slush. We’re going to care about these tests now.

And importantly— this is really important to the Kubernetes community— when we went to the various SIGs, the SIG Cluster Lifecycle and SIG Scalability and SIG Node and the other ones who were having test failures, and we said this to them. They didn’t say, get lost. I’m busy. They said, what’s failing?

CRAIG BOX: Great.

JOSH BERKUS: And so that made a big difference. And the second thing that was pretty much allowed by the first thing was to shorten the code freeze period. Because the code freeze period is frustrating for developers, because if they don’t happen to be working on a 1.11 feature, even if they worked on one before, and they delivered it early in the cycle, and it’s completely done, they’re kind of paralyzed, and they can’t do anything during code freeze. And so it’s very frustrating for them, and we want to make that period as short as possible. And we did that this time, and I think it helped everybody.

CRAIG BOX: What went poorly?

JOSH BERKUS: We had a lot of problems with flaky tests. We have a lot of old tests that are not all that well maintained, and they’re testing very complicated things like upgrading a cluster that has 40 nodes. And as a result, these tests have high failure rates that have very little to do with any change in the code.

And so one of the things that happened, and the reason we had a one-day delay in the release is, you know, we’re a week out from release, and just by random luck of the draw, a bunch of these tests all at once got a run of failures. And it turned out that that run of failures didn’t actually mean anything, having anything to do with Kubernetes. But there was no way for us to tell that without a lot of research, and we were not going to have enough time for that research without delaying the release.

So one of the things we’re looking to address in the 1.12 cycle is to actually move some of those flaky tests out. Either fix them or move them out of the release blocking category.

TIM PEPPER: In a way, I think this also highlights one of the things that Josh mentioned that went well, the emphasis early on getting the test results green, it allows us to see the extent to which these flakes are such a problem. And then the unlucky occurrence of them all happening to overlap on a failure, again, highlights that these flakes have been called out in the community for quite some time. I mean, at least a year. I know one contributor who was really concerned about them.

But they became a second order concern versus just getting things done in the short term, getting features and proving that the features worked, and kind of accepting in a risk management way on the release team that, yes, those are flakes. We don’t have time to do something about them, and it’s OK. But because of the emphasis on keeping the test always green now, we have the luxury maybe to focus on improving these flakes, and really get to where we have truly high quality CI signal, and can really believe in the results that we have on an ongoing basis.

JOSH BERKUS: And having solved some of the more basic problems, we’re now seeing some of the other problems like coordination between related features. Like we right now have a feature where— and this is one of the sort of backwards compatibility release notes— where the feature went into beta, and is on by default.

And the second feature that was supposed to provide access control for the first feature did not go in as beta, and is not on by default. And the team for the first feature did not realize the second feature was being held up until two days before the release. So it’s going to result in us actually patching something in 11.1.

And so like, we put that into something that didn’t go well. But on the other hand, as Tim points out, a few release cycles ago, we wouldn’t even have identified that as a problem, because we were still struggling with just individual features having a clear idea well ahead of the release of what was going in and what wasn’t going in.

TIM PEPPER: I think something like this also is a case that maybe advocates for the use of feature branches. If these things are related, we might have seen it and done more pre-testing within that branch and pre-integration, and decide maybe to merge a couple of what initially had been disjoint features into a single feature branch, and really convince ourselves that together they were good. And cross all the Ts, dot all the Is on them, and not have something that’s gated on an alpha feature that’s possibly falling away.

CRAIG BOX: And then the final question, which I think you’ve both touched on a little. Where did you get lucky, or unlucky perhaps?

JOSH BERKUS: I would say number one where I got lucky is truly having a fantastic team. I mean, we just had a lot of terrific people who were very good and very energetic and very enthusiastic about taking on their release responsibilities including Aish and Tim and Ben and Nick and Misty who took over Docs four weeks into the release. And then went crazy with it and said, well, I’m new here, so I’m going to actually change a bunch of things we’ve been doing that didn’t work in the first place. So that was number one. I mean, that really made honestly all the difference.

And then the second thing, like I said, is that we didn’t have sort of major, unexpected monkey wrenches thrown at us. So in the 1.10 cycle, we actually had two of those, which is why I still count Jace as heroic for pulling off a release that was only a week late.

You know, number one was having the scalability tests start failing for unrelated reasons for a long period, which then masked the fact that they were actually failing for real reasons when we actually got them working again. And as a result, ending up debugging a major and super complicated scalability issue within days of what was supposed to be the original release date. So that was monkey wrench number one for the 1.10 cycle.

Monkey wrench number two for the 1.10 cycle was we got a security hole that needed to be patched. And so again, a week out from what was supposed to be the original release date, we were releasing a security update, and that security update required patching the release branch. And it turns out that that patch against the release branch broke a bunch of incoming features. And we didn’t get anything of that magnitude in the 1.11 release, and I’m thankful for that.

TIM PEPPER: Also, I would maybe argue in a way that a portion of that wasn’t just luck. The extent to which this community has a good team, not just the release team but beyond, some of this goes to active work that folks all across the project, but especially in the contributor experience SIG are doing to cultivate a positive and inclusive culture here. And you really see that. When problems crop up, you’re seeing people jump on and really try to constructively tackle them. And it’s really fun to be a part of that.


Thanks to Josh Berkus and Tim Pepper for talking to the Kubernetes Podcast from Google.

Josh Berkus hangs out in #sig-release on the Kubernetes Slack. He maintains a newsletter called “Last Week in Kubernetes Development”, with Noah Kantrowitz. You can read him on Twitter at @fuzzychef, but he does warn you that there’s a lot of politics there as well.

Tim Pepper is also on Slack - he’s always open to folks reaching out with a question, looking for help or advice. On Twitter you’ll find him at @pythomit, which is “Timothy P” backwards. Tim is an avid soccer fan and season ticket holder for the Portland Timbers and the Portland Thorns, so you’ll get all sorts of opinions on soccer in addition to technology!

You can find the Kubernetes Podcast from Google at @kubernetespod on Twitter, and you can subscribe so you never miss an episode.


Blog: 11 Ways (Not) to Get Hacked

$
0
0

Author: Andrew Martin (ControlPlane)

Kubernetes security has come a long way since the project's inception, but still contains some gotchas. Starting with the control plane, building up through workload and network security, and finishing with a projection into the future of security, here is a list of handy tips to help harden your clusters and increase their resilience if compromised.

Part One: The Control Plane

The control plane is Kubernetes' brain. It has an overall view of every container and pod running on the cluster, can schedule new pods (which can include containers with root access to their parent node), and can read all the secrets stored in the cluster. This valuable cargo needs protecting from accidental leakage and malicious intent: when it's accessed, when it's at rest, and when it's being transported across the network.

1. TLS Everywhere

TLS should be enabled for every component that supports it to prevent traffic sniffing, verify the identity of the server, and (for mutual TLS) verify the identity of the client.

Note that some components and installation methods may enable local ports over HTTP and administrators should familiarize themselves with the settings of each component to identify potentially unsecured traffic.

Source

This network diagram by Lucas Käldström demonstrates some of the places TLS should ideally be applied: between every component on the master, and between the Kubelet and API server. Kelsey Hightower's canonical Kubernetes The Hard Way provides detailed manual instructions, as does etcd's security model documentation.

Autoscaling Kubernetes nodes was historically difficult, as each node requires a TLS key to connect to the master, and baking secrets into base images is not good practice. Kubelet TLS bootstrapping provides the ability for a new kubelet to create a certificate signing request so that certificates are generated at boot time.

2. Enable RBAC with Least Privilege, Disable ABAC, and Monitor Logs

Role-based access control provides fine-grained policy management for user access to resources, such as access to namespaces.

Kubernetes’ ABAC (Attribute Based Access Control) has been superseded by RBAC since release 1.6, and should not be enabled on the API server. Use this flag to disable it:

--no-enable-legacy-authorization

There are plenty of good examples of RBAC policies for cluster services, as well as the docs. And it doesn't have to stop there - fine-grained RBAC policies can be extracted from audit logs with audit2rbac.

Incorrect or excessively permissive RBAC policies are a security threat in case of a compromised pod. Maintaining least privilege, and continuously reviewing and improving RBAC rules, should be considered part of the “technical debt hygiene” that teams build into their development lifecycle.

Audit Logging (beta in 1.10) provides customisable API logging at the payload (e.g. request and response), and also metadata levels. Log levels can be tuned to your organisation's security policy - GKE provides sane defaults to get you started.

For read requests such as get, list, and watch, only the request object is saved in the audit logs; the response object is not. For requests involving sensitive data such as Secret and ConfigMap, only the metadata is exported. For all other requests, both request and response objects are saved in audit logs.

Don't forget: keeping these logs inside the cluster is a security threat in case of compromise. These, like all other security-sensitive logs, should be transported outside the cluster to prevent tampering in the event of a breach.

3. Use Third Party Auth for API Server

Centralising authentication and authorisation across an organisation (aka Single Sign On) helps onboarding, offboarding, and consistent permissions for users.

Integrating Kubernetes with third party auth providers (like Google or Github) uses the remote platform's identity guarantees (backed up by things like 2FA) and prevents administrators having to reconfigure the Kubernetes API server to add or remove users.

Dex is an OpenID Connect Identity (OIDC) and OAuth 2.0 provider with pluggable connectors. Pusher takes this a stage further with some custom tooling, and there are some otherhelpers available with slightly different use cases.

4. Separate and Firewall your etcd Cluster

etcd stores information on state and secrets, and is a critical Kubernetes component - it should be protected differently from the rest of your cluster.

Write access to the API server's etcd is equivalent to gaining root on the entire cluster, and even read access can be used to escalate privileges fairly easily.

The Kubernetes scheduler will search etcd for pod definitions that do not have a node. It then sends the pods it finds to an available kubelet for scheduling. Validation for submitted pods is performed by the API server before it writes them to etcd, so malicious users writing directly to etcd can bypass many security mechanisms - e.g. PodSecurityPolicies.

etcd should be configured with peer and client TLS certificates, and deployed on dedicated nodes. To mitigate against private keys being stolen and used from worker nodes, the cluster can also be firewalled to the API server.

5. Rotate Encryption Keys

A security best practice is to regularly rotate encryption keys and certificates, in order to limit the "blast radius" of a key compromise.

Kubernetes will rotate some certificates automatically (notably, the kubelet client and server certs) by creating new CSRs as its existing credentials expire.

However, the symmetric encryption keys that the API server uses to encrypt etcd values are not automatically rotated - they must be rotated manually. Master access is required to do this, so managed services (such as GKE or AKS) abstract this problem from an operator.

Part Two: Workloads

With minimum viable security on the control plane the cluster is able to operate securely. But, like a ship carrying potentially dangerous cargo, the ship’s containers must be protected to contain that cargo in the event of an unexpected accident or breach. The same is true for Kubernetes workloads (pods, deployments, jobs, sets, etc.) - they may be trusted at deployment time, but if they're internet-facing there's always a risk of later exploitation. Running workloads with minimal privileges and hardening their runtime configuration can help to mitigate this risk.

6. Use Linux Security Features and PodSecurityPolicies

The Linux kernel has a number of overlapping security extensions (capabilities, SELinux, AppArmor, seccomp-bpf) that can be configured to provide least privilege to applications.

Tools like bane can help to generate AppArmor profiles, and docker-slim for seccomp profiles, but beware - a comprehensive test suite it required to exercise all code paths in your application when verifying the side effects of applying these policies.

PodSecurityPolicies can be used to mandate the use of security extensions and other Kubernetes security directives. They provide a minimum contract that a pod must fulfil to be submitted to the API server - including security profiles, the privileged flag, and the sharing of host network, process, or IPC namespaces.

These directives are important, as they help to prevent containerised processes from escaping their isolation boundaries, and Tim Allclair's example PodSecurityPolicy is a comprehensive resource that you can customise to your use case.

7. Statically Analyse YAML

Where PodSecurityPolicies deny access to the API server, static analysis can also be used in the development workflow to model an organisation's compliance requirements or risk appetite.

Sensitive information should not be stored in pod-type YAML resource (deployments, pods, sets, etc.), and sensitive configmaps and secrets should be encrypted with tools such as vault (with CoreOS's operator), git-crypt, sealed secrets, or cloud provider KMS.

Static analysis of YAML configuration can be used to establish a baseline for runtime security. kubesec generates risk scores for resources:

{"score": -30,"scoring": {"critical": [{"selector": "containers[] .securityContext .privileged == true","reason": "Privileged containers can allow almost completely unrestricted host access"
    }],"advise": [{"selector": "containers[] .securityContext .runAsNonRoot == true","reason": "Force the running image to run as a non-root user to ensure least privilege"
    }, {"selector": "containers[] .securityContext .capabilities .drop","reason": "Reducing kernel capabilities available to a container limits its attack surface","href": "https://kubernetes.io/docs/tasks/configure-pod-container/security-context/"
    }]
  }
}

And kubetest is a unit test framework for Kubernetes configurations:

#// vim: set ft=python:deftest_for_team_label():if spec["kind"] =="Deployment":
        labels = spec["spec"]["template"]["metadata"]["labels"]
        assert_contains(labels, "team", "should indicate which team owns the deployment")

test_for_team_label()

These tools "shift left" (moving checks and verification earlier in the development cycle). Security testing in the development phase gives users fast feedback about code and configuration that may be rejected by a later manual or automated check, and can reduce the friction of introducing more secure practices.

8. Run Containers as a Non-Root User

Containers that run as root frequently have far more permissions than their workload requires which, in case of compromise, could help an attacker further their attack.

Containers still rely on the traditional Unix security model (called discretionary access control or DAC) - everything is a file, and permissions are granted to users and groups.

User namespaces are not enabled in Kubernetes. This means that a container's user ID table maps to the host's user table, and running a process as the root user inside a container runs it as root on the host. Although we have layered security mechanisms to prevent container breakouts, running as root inside the container is still not recommended.

Many container images use the root user to run PID 1 - if that process is compromised, the attacker has root in the container, and any mis-configurations become much easier to exploit.

Bitnami has done a lot of work moving their container images to non-root users (especially as OpenShift requires this by default), which may ease a migration to non-root container images.

This PodSecurityPolicy snippet prevents running processes as root inside a container, and also escalation to root:

# Required to prevent escalations to root.allowPrivilegeEscalation:falserunAsUser:# Require the container to run without root privileges.rule:'MustRunAsNonRoot'

Non-root containers cannot bind to the privileged ports under 1024 (this is gated by the CAP_NET_BIND_SERVICE kernel capability), but services can be used to disguise this fact. In this example the fictional MyApp application is bound to port 8443 in its container, but the service exposes it on 443 by proxying the request to the targetPort:

kind:ServiceapiVersion:v1metadata:name:my-servicespec:selector:app:MyAppports:-protocol:TCPport:443targetPort:8443

Having to run workloads as a non-root user is not going to change until user namespaces are usable, or the ongoing work to run containers without root lands in container runtimes.

9. Use Network Policies

By default, Kubernetes networking allows all pod to pod traffic; this can be restricted using aNetwork Policy.

Traditional services are restricted with firewalls, which use static IP and port ranges for each service. As these IPs very rarely change they have historically been used as a form of identity. Containers rarely have static IPs - they are built to fail fast, be rescheduled quickly, and use service discovery instead of static IP addresses. These properties mean that firewalls become much more difficult to configure and review.

As Kubernetes stores all its system state in etcd it can configure dynamic firewalling - if it is supported by the CNI networking plugin. Calico, Cilium, kube-router, Romana, and Weave Net all support network policy.

It should be noted that these policies fail-closed, so the absence of a podSelector here defaults to a wildcard:

apiVersion:networking.k8s.io/v1kind:NetworkPolicymetadata:name:default-denyspec:podSelector:

Here's an example NetworkPolicy that denies all egress except UDP 53 (DNS), which also prevents inbound connections to your application. NetworkPolicies are stateful, so the replies to outbound requests still reach the application.

apiVersion:networking.k8s.io/v1kind:NetworkPolicymetadata:name:myapp-deny-external-egressspec:podSelector:matchLabels:app:myapppolicyTypes:-Egressegress:-ports:-port:53protocol:UDP-to:-namespaceSelector:{}

Kubernetes network policies can not be applied to DNS names. This is because DNS can resolve round-robin to many IPs, or dynamically based on the calling IP, so network policies can be applied to a fixed IP or podSelector (for dynamic Kubernetes IPs) only.

Best practice is to start by denying all traffic for a namespace and incrementally add routes to allow an application to pass its acceptance test suite. This can become complex, so ControlPlane hacked together netassert - network security testing for DevSecOps workflows with highly parallelised nmap:

k8s:# used for Kubernetes podsdeployment:# only deployments currently supportedtest-frontend:# pod name, defaults to `default` namespacetest-microservice:80# `test-microservice` is the DNS name of the target servicetest-database:-80# `test-frontend` should not be able to access test-database’s port 80169.254.169.254:-80,-443# AWS metadata APImetadata.google.internal:-80,-443# GCP metadata APInew-namespace:test-microservice:# `new-namespace` is the namespace nametest-database.new-namespace:80# longer DNS names can be used for other namespacestest-frontend.default:80169.254.169.254:-80,-443# AWS metadata APImetadata.google.internal:-80,-443# GCP metadata API

Cloud provider metadata APIs are a constant source of escalation (as the recent Shopifybug bounty demonstrates), so specific tests to confirm that the APIs are blocked on the container network helps to guard against accidental misconfiguration.

10. Scan Images and Run IDS

Web servers present an attack surface to the network they're attached to: scanning an image's installed files ensures the absence of known vulnerabilities that an attacker could exploit to gain remote access to the container. An IDS (Intrusion Detection System) detects them if they do.

Kubernetes permits pods into the cluster through a series of admission controller gates, which are applied to pods and other resources like deployments. These gates can validate each pod for admission or change its contents, and they now support backend webhooks.

These webhooks can be used by container image scanning tools to validate images before they are deployed to the cluster. Images that have failed checks can be refused admission.

Scanning container images for known vulnerabilities can reduce the window of time that an attacker can exploit a disclosed CVE. Free tools such as CoreOS's Clair and Aqua's Micro Scanner should be used in a deployment pipeline to prevent the deployment of images with critical, exploitable vulnerabilities.

Tools such as Grafeas can store image metadata for constant compliance and vulnerability checks against a container's unique signature (a content addressable hash). This means that scanning a container image with that hash is the same as scanning the images deployed in production, and can be done continually without requiring access to production environments.

Unknown Zero Day vulnerabilities will always exist, and so intrusion detection tools such as Twistlock, Aqua, and Sysdig Secure should be deployed in Kubernetes. IDS detects unusual behaviours in a container and pauses or kills it - Sysdig's Falco is a an Open Source rules engine, and an entrypoint to this ecosystem.

Part Three: The Future

The next stage of security's "cloud native evolution" looks to be the service mesh, although adoption may take time - migration involves shifting complexity from applications to the mesh infrastructure, and organisations will be keen to understand best-practice.

11. Run a Service Mesh

A service mesh is a web of encrypted persistent connections, made between high performance "sidecar" proxy servers like Envoy and Linkerd. It adds traffic management, monitoring, and policy - all without microservice changes.

Offloading microservice security and networking code to a shared, battle tested set of libraries was already possible with Linkerd, and the introduction of Istio by Google, IBM, and Lyft, has added an alternative in this space. With the addition of SPIFFE for per-pod cryptographic identity and a plethora of other features, Istio could simplify the deployment of the next generation of network security.

In "Zero Trust" networks there may be no need for traditional firewalling or Kubernetes network policy, as every interaction occurs over mTLS (mutual TLS), ensuring that both parties are not only communicating securely, but that the identity of both services is known.

This shift from traditional networking to Cloud Native security principles is not one we expect to be easy for those with a traditional security mindset, and the Zero Trust Networking book from SPIFFE's Evan Gilman is a highly recommended introduction to this brave new world.

Istio 0.8 LTS is out, and the project is approaching 1.0. Its stability versioning is the same as the Kubernetes model: a stable core, with individual APIs identifying themselves under their own alpha/beta stability namespace. Expect to see an uptick in adoption of 0.8 soon!

Conclusion

Cloud Native applications have a greater, more fine-grained set of lightweight security primitives to lock down workloads and infrastructure. The power and flexibility of these tools is both a blessing and curse - with insufficient automation it has become easier to expose insecure workloads which permit breakouts from the container or its isolation model.

There are more defensive tools available than ever, but caution must be taken to reduce attack surfaces and the potential for misconfiguration.

However if security slows down an organisation's pace of feature delivery it will never be a first-class citizen. Applying Continuous Delivery principles to the software supply chain allows an organisation to achieve compliance, continual audit, and high security without impacting the business's bottom line.

The only way to iterate quickly on software and security is when it is supported by a comprehensive test suite. This is achieved with Continuous Security - an alternative to point-in-time penetration tests, with constant pipeline validation ensuring an organisation's attack surface is known, and the risk constantly understood and managed. This is ControlPlane's modus operandi: if we can help kickstart a Continuous Security discipline, deliver Kubernetes security and operations training, or co-implement a secure cloud native evolution for you, please get in touch.


Andrew Martin is a co-founder at @controlplaneio and tweets about cloud native security at @sublimino

Blog: Kubernetes Wins the 2018 OSCON Most Impact Award

$
0
0

Authors: Brian Grant (Principal Engineer, Google) and Tim Hockin (Principal Engineer, Google)

We are humbled to be recognized by the community with this award.

We had high hopes when we created Kubernetes. We wanted to change the way cloud applications were deployed and managed. Whether we’d succeed or not was very uncertain. And look how far we’ve come in such a short time.

The core technology behind Kubernetes was informed by lessons learned from Google’s internal infrastructure, but nobody can deny the enormous role of the Kubernetes community in the success of the project. The community, of which Google is a part, now drives every aspect of the project: the design, development, testing, documentation, releases, and more. That is what makes Kubernetes fly.

While we actively sought partnerships and community engagement, none of us anticipated just how important the open-source community would be, how fast it would grow, or how large it would become. Honestly, we really didn’t have much of a plan.

We looked to other open-source projects for inspiration and advice: Docker (now Moby), other open-source projects at Google such as Angular and Go, the Apache Software Foundation, OpenStack, Node.js, Linux, and others. But it became clear that there was no clear-cut recipe we could follow. So we winged it.

Rather than rehashing history, we thought we’d share two high-level lessons we learned along the way.

First, in order to succeed, community health and growth needs to be treated as a top priority. It’s hard, and it is time-consuming. It requires attention to both internal project dynamics and outreach, as well as constant vigilance to build and sustain relationships, be inclusive, maintain open communication, and remain responsive to contributors and users. Growing existing contributors and onboarding new ones is critical to sustaining project growth, but that takes time and energy that might otherwise be spent on development. These things have to become core values in order for contributors to keep them going.

Second, start simple with how the project is organized and operated, but be ready to adopt to more scalable approaches as it grows. Over time, Kubernetes has transitioned from what was effectively a single team and git repository to many subgroups (Special Interest Groups and Working Groups), sub-projects, and repositories. From manual processes to fully automated ones. From informal policies to formal governance.

We certainly didn’t get everything right or always adapt quickly enough, and we constantly struggle with scale. At this point, Kubernetes has more than 20,000 contributors and is approaching one million comments on its issues and pull requests, making it one of the fastest moving projects in the history of open source.

Thank you to all our contributors and to all the users who’ve stuck with us on the sometimes bumpy journey. This project would not be what it is today without the community.

Blog: The History of Kubernetes & the Community Behind It

$
0
0

Authors: Brendan Burns (Distinguished Engineer, Microsoft)

oscon award

It is remarkable to me to return to Portland and OSCON to stand on stage with members of the Kubernetes community and accept this award for Most Impactful Open Source Project. It was scarcely three years ago, that on this very same stage we declared Kubernetes 1.0 and the project was added to the newly formed Cloud Native Computing Foundation.

To think about how far we have come in that short period of time and to see the ways in which this project has shaped the cloud computing landscape is nothing short of amazing. The success is a testament to the power and contributions of this amazing open source community. And the daily passion and quality contributions of our endlessly engaged, world-wide community is nothing short of humbling.

At a meetup in Portland this week, I had a chance to tell the story of Kubernetes’ past, its present and some thoughts about its future, so I thought I would write down some pieces of what I said for those of you who couldn’t be there in person.

It all began in the fall of 2013, with three of us: Craig McLuckie, Joe Beda and I were working on public cloud infrastructure. If you cast your mind back to the world of cloud in 2013, it was a vastly different place than it is today. Imperative bash scripts were only just starting to give way to declarative configuration of IaaS with systems. Netflix was popularizing the idea of immutable infrastructure but doing it with heavy-weight full VM images. The notion of orchestration, and certainly container orchestration existed in a few internet scale companies, but not in cloud and certainly not in the enterprise.

Docker changed all of that. By popularizing a lightweight container runtime and providing a simple way to package, distributed and deploy applications onto a machine, the Docker tooling and experience popularized a brand-new cloud native approach to application packaging and maintenance. Were it not for Docker’s shifting of the cloud developer’s perspective, Kubernetes simply would not exist.

I think that it was Joe who first suggested that we look at Docker in the summer of 2013, when Craig, Joe and I were all thinking about how we could bring a cloud native application experience to a broader audience. And for all three of us, the implications of this new tool were immediately obvious. We knew it was a critical component in the development of cloud native infrastructure.

But as we thought about it, it was equally obvious that Docker, with its focus on a single machine, was not the complete solution. While Docker was great at building and packaging individual containers and running them on individual machines, there was a clear need for an orchestrator that could deploy and manage large numbers of containers across a fleet of machines.

As we thought about it some more, it became increasingly obvious to Joe, Craig and I, that not only was such an orchestrator necessary, it was also inevitable, and it was equally inevitable that this orchestrator would be open source. This realization crystallized for us in the late fall of 2013, and thus began the rapid development of first a prototype, and then the system that would eventually become known as Kubernetes. As 2013 turned into 2014 we were lucky to be joined by some incredibly talented developers including Ville Aikas, Tim Hockin, Dawn Chen, Brian Grant and Daniel Smith.

The initial goal of this small team was to develop a “minimally viable orchestrator.” From experience we knew that the basic feature set for such an orchestrator was:

  • Replication to deploy multiple instances of an application
  • Load balancing and service discovery to route traffic to these replicated containers
  • Basic health checking and repair to ensure a self-healing system
  • Scheduling to group many machines into a single pool and distribute work to them

Along the way, we also spent a significant chunk of our time convincing executive leadership that open sourcing this project was a good idea. I’m endlessly grateful to Craig for writing numerous whitepapers and to Eric Brewer, for the early and vocal support that he lent us to ensure that Kubernetes could see the light of day.

In June of 2014 when Kubernetes was released to the world, the list above was the sum total of its basic feature set. As an early stage open source community, we then spent a year building, expanding, polishing and fixing this initial minimally viable orchestrator into the product that we released as a 1.0 in OSCON in 2015. We were very lucky to be joined early on by the very capable OpenShift team which lent significant engineering and real world enterprise expertise to the project. Without their perspective and contributions, I don’t think we would be standing here today.

Three years later, the Kubernetes community has grown exponentially, and Kubernetes has become synonymous with cloud native container orchestration. There are more than 1700 people who have contributed to Kubernetes, there are more than 500 Kubernetes meetups worldwide and more than 42000 users have joined the #kubernetes-dev channel. What’s more, the community that we have built works successfully across geographic, language and corporate boundaries. It is a truly open, engaged and collaborative community, and in-and-of-itself and amazing achievement. Many thanks to everyone who has helped make it what it is today. Kubernetes is a commodity in the public cloud because of you.

But if Kubernetes is a commodity, then what is the future? Certainly, there are an endless array of tweaks, adjustments and improvements to the core codebase that will occupy us for years to come, but the true future of Kubernetes are the applications and experiences that are being built on top of this new, ubiquitous platform.

Kubernetes has dramatically reduced the complexity to build new developer experiences, and a myriad of new experiences have been developed or are in the works that provide simplified or targeted developer experiences like Functions-as-a-Service, on top of core Kubernetes-as-a-Service.

The Kubernetes cluster itself is being extended with custom resource definitions (which I first described to Kelsey Hightower on a walk from OSCON to a nearby restaurant in 2015), these new resources allow cluster operators to enable new plugin functionality that extend and enhance the APIs that their users have access to.

By embedding core functionality like logging and monitoring in the cluster itself and enabling developers to take advantage of such services simply by deploying their application into the cluster, Kubernetes has reduced the learning necessary for developers to build scalable reliable applications.

Finally, Kubernetes has provided a new, common vocabulary for expressing the patterns and paradigms of distributed system development. This common vocabulary means that we can more easily describe and discuss the common ways in which our distributed systems are built, and furthermore we can build standardized, re-usable implementations of such systems. The net effect of this is the development of higher quality, reliable distributed systems, more quickly.

It’s truly amazing to see how far Kubernetes has come, from a rough idea in the minds of three people in Seattle to a phenomenon that has redirected the way we think about cloud native development across the world. It has been an amazing journey, but what’s truly amazing to me, is that I think we’re only just now scratching the surface of the impact that Kubernetes will have. Thank you to everyone who has enabled us to get this far, and thanks to everyone who will take us further.

Brendan

Blog: Feature Highlight: CPU Manager

$
0
0

Authors: Balaji Subramaniam (Intel), Connor Doyle (Intel)

This blog post describes the CPU Manager, a beta feature in Kubernetes. The CPU manager feature enables better placement of workloads in the Kubelet, the Kubernetes node agent, by allocating exclusive CPUs to certain pod containers.

cpu manager

Sounds Good! But Does the CPU Manager Help Me?

It depends on your workload. A single compute node in a Kubernetes cluster can run many pods and some of these pods could be running CPU-intensive workloads. In such a scenario, the pods might contend for the CPU resources available in that compute node. When this contention intensifies, the workload can move to different CPUs depending on whether the pod is throttled and the availability of CPUs at scheduling time. There might also be cases where the workload could be sensitive to context switches. In all the above scenarios, the performance of the workload might be affected.

If your workload is sensitive to such scenarios, then CPU Manager can be enabled to provide better performance isolation by allocating exclusive CPUs for your workload.

CPU manager might help workloads with the following characteristics:

  • Sensitive to CPU throttling effects.
  • Sensitive to context switches.
  • Sensitive to processor cache misses.
  • Benefits from sharing a processor resources (e.g., data and instruction caches).
  • Sensitive to cross-socket memory traffic.
  • Sensitive or requires hyperthreads from the same physical CPU core.

Ok! How Do I use it?

Using the CPU manager is simple. First, enable CPU manager with the Static policy in the Kubelet running on the compute nodes of your cluster. Then configure your pod to be in the Guaranteed Quality of Service (QoS) class. Request whole numbers of CPU cores (e.g., 1000m, 4000m) for containers that need exclusive cores. Create your pod in the same way as before (e.g., kubectl create -f pod.yaml). And voilà, the CPU manager will assign exclusive CPUs to each of container in the pod according to their CPU requests.

apiVersion: v1
kind: Pod
metadata:
  name: exclusive-2
spec:
  containers:
  - image: quay.io/connordoyle/cpuset-visualizer
    name: exclusive-2
    resources:
      # Pod is in the Guaranteed QoS class because requests == limits
      requests:
        # CPU request is an integer
        cpu: 2
        memory: "256M"
      limits:
        cpu: 2
        memory: "256M"

Pod specification requesting two exclusive CPUs.

Hmm … How Does the CPU Manager Work?

For Kubernetes, and the purposes of this blog post, we will discuss three kinds of CPU resource controls available in most Linux distributions. The first two are CFS shares (what’s my weighted fair share of CPU time on this system) and CFS quota (what’s my hard cap of CPU time over a period). The CPU manager uses a third control called CPU affinity (on what logical CPUs am I allowed to execute).

By default, all the pods and the containers running on a compute node of your Kubernetes cluster can execute on any available cores in the system. The total amount of allocatable shares and quota are limited by the CPU resources explicitly reserved for kubernetes and system daemons. However, limits on the CPU time being used can be specified using CPU limits in the pod spec. Kubernetes uses CFS quota to enforce CPU limits on pod containers.

When CPU manager is enabled with the “static” policy, it manages a shared pool of CPUs. Initially this shared pool contains all the CPUs in the compute node. When a container with integer CPU request in a Guaranteed pod is created by the Kubelet, CPUs for that container are removed from the shared pool and assigned exclusively for the lifetime of the container. Other containers are migrated off these exclusively allocated CPUs.

All non-exclusive-CPU containers (Burstable, BestEffort and Guaranteed with non-integer CPU) run on the CPUs remaining in the shared pool. When a container with exclusive CPUs terminates, its CPUs are added back to the shared CPU pool.

More Details Please …

cpu manager

The figure above shows the anatomy of the CPU manager. The CPU Manager uses the Container Runtime Interface’s UpdateContainerResources method to modify the CPUs on which containers can run. The Manager periodically reconciles the current State of the CPU resources of each running container with cgroupfs.

The CPU Manager uses Policies to decide the allocation of CPUs. There are two policies implemented: None and Static. By default, the CPU manager is enabled with the None policy from Kubernetes version 1.10.

The Static policy allocates exclusive CPUs to pod containers in the Guaranteed QoS class which request integer CPUs. On a best-effort basis, the Static policy tries to allocate CPUs topologically in the following order:

  1. Allocate all the CPUs in the same processor socket if available and the container requests at least an entire socket worth of CPUs.
  2. Allocate all the logical CPUs (hyperthreads) from the same physical CPU core if available and the container requests an entire core worth of CPUs.
  3. Allocate any available logical CPU, preferring to acquire CPUs from the same socket.

How is Performance Isolation Improved by CPU Manager?

With CPU manager static policy enabled, the workloads might perform better due to one of the following reasons:

  1. Exclusive CPUs can be allocated for the workload container but not the other containers. These containers do not share the CPU resources. As a result, we expect better performance due to isolation when an aggressor or a co-located workload is involved.
  2. There is a reduction in interference between the resources used by the workload since we can partition the CPUs among workloads. These resources might also include the cache hierarchies and memory bandwidth and not just the CPUs. This helps improve the performance of workloads in general.
  3. CPU Manager allocates CPUs in a topological order on a best-effort basis. If a whole socket is free, the CPU Manager will exclusively allocate the CPUs from the free socket to the workload. This boosts the performance of the workload by avoiding any cross-socket traffic.
  4. Containers in Guaranteed QoS pods are subject to CFS quota. Very bursty workloads may get scheduled, burn through their quota before the end of the period, and get throttled. During this time, there may or may not be meaningful work to do with those CPUs. Because of how the resource math lines up between CPU quota and number of exclusive CPUs allocated by the static policy, these containers are not subject to CFS throttling (quota is equal to the maximum possible cpu-time over the quota period).

Ok! Ok! Do You Have Any Results?

Glad you asked! To understand the performance improvement and isolation provided by enabling the CPU Manager feature in the Kubelet, we ran experiments on a dual-socket compute node (Intel Xeon CPU E5-2680 v3) with hyperthreading enabled. The node consists of 48 logical CPUs (24 physical cores each with 2-way hyperthreading). Here we demonstrate the performance benefits and isolation provided by the CPU Manager feature using benchmarks and real-world workloads for three different scenarios.

How Do I Interpret the Plots?

For each scenario, we show box plots that illustrates the normalized execution time and its variability of running a benchmark or real-world workload with and without CPU Manager enabled. The execution time of the runs are normalized to the best-performing run (1.00 on y-axis represents the best performing run and lower is better). The height of the box plot shows the variation in performance. For example if the box plot is a line, then there is no variation in performance across runs. In the box, middle line is the median, upper line is 75th percentile and lower line is 25th percentile. The height of the box (i.e., difference between 75th and 25th percentile) is defined as the interquartile range (IQR). Whiskers shows data outside that range and the points show outliers. The outliers are defined as any data 1.5x IQR below or above the lower or upper quartile respectively. Every experiment is run ten times.

Protection from Aggressor Workloads

We ran six benchmarks from the PARSEC benchmark suite (the victim workloads) co-located with a CPU stress container (the aggressor workload) with and without the CPU Manager feature enabled. The CPU stress container is run as a pod in the Burstable QoS class requesting 23 CPUs with --cpus 48 flag. The benchmarks are run as pods in the Guaranteed QoS class requesting a full socket worth of CPUs (24 CPUs on this system). The figure below plots the normalized execution time of running a benchmark pod co-located with the stress pod, with and without the CPU Manager static policy enabled. We see improved performance and reduced performance variability when static policy is enabled for all test cases.

execution time

Performance Isolation for Co-located Workloads

In this section, we demonstrate how CPU manager can be beneficial to multiple workloads in a co-located workload scenario. In the box plots below we show the performance of two benchmarks (Blackscholes and Canneal) from the PARSEC benchmark suite run in the Guaranteed (Gu) and Burstable (Bu) QoS classes co-located with each other, with and without the CPU manager static policy enabled.

Starting from the top left and proceeding clockwise, we show the performance of Blackscholes in the Bu QoS class (top left), Canneal in the Bu QoS class (top right), Canneal in Gu QoS class (bottom right) and Blackscholes in the Gu QoS class (bottom left, respectively. In each case, they are co-located with Canneal in the Gu QoS class (top left), Blackscholes in the Gu QoS class (top right), Blackscholes in the Bu QoS class (bottom right) and Canneal in the Bu QoS class (bottom left) going clockwise from top left, respectively. For example, Bu-blackscholes-Gu-canneal plot (top left) is showing the performance of Blackscholes running in the Bu QoS class when co-located with Canneal running in the Gu QoS class. In each case, the pod in Gu QoS class requests cores worth a whole socket (i.e., 24 CPUs) and the pod in Bu QoS class request 23 CPUs.

There is better performance and less performance variation for both the co-located workloads in all the tests. For example, consider the case of Bu-blackscholes-Gu-canneal (top left) and Gu-canneal-Bu-blackscholes (bottom right). They show the performance of Blackscholes and Canneal run simultaneously with and without the CPU manager enabled. In this particular case, Canneal gets exclusive cores due to CPU manager since it is in the Gu QoS class and requesting integer number of CPU cores. But Blackscholes also gets exclusive set of CPUs as it is the only workload in the shared pool. As a result, both Blackscholes and Canneal get some performance isolation benefits due to the CPU manager.

performance comparison

Performance Isolation for Stand-Alone Workloads

This section shows the performance improvement and isolation provided by the CPU manager for stand-alone real-world workloads. We use two workloads from the TensorFlow official models: wide and deep and ResNet. We use the census and CIFAR10 dataset for the wide and deep and ResNet models respectively. In each case the pods (wide and deep, ResNet request 24 CPUs which corresponds to a whole socket worth of cores. As shown in the plots, CPU manager enables better performance isolation in both cases.

performance comparison

Limitations

Users might want to get CPUs allocated on the socket near to the bus which connects to an external device, such as an accelerator or high-performance network card, in order to avoid cross-socket traffic. This type of alignment is not yet supported by CPU manager. Since the CPU manager provides a best-effort allocation of CPUs belonging to a socket and physical core, it is susceptible to corner cases and might lead to fragmentation. The CPU manager does not take the isolcpus Linux kernel boot parameter into account, although this is reportedly common practice for some low-jitter use cases.

Acknowledgements

We thank the members of the community who have contributed to this feature or given feedback including members of WG-Resource-Management and SIG-Node. cmx.io (for the fun drawing tool).

Notices and Disclaimers

Software and workloads used in performance tests may have been optimized for performance only on Intel microprocessors. Performance tests, such as SYSmark and MobileMark, are measured using specific computer systems, components, software, operations and functions. Any change to any of those factors may cause the results to vary. You should consult other information and performance tests to assist you in fully evaluating your contemplated purchases, including the performance of that product when combined with other products. For more information go to www.intel.com/benchmarks.

Intel technologies’ features and benefits depend on system configuration and may require enabled hardware, software or service activation. Performance varies depending on system configuration. No computer system can be absolutely secure. Check with your system manufacturer or retailer or learn more at intel.com.

Workload Configuration:https://gist.github.com/balajismaniam/fac7923f6ee44f1f36969c29354e3902https://gist.github.com/balajismaniam/7c2d57b2f526a56bb79cf870c122a34chttps://gist.github.com/balajismaniam/941db0d0ec14e2bc93b7dfe04d1f6c58https://gist.github.com/balajismaniam/a1919010fe9081ca37a6e1e7b01f02e3https://gist.github.com/balajismaniam/9953b54dd240ecf085b35ab1bc283f3c

System Configuration: CPU Architecture: x86_64 CPU op-mode(s): 32-bit, 64-bit Byte Order: Little Endian CPU(s): 48 On-line CPU(s) list: 0-47 Thread(s) per core: 2 Core(s) per socket: 12 Socket(s): 2 NUMA node(s): 2 Vendor ID: GenuineIntel Model name: Intel® Xeon® CPU E5-2680 v3 Memory 256 GB OS/Kernel Linux 3.10.0-693.21.1.el7.x86_64

Intel, the Intel logo, Xeon are trademarks of Intel Corporation or its subsidiaries in the U.S. and/or other countries.
*Other names and brands may be claimed as the property of others. © Intel Corporation.

Blog: KubeVirt: Extending Kubernetes with CRDs for Virtualized Workloads

$
0
0

Author: David Vossel (Red Hat)

What is KubeVirt?

KubeVirt is a Kubernetes addon that provides users the ability to schedule traditional virtual machine workloads side by side with container workloads. Through the use of Custom Resource Definitions (CRDs) and other Kubernetes features, KubeVirt seamlessly extends existing Kubernetes clusters to provide a set of virtualization APIs that can be used to manage virtual machines.

Why Use CRDs Over an Aggregated API Server?

Back in the middle of 2017, those of us working on KubeVirt were at a crossroads. We had to make a decision whether or not to extend Kubernetes using an aggregated API server or to make use of the new Custom Resource Definitions (CRDs) feature.

At the time, CRDs lacked much of the functionality we needed to deliver our feature set. The ability to create our own aggregated API server gave us all the flexibility we needed, but it had one major flaw. An aggregated API server significantly increased the complexity involved with installing and operating KubeVirt.

The crux of the issue for us was that aggregated API servers required access to etcd for object persistence. This meant that cluster admins would have to either accept that KubeVirt needs a separate etcd deployment which increases complexity, or provide KubeVirt with shared access to the Kubernetes etcd store which introduces risk.

We weren’t okay with this tradeoff. Our goal wasn’t to just extend Kubernetes to run virtualization workloads, it was to do it in the most seamless and effortless way possible. We felt that the added complexity involved with an aggregated API server sacrificed the part of the user experience involved with installing and operating KubeVirt.

Ultimately we chose to go with CRDs and trust that the Kubernetes ecosystem would grow with us to meet the needs of our use case. Our bets were well placed. At this point there are either solutions in place or solutions under discussion that solve every feature gap we encountered back in 2017 when were evaluating CRDs vs an aggregated API server.

Building Layered “Kubernetes like” APIs with CRDs

We designed KubeVirt’s API to follow the same patterns users are already familiar with in the Kubernetes core API.

For example, in Kubernetes the lowest level unit that users create to perform work is a Pod. Yes, Pods do have multiple containers but logically the Pod is the unit at the bottom of the stack. A Pod represents a mortal workload. The Pod gets scheduled, eventually the Pod’s workload terminates, and that’s the end of the Pod’s lifecycle.

Workload controllers such as the ReplicaSet and StatefulSet are layered on top of the Pod abstraction to help manage scale out and stateful applications. From there we have an even higher level controller called a Deployment which is layered on top of ReplicaSets help manage things like rolling updates.

In KubeVirt, this concept of layering controllers is at the very center of our design. The KubeVirt VirtualMachineInstance (VMI) object is the lowest level unit at the very bottom of the KubeVirt stack. Similar in concept to a Pod, a VMI represents a single mortal virtualized workload that executes once until completion (powered off).

Layered on top of VMIs we have a workload controller called a VirtualMachine (VM). The VM controller is where we really begin to see the differences between how users manage virtualized workloads vs containerized workloads. Within the context of existing Kubernetes functionality, the best way to describe the VM controller’s behavior is to compare it to a StatefulSet of size one. This is because the VM controller represents a single stateful (immortal) virtual machine capable of persisting state across both node failures and multiple restarts of its underlying VMI. This object behaves in the way that is familiar to users who have managed virtual machines in AWS, GCE, OpenStack or any other similar IaaS cloud platform. The user can shutdown a VM, then choose to start that exact same VM up again at a later time.

In addition to VMs, we also have a VirtualMachineInstanceReplicaSet (VMIRS) workload controller which manages scale out of identical VMI objects. This controller behaves nearly identically to the Kubernetes ReplicSet controller. The primary difference being that the VMIRS manages VMI objects and the ReplicaSet manages Pods. Wouldn’t it be nice if we could come up with a way to use the Kubernetes ReplicaSet controller to scale out CRDs?

Each one of these KubeVirt objects (VMI, VM, VMIRS) are registered with Kubernetes as a CRD when the KubeVirt install manifest is posted to the cluster. By registering our APIs as CRDs with Kubernetes, all the tooling involved with managing Kubernetes clusters (like kubectl) have access to the KubeVirt APIs just as if they are native Kubernetes objects.

Dynamic Webhooks for API Validation

One of the responsibilities of the Kubernetes API server is to intercept and validate requests prior to allowing objects to be persisted into etcd. For example, if someone tries to create a Pod using a malformed Pod specification, the Kubernetes API server immediately catches the error and rejects the POST request. This all occurs before the object is persistent into etcd preventing the malformed Pod specification from making its way into the cluster.

This validation occurs during a process called admission control. Until recently, it was not possible to extend the default Kubernetes admission controllers without altering code and compiling/deploying an entirely new Kubernetes API server. This meant that if we wanted to perform admission control on KubeVirt’s CRD objects while they are posted to the cluster, we’d have to build our own version of the Kubernetes API server and convince our users to use that instead. That was not a viable solution for us.

Using the new Dynamic Admission Control feature that first landed in Kubernetes 1.9, we now have a path for performing custom validation on KubeVirt API through the use of a ValidatingAdmissionWebhook. This feature allows KubeVirt to dynamically register an HTTPS webhook with Kubernetes at KubeVirt install time. After registering the custom webhook, all requests related to KubeVirt API objects are forwarded from the Kubernetes API server to our HTTPS endpoint for validation. If our endpoint rejects a request for any reason, the object will not be persisted into etcd and the client receives our response outlining the reason for the rejection.

For example, if someone posts a malformed VirtualMachine object, they’ll receive an error indicating what the problem is.

$ kubectl create -f my-vm.yaml 
Error from server: error when creating "my-vm.yaml": admission webhook "virtualmachine-validator.kubevirt.io" denied the request: spec.template.spec.domain.devices.disks[0].volumeName 'registryvolume' not found.

In the example output above, that error response is coming directly from KubeVirt’s admission control webhook.

CRD OpenAPIv3 Validation

In addition to the validating webhook, KubeVirt also uses the ability to provide an OpenAPIv3 validation schema when registering a CRD with the cluster. While the OpenAPIv3 schema does not let us express some of the more advanced validation checks that the validation webhook provides, it does offer the ability to enforce simple validation checks involving things like required fields, max/min value lengths, and verifying that values are formatted in a way that matches a regular expression string.

Dynamic Webhooks for “PodPreset Like” Behavior

The Kubernetes Dynamic Admission Control feature is not only limited to validation logic, it also provides the ability for applications like KubeVirt to both intercept and mutate requests as they enter the cluster. This is achieved through the use of a MutatingAdmissionWebhook object. In KubeVirt, we are looking to use a mutating webhook to support our VirtualMachinePreset (VMPreset) feature.

A VMPreset acts in a similar way to a PodPreset. Just like a PodPreset allows users to define values that should automatically be injected into pods at creation time, a VMPreset allows users to define values that should be injected into VMs at creation time. Through the use of a mutating webhook, KubeVirt can intercept a request to create a VM, apply VMPresets to the VM spec, and then validate that the resulting VM object. This all occurs before the VM object is persisted into etcd which allows KubeVirt to immediately notify the user of any conflicts at the time the request is made.

Subresources for CRDs

When comparing the use of CRDs to an aggregated API server, one of the features CRDs lack is the ability to support subresources. Subresources are used to provide additional resource functionality. For example, the pod/logs and pod/exec subresource endpoints are used behind the scenes to provide the kubectl logs and kubectl exec command functionality.

Just like Kubernetes uses the pod/exec subresource to provide access to a pod’s environment, in KubeVirt we want subresources to provide serial-console, VNC, and SPICE access to a virtual machine. By adding virtual machine guest access through subresources, we can leverage RBAC to provide access control for these features.

So, given that the KubeVirt team decided to use CRD’s instead of an aggregated API server for custom resource support, how can we have subresources for CRDs when the CRD feature expiclity does not support subresources?

We created a workaround for this limitation by implementing a stateless aggregated API server that exists only to serve subresource requests. With no state, we don’t have to worry about any of the issues we identified earlier with regards to access to etcd. This means the KubeVirt API is actually supported through a combination of both CRDs for resources and an aggregated API server for stateless subresources.

This isn’t a perfect solution for us. Both aggregated API servers and CRDs require us to register an API GroupName with Kubernetes. This API GroupName field essentially namespaces the API’s REST path in a way that prevents API naming conflicts between other third party applications. Because CRDs and aggregated API servers can’t share the same GroupName, we have to register two separate GroupNames. One is used by our CRDs and the other is used by the aggregated API server for subresource requests.

Having two GroupNames in our API is slightly inconvenient because it means the REST path for the endpoints that serve the KubeVirt subresource requests have a slightly different base path than the resources.

For example, the endpoint to create a VMI object is as follows.

/apis/kubevirt.io/v1alpha2/namespaces/my-namespace/virtualmachineinstances/my-vm

However, the subresource endpoint to access graphical VNC looks like this.

/apis/subresources.kubevirt.io/v1alpha2/namespaces/my-namespace/virtualmachineinstances/my-vm/vnc

Notice that the first request uses kubevirt.io and the second request uses subresource.kubevirt.io. We don’t like that, but that’s how we’ve managed to combine CRDs with a stateless aggregated API server for subresources.

One thing worth noting is that in Kubernetes 1.10 a very basic form of CRD subresource support was added in the form of the /status and /scale subresources. This support does not help us deliver the virtualization features we want subresources for. However, there have been discussions about exposing custom CRD subresources as webhooks in a future Kubernetes version. If this functionality lands, we will gladly transition away from our stateless aggregated API server workaround to use a subresource webhook feature.

CRD Finalizers

A CRD finalizer is a feature that lets us provide a pre-delete hook in order to perform actions before allowing a CRD object to be removed from persistent storage. In KubeVirt, we use finalizers to guarantee a virtual machine has completely terminated before we allow the corresponding VMI object to be removed from etcd.

API Versioning for CRDs

The Kubernetes core APIs have the ability to support multiple versions for a single object type and perform conversions between those versions. This gives the Kubernetes core APIs a path for advancing the v1alpha1 version of an object to a v1beta1 version and so forth.

Prior to Kubernetes 1.11, CRDs did not not have support for multiple versions. This meant when we wanted to progress a CRD from kubevirt.io/v1alpha1 to kubevirt.io/v1beta1, the only path available to was to backup our CRD objects, delete the registered CRD from Kubernetes, register a new CRD with the updated version, convert the backed up CRD objects to the new version, and finally post the migrated CRD objects back to the cluster.

That strategy was not exactly a viable option for us.

Fortunately thanks to some recent work to rectify this issue in Kubernetes, the latest Kubernetes v1.11 now supports CRDs with multiple versions. Note however that this initial multi version support is limited. While a CRD can now have multiple versions, the feature does not currently contain a path for performing conversions between versions. In KubeVirt, the lack of conversion makes it difficult us to evolve our API as we progress versions. Luckily, support for conversions between versions is underway and we look forward to taking advantage of that feature once it lands in a future Kubernetes release.

Blog: Dynamically Expand Volume with CSI and Kubernetes

$
0
0

Author: Orain Xiong (Co-Founder, WoquTech)

There is a very powerful storage subsystem within Kubernetes itself, covering a fairly broad spectrum of use cases. Whereas, when planning to build a product-grade relational database platform with Kubernetes, we face a big challenge: coming up with storage. This article describes how to extend latest Container Storage Interface 0.2.0 and integrate with Kubernetes, and demonstrates the essential facet of dynamically expanding volume capacity.

Introduction

As we focalize our customers, especially in financial space, there is a huge upswell in the adoption of container orchestration technology.

They are looking forward to open source solutions to redesign already existing monolithic applications, which have been running for several years on virtualization infrastructure or bare metal.

Considering extensibility and the extent of technical maturity, Kubernetes and Docker are at the very top of the list. But migrating monolithic applications to a distributed orchestration like Kubernetes is challenging, the relational database is critical for the migration.

With respect to the relational database, we should pay attention to storage. There is a very powerful storage subsystem within Kubernetes itself. It is very useful and covers a fairly broad spectrum of use cases. When planning to run a relational database with Kubernetes in production, we face a big challenge: coming up with storage. There are still some fundamental functionalities which are left unimplemented. Specifically, dynamically expanding volume. It sounds boring but is highly required, except for actions like create and delete and mount and unmount.

Currently, expanding volume is only available with those storage provisioners:

  • gcePersistentDisk
  • awsElasticBlockStore
  • OpenStack Cinder
  • glusterfs
  • rbd

In order to enable this feature, we should set feature gate ExpandPersistentVolumes true and turn on the PersistentVolumeClaimResize admission plugin. Once PersistentVolumeClaimResize has been enabled, resizing will be allowed by a Storage Class whose allowVolumeExpansion field is set to true.

Unfortunately, dynamically expanding volume through the Container Storage Interface (CSI) and Kubernetes is unavailable, even though the underlying storage providers have this feature.

This article will give a simplified view of CSI, followed by a walkthrough of how to introduce a new expanding volume feature on the existing CSI and Kubernetes. Finally, the article will demonstrate how to dynamically expand volume capacity.

Container Storage Interface (CSI)

To have a better understanding of what we’re going to do, the first thing we need to know is what the Container Storage Interface is. Currently, there are still some problems for already existing storage subsystem within Kubernetes. Storage driver code is maintained in the Kubernetes core repository which is difficult to test. But beyond that, Kubernetes needs to give permissions to storage vendors to check code into the Kubernetes core repository. Ideally, that should be implemented externally.

CSI is designed to define an industry standard that will enable storage providers who enable CSI to be available across container orchestration systems that support CSI.

This diagram depicts a kind of high-level Kubernetes archetypes integrated with CSI:

csi diagram

  • Three new external components are introduced to decouple Kubernetes and Storage Provider logic
  • Blue arrows present the conventional way to call against API Server
  • Red arrows present gRPC to call against Volume Driver

For more details, please visit: https://github.com/container-storage-interface/spec/blob/master/spec.md

Extend CSI and Kubernetes

In order to enable the feature of expanding volume atop Kubernetes, we should extend several components including CSI specification, “in-tree” volume plugin, external-provisioner and external-attacher.

Extend CSI spec

The feature of expanding volume is still undefined in latest CSI 0.2.0. The new 3 RPCs, including RequiresFSResize and ControllerResizeVolume and NodeResizeVolume, should be introduced.

service Controller {
 rpc CreateVolume (CreateVolumeRequest)
   returns (CreateVolumeResponse) {}
……
 rpc RequiresFSResize (RequiresFSResizeRequest)
   returns (RequiresFSResizeResponse) {}
 rpc ControllerResizeVolume (ControllerResizeVolumeRequest)
   returns (ControllerResizeVolumeResponse) {}
}

service Node {
 rpc NodeStageVolume (NodeStageVolumeRequest)
   returns (NodeStageVolumeResponse) {}
……
 rpc NodeResizeVolume (NodeResizeVolumeRequest)
   returns (NodeResizeVolumeResponse) {}
}

Extend “In-Tree” Volume Plugin

In addition to the extend CSI specification, the csiPlugin interface within Kubernetes should also implement expandablePlugin. The csiPlugin interface will expand PersistentVolumeClaim representing for ExpanderController.

type ExpandableVolumePlugin interface {
VolumePlugin
ExpandVolumeDevice(spec Spec, newSize resource.Quantity, oldSize resource.Quantity) (resource.Quantity, error)
RequiresFSResize() bool
}

Implement Volume Driver

Finally, to abstract complexity of the implementation, we should hard code the separate storage provider management logic into the following functions which is well-defined in the CSI specification:

  • CreateVolume
  • DeleteVolume
  • ControllerPublishVolume
  • ControllerUnpublishVolume
  • ValidateVolumeCapabilities
  • ListVolumes
  • GetCapacity
  • ControllerGetCapabilities
  • RequiresFSResize
  • ControllerResizeVolume

Demonstration

Let’s demonstrate this feature with a concrete user case.

  • Create storage class for CSI storage provisioner
allowVolumeExpansion:trueapiVersion:storage.k8s.io/v1kind:StorageClassmetadata:name:csi-qcfsparameters:csiProvisionerSecretName:orain-testcsiProvisionerSecretNamespace:defaultprovisioner:csi-qcfspluginreclaimPolicy:DeletevolumeBindingMode:Immediate
  • Deploy CSI Volume Driver including storage provisioner csi-qcfsplugin across Kubernetes cluster

  • Create PVC qcfs-pvc which will be dynamically provisioned by storage class csi-qcfs

apiVersion:v1kind:PersistentVolumeClaimmetadata:name:qcfs-pvcnamespace:default....spec:accessModes:-ReadWriteOnceresources:requests:storage:300GistorageClassName:csi-qcfs
  • Create MySQL 5.7 instance to use PVC qcfs-pvc
  • In order to mirror the exact same production-level scenario, there are actually two different types of workloads including:
    • Batch insert to make MySQL consuming more file system capacity
    • Surge query request
  • Dynamically expand volume capacity through edit pvc qcfs-pvc configuration

The Prometheus and Grafana integration allows us to visualize corresponding critical metrics.

prometheus grafana

We notice that the middle reading shows MySQL datafile size increasing slowly during bulk inserting. At the same time, the bottom reading shows file system expanding twice in about 20 minutes, from 300 GiB to 400 GiB and then 500 GiB. Meanwhile, the upper reading shows the whole process of expanding volume immediately completes and hardly impacts MySQL QPS.

Conclusion

Regardless of whatever infrastructure applications have been running on, the database is always a critical resource. It is essential to have a more advanced storage subsystem out there to fully support database requirements. This will help drive the more broad adoption of cloud native technology.

Blog: Out of the Clouds onto the Ground: How to Make Kubernetes Production Grade Anywhere

$
0
0

Authors: Steven Wong (VMware), Michael Gasch (VMware)

This blog offers some guidelines for running a production grade Kubernetes cluster in an environment like an on-premise data center or edge location.

What does it mean to be “production grade”?

  • The installation is secure
  • The deployment is managed with a repeatable and recorded process
  • Performance is predictable and consistent
  • Updates and configuration changes can be safely applied
  • Logging and monitoring is in place to detect and diagnose failures and resource shortages
  • Service is “highly available enough” considering available resources, including constraints on money, physical space, power, etc.
  • A recovery process is available, documented, and tested for use in the event of failures

In short, production grade means anticipating accidents and preparing for recovery with minimal pain and delay.

This article is directed at on-premise Kubernetes deployments on a hypervisor or bare-metal platform, facing finite backing resources compared to the expansibility of the major public clouds. However, some of these recommendations may also be useful in a public cloud if budget constraints limit the resources you choose to consume.

A single node bare-metal Minikube deployment may be cheap and easy, but is not production grade. Conversely, you’re not likely to achieve Google’s Borg experience in a retail store, branch office, or edge location, nor are you likely to need it.

This blog offers some guidance on achieving a production worthy Kubernetes deployment, even when dealing with some resource constraints.

without incidence

Critical components in a Kubernetes cluster

Before we dive into the details, it is critical to understand the overall Kubernetes architecture.

A Kubernetes cluster is a highly distributed system based on a control plane and clustered worker node architecture as depicted below.

api server

Typically the API server, Controller Manager and Scheduler components are co-located within multiple instances of control plane (aka Master) nodes. Master nodes usually include etcd too, although there are high availability and large cluster scenarios that call for running etcd on independent hosts. The components can be run as containers, and optionally be supervised by Kubernetes, i.e. running as statics pods.

For high availability, redundant instances of these components are used. The importance and required degree of redundancy varies.

Kubernetes components from an HA perspective

kubernetes components HA

Risks to these components include hardware failures, software bugs, bad updates, human errors, network outages, and overloaded systems resulting in resource exhaustion. Redundancy can mitigate the impact of many of these hazards. In addition, the resource scheduling and high availability features of a hypervisor platform can be useful to surpass what can be achieved using the Linux operating system, Kubernetes, and a container runtime alone.

The API Server uses multiple instances behind a load balancer to achieve scale and availability. The load balancer is a critical component for purposes of high availability. Multiple DNS API Server ‘A’ records might be an alternative if you don’t have a load balancer.

The kube-scheduler and kube-controller-manager engage in a leader election process, rather than utilizing a load balancer. Since a cloud-controller-manager is used for selected types of hosting infrastructure, and these have implementation variations, they will not be discussed, beyond indicating that they are a control plane component.

Pods running on Kubernetes worker nodes are managed by the kubelet agent. Each worker instance runs the kubelet agent and a CRI-compatible container runtime. Kubernetes itself is designed to monitor and recover from worker node outages. But for critical workloads, hypervisor resource management, workload isolation and availability features can be used to enhance availability and make performance more predictable.

etcd

etcd is the persistent store for all Kubernetes objects. The availability and recoverability of the etcd cluster should be the first consideration in a production-grade Kubernetes deployment.

A five-node etcd cluster is a best practice if you can afford it. Why? Because you could engage in maintenance on one and still tolerate a failure. A three-node cluster is the minimum recommendation for production-grade service, even if only a single hypervisor host is available. More than seven nodes is not recommended except for very large installations straddling multiple availability zones.

The minimum recommendation for hosting an etcd cluster node is 2GB of RAM with 8GB of SSD-backed disk. Usually, 8GB RAM and a 20GB disk will be enough. Disk performance affects failed node recovery time. See https://coreos.com/etcd/docs/latest/op-guide/hardware.html for more on this.

Consider multiple etcd clusters in special situations

For very large Kubernetes clusters, consider using a separate etcd cluster for Kubernetes events so that event storms do not impact the main Kubernetes API service. If you use flannel networking, it retains configuration in etcd and may have differing version requirements than Kubernetes, which can complicate etcd backup – consider using a dedicated etcd cluster for flannel.

Single host deployments

The availability risk list includes hardware, software and people. If you are limited to a single host, the use of redundant storage, error-correcting memory and dual power supplies can reduce hardware failure exposure. Running a hypervisor on the physical host will allow operation of redundant software components and add operational advantages related to deployment, upgrade, and resource consumption governance, with predictable and repeatable performance under stress. For example, even if you can only afford to run singletons of the master services, they need to be protected from overload and resource exhaustion while competing with your application workload. A hypervisor can be more effective and easier to manage than configuring Linux scheduler priorities, cgroups, Kubernetes flags, etc.

If resources on the host permit, you can deploy three etcd VMs. Each of the etcd VMs should be backed by a different physical storage device, or they should use separate partitions of a backing store using redundancy (mirroring, RAID, etc).

Dual redundant instances of the API server, scheduler and controller manager would be the next upgrade, if your single host has the resources.

Single host deployment options, least production worthy to better

single host deployment

Dual host deployments

With two hosts, storage concerns for etcd are the same as a single host, you want redundancy. And you would preferably run 3 etcd instances. Although possibly counter-intuitive, it is better to concentrate all etcd nodes on a single host. You do not gain reliability by doing a 2+1 split across two hosts - because loss of the node holding the majority of etcd instances results in an outage, whether that majority is 2 or 3. If the hosts are not identical, put the whole etcd cluster on the most reliable host.

Running redundant API Servers, kube-schedulers, and kube-controller-managers is recommended. These should be split across hosts to minimize risk due to container runtime, OS and hardware failures.

Running a hypervisor layer on the physical hosts will allow operation of redundant software components with resource consumption governance, and can have planned maintenance operational advantages.

Dual host deployment options, least production worthy to better

dual host deployment

Triple (or larger) host deployments – Moving into uncompromised production-grade service Splitting etcd across three hosts is recommended. A single hardware failure will reduce application workload capacity, but should not result in a complete service outage.

With very large clusters, more etcd instances will be required.

Running a hypervisor layer offers operational advantages and better workload isolation. It is beyond the scope of this article, but at the three-or-more host level, advanced features may be available (clustered redundant shared storage, resource governance with dynamic load balancing, automated health monitoring with live migration or failover).

Triple (or more) host options, least production worthy to better

triple host deployment

Kubernetes configuration settings

Master and Worker nodes should be protected from overload and resource exhaustion. Hypervisor features can be used to isolate critical components and reserve resources. There are also Kubernetes configuration settings that can throttle things like API call rates and pods per node. Some install suites and commercial distributions take care of this, but if you are performing a custom Kubernetes deployment, you may find that the defaults are not appropriate, particularly if your resources are small or your cluster is large.

Resource consumption by the control plane will correlate with the number of pods and the pod churn rate. Very large and very small clusters will benefit from non-default settings of kube-apiserver request throttling and memory. Having these too high can lead to request limit exceeded and out of memory errors.

On worker nodes, Node Allocatable should be configured based on a reasonable supportable workload density at each node. Namespaces can be created to subdivide the worker node cluster into multiple virtual clusters with resource CPU and memory quotas. Kubelet handling of out of resource conditions can be configured.

Security

Every Kubernetes cluster has a cluster root Certificate Authority (CA). The Controller Manager, API Server, Scheduler, kubelet client, kube-proxy and administrator certificates need to be generated and installed. If you use an install tool or a distribution this may be handled for you. A manual process is described here. You should be prepared to reinstall certificates in the event of node replacements or expansions.

As Kubernetes is entirely API driven, controlling and limiting who can access the cluster and what actions they are allowed to perform is essential. Encryption and authentication options are addressed in this documentation.

Kubernetes application workloads are based on container images. You want the source and content of these images to be trustworthy. This will almost always mean that you will host a local container image repository. Pulling images from the public Internet can present both reliability and security issues. You should choose a repository that supports image signing, security scanning, access controls on pushing and pulling images, and logging of activity.

Processes must be in place to support applying updates for host firmware, hypervisor, OS, Kubernetes, and other dependencies. Version monitoring should be in place to support audits.

Recommendations:

  • Tighten security settings on the control plane components beyond defaults (e.g., locking down worker nodes)
  • Utilize Pod Security Policies
  • Consider the NetworkPolicy integration available with your networking solution, including how you will accomplish tracing, monitoring and troubleshooting.
  • Use RBAC to drive authorization decisions and enforcement.
  • Consider physical security, especially when deploying to edge or remote office locations that may be unattended. Include storage encryption to limit exposure from stolen devices and protection from attachment of malicious devices like USB keys.
  • Protect Kubernetes plain-text cloud provider credentials (access keys, tokens, passwords, etc.)

Kubernetes secret objects are appropriate for holding small amounts of sensitive data. These are retained within etcd. These can be readily used to hold credentials for the Kubernetes API but there are times when a workload or an extension of the cluster itself needs a more full-featured solution. The HashiCorp Vault project is a popular solution if you need more than the built-in secret objects can provide.

Disaster Recovery and Backup

disaster recovery

Utilizing redundancy through the use of multiple hosts and VMs helps reduce some classes of outages, but scenarios such as a sitewide natural disaster, a bad update, getting hacked, software bugs, or human error could still result in an outage.

A critical part of a production deployment is anticipating a possible future recovery.

It’s also worth noting that some of your investments in designing, documenting, and automating a recovery process might also be re-usable if you need to do large-scale replicated deployments at multiple sites.

Elements of a DR plan include backups (and possibly replicas), replacements, a planned process, people who can carry out the process, and recurring training. Regular test exercises and chaos engineering principles can be used to audit your readiness.

Your availability requirements might demand that you retain local copies of the OS, Kubernetes components, and container images to allow recovery even during an Internet outage. The ability to deploy replacement hosts and nodes in an “air-gapped” scenario can also offer security and speed of deployment advantages.

All Kubernetes objects are stored on etcd. Periodically backing up the etcd cluster data is important to recover Kubernetes clusters under disaster scenarios, such as losing all master nodes.

Backing up an etcd cluster can be accomplished with etcd’s built-in snapshot mechanism, and copying the resulting file to storage in a different failure domain. The snapshot file contains all the Kubernetes states and critical information. In order to keep the sensitive Kubernetes data safe, encrypt the snapshot files.

Using disk volume based snapshot recovery of etcd can have issues; see #40027. API-based backup solutions (e.g., Ark) can offer more granular recovery than a etcd snapshot, but also can be slower. You could utilize both snapshot and API-based backups, but you should do one form of etcd backup as a minimum.

Be aware that some Kubernetes extensions may maintain state in independent etcd clusters, on persistent volumes, or through other mechanisms. If this state is critical, it should have a backup and recovery plan.

Some critical state is held outside etcd. Certificates, container images, and other configuration- and operation-related state may be managed by your automated install/update tooling. Even if these items can be regenerated, backup or replication might allow for faster recovery after a failure. Consider backups with a recovery plan for these items:

  • Certificate and key pairs
    • CA
    • API Server
    • Apiserver-kubelet-client
    • ServiceAccount signing
    • “Front proxy”
    • Front proxy client
  • Critical DNS records
  • IP/subnet assignments and reservations
  • External load-balancers
  • kubeconfig files
  • LDAP or other authentication details
  • Cloud provider specific account and configuration data

Considerations for your production workloads

Anti-affinity specifications can be used to split clustered services across backing hosts, but at this time the settings are used only when the pod is scheduled. This means that Kubernetes can restart a failed node of your clustered application, but does not have a native mechanism to rebalance after a fail back. This is a topic worthy of a separate blog, but supplemental logic might be useful to achieve optimal workload placements after host or worker node recoveries or expansions. The Pod Priority and Preemption feature can be used to specify a preferred triage in the event of resource shortages caused by failures or bursting workloads.

For stateful services, external attached volume mounts are the standard Kubernetes recommendation for a non-clustered service (e.g., a typical SQL database). At this time Kubernetes managed snapshots of these external volumes is in the category of a roadmap feature request, likely to align with the Container Storage Interface (CSI) integration. Thus performing backups of such a service would involve application specific, in-pod activity that is beyond the scope of this document. While awaiting better Kubernetes support for a snapshot and backup workflow, running your database service in a VM rather than a container, and exposing it to your Kubernetes workload may be worth considering.

Cluster-distributed stateful services (e.g., Cassandra) can benefit from splitting across hosts, using local persistent volumes if resources allow. This would require deploying multiple Kubernetes worker nodes (could be VMs on hypervisor hosts) to preserve a quorum under single point failures.

Other considerations

Logs and metrics (if collected and persistently retained) are valuable to diagnose outages, but given the variety of technologies available it will not be addressed in this blog. If Internet connectivity is available, it may be desirable to retain logs and metrics externally at a central location.

Your production deployment should utilize an automated installation, configuration and update tool (e.g., Ansible, BOSH, Chef, Juju, kubeadm, Puppet, etc.). A manual process will have repeatability issues, be labor intensive, error prone, and difficult to scale. Certified distributions are likely to include a facility for retaining configuration settings across updates, but if you implement your own install and config toolchain, then retention, backup and recovery of the configuration artifacts is essential. Consider keeping your deployment components and settings under a version control system such as Git.

Outage recovery

Runbooks documenting recovery procedures should be tested and retained offline – perhaps even printed. When an on-call staff member is called up at 2 am on a Friday night, it may not be a great time to improvise. Better to execute from a pre-planned, tested checklist – with shared access by remote and onsite personnel.

Final thoughts

airplane

Buying a ticket on a commercial airline is convenient and safe. But when you travel to a remote location with a short runway, that commercial Airbus A320 flight isn’t an option. This doesn’t mean that air travel is off the table. It does mean that some compromises are necessary.

The adage in aviation is that on a single engine aircraft, an engine failure means you crash. With twin engines, at the very least, you get more choices of where you crash. Kubernetes on a small number of hosts is similar, and if your business case justifies it, you might scale up to a larger fleet of mixed large and small vehicles (e.g., FedEx, Amazon).

Those designing a production-grade Kubernetes solution have a lot of options and decisions. A blog-length article can’t provide all the answers, and can’t know your specific priorities. We do hope this offers a checklist of things to consider, along with some useful guidance. Some options were left “on the cutting room floor” (e.g., running Kubernetes components using self-hosting instead of static pods). These might be covered in a follow up if there is interest. Also, Kubernetes’ high enhancement rate means that if your search engine found this article after 2019, some content might be past the “sell by” date.


Blog: Introducing Kubebuilder: an SDK for building Kubernetes APIs using CRDs

$
0
0

Author: Phillip Wittrock (Google), Sunil Arora (Google)

How can we enable applications such as MySQL, Spark and Cassandra to manage themselves just like Kubernetes Deployments and Pods do? How do we configure these applications as their own first class APIs instead of a collection of StatefulSets, Services, and ConfigMaps?

We have been working on a solution and are happy to introduce kubebuilder, a comprehensive development kit for rapidly building and publishing Kubernetes APIs and Controllers using CRDs. Kubebuilder scaffolds projects and API definitions and is built on top of the controller-runtime libraries.

Why Kubebuilder and Kubernetes APIs?

Applications and cluster resources typically require some operational work - whether it is replacing failed replicas with new ones, or scaling replica counts while resharding data. Running the MySQL application may require scheduling backups, reconfiguring replicas after scaling, setting up failure detection and remediation, etc.

With the Kubernetes API model, management logic is embedded directly into an application specific Kubernetes API, e.g. a “MySQL” API. Users then declaratively manage the application through YAML configuration using tools such as kubectl, just like they do for Kubernetes objects. This approach is referred to as an Application Controller, also known as an Operator. Controllers are a powerful technique backing the core Kubernetes APIs that may be used to build many kinds of solutions in addition to Applications; such as Autoscalers, Workload APIs, Configuration APIs, CI/CD systems, and more.

However, while it has been possible for trailblazers to build new Controllers on top of the raw API machinery, doing so has been a DIY “from scratch” experience, requiring developers to learn low level details about how Kubernetes libraries are implemented, handwrite boilerplate code, and warp their own solutions for integration testing, RBAC configuration, documentation, etc. Kubebuilder makes this experience simple and easy by applying the lessons learned from building the core Kubernetes APIs.

Getting Started Building Application Controllers and Kubernetes APIs

By providing an opinionated and structured solution for creating Controllers and Kubernetes APIs, developers have a working “out of the box” experience that uses the lessons and best practices learned from developing the core Kubernetes APIs. Creating a new “Hello World” Controller with kubebuilder is as simple as:

  1. Create a project with kubebuilder init
  2. Define a new API with kubebuilder create api
  3. Build and run the provided main function with make install & make run

This will scaffold the API and Controller for users to modify, as well as scaffold integration tests, RBAC rules, Dockerfiles, Makefiles, etc. After adding their implementation to the project, users create the artifacts to publish their API through:

  1. Build and push the container image from the provided Dockerfile using make docker-buildandmake docker-push` commands
  2. Deploy the API using make deploy command

Whether you are already a Controller aficionado or just want to learn what the buzz is about, check out the kubebuilder repo or take a look at an example in the kubebuilder book to learn about how simple and easy it is to build Controllers.

Get Involved

Kubebuilder is a project under SIG API Machinery and is being actively developed by contributors from many companies such as Google, Red Hat, VMware, Huawei and others. Get involved by giving us feedback through these channels:

Blog: The Machines Can Do the Work, a Story of Kubernetes Testing, CI, and Automating the Contributor Experience

$
0
0

Author: Aaron Crickenberger (Google) and Benjamin Elder (Google)

“Large projects have a lot of less exciting, yet, hard work. We value time spent automating repetitive work more highly than toil. Where that work cannot be automated, it is our culture to recognize and reward all types of contributions. However, heroism is not sustainable.” - Kubernetes Community Values

Like many open source projects, Kubernetes is hosted on GitHub. We felt the barrier to participation would be lowest if the project lived where developers already worked, using tools and processes developers already knew. Thus the project embraced the service fully: it was the basis of our workflow, our issue tracker, our documentation, our blog platform, our team structure, and more.

This strategy worked. It worked so well that the project quickly scaled past its contributors’ capacity as humans. What followed was an incredible journey of automation and innovation. We didn’t just need to rebuild our airplane mid-flight without crashing, we needed to convert it into a rocketship and launch into orbit. We needed machines to do the work.

The Work

Initially, we focused on the fact that we needed to support the sheer volume of tests mandated by a complex distributed system such as Kubernetes. Real world failure scenarios had to be exercised via end-to-end (e2e) tests to ensure proper functionality. Unfortunately, e2e tests were susceptible to flakes (random failures) and took anywhere from an hour to a day to complete.

Further experience revealed other areas where machines could do the work for us:

  • PR Workflow
    • Did the contributor sign our CLA?
    • Did the PR pass tests?
    • Is the PR mergeable?
    • Did the merge commit pass tests?
  • Triage
    • Who should be reviewing PRs?
    • Is there enough information to route an issue to the right people?
    • Is an issue still relevant?
  • Project Health
    • What is happening in the project?
    • What should we be paying attention to?

As we developed automation to improve our situation, we followed a few guiding principles:

  • Follow the push/poll control loop patterns that worked well for Kubernetes
  • Prefer stateless loosely coupled services that do one thing well
  • Prefer empowering the entire community over empowering a few core contributors
  • Eat our own dogfood and avoid reinventing wheels

Enter Prow

This led us to create Prow as the central component for our automation. Prow is sort of like an If This, Then That for GitHub events, with a built-in library of commands, plugins, and utilities. We built Prow on top of Kubernetes to free ourselves from worrying about resource management and scheduling, and ensure a more pleasant operational experience.

Prow lets us do things like:

  • Allow our community to triage issues/PRs by commenting commands such as “/priority critical-urgent”, “/assign mary” or “/close”
  • Auto-label PRs based on how much code they change, or which files they touch
  • Age out issues/PRs that have remained inactive for too long
  • Auto-merge PRs that meet our PR workflow requirements
  • Run CI jobs defined as Knative Builds, Kubernetes Pods, or Jenkins jobs
  • Enforce org-wide and per-repo GitHub policies like branch protection and GitHub labels

Prow was initially developed by the engineering productivity team building Google Kubernetes Engine, and is actively contributed to by multiple members of Kubernetes SIG Testing. Prow has been adopted by several other open source projects, including Istio, JetStack, Knative and OpenShift. Getting started with Prow takes a Kubernetes cluster and kubectl apply starter.yaml (running pods on a Kubernetes cluster).

Once we had Prow in place, we began to hit other scaling bottlenecks, and so produced additional tooling to support testing at the scale required by Kubernetes, including:

  • Boskos: manages job resources (such as GCP projects) in pools, checking them out for jobs and cleaning them up automatically (with monitoring)
  • ghProxy: a reverse proxy HTTP cache optimized for use with the GitHub API, to ensure our token usage doesn’t hit API limits (with monitoring)
  • Greenhouse: allows us to use a remote bazel cache to provide faster build and test results for PRs (with monitoring)
  • Splice: allows us to test and merge PRs in a batch, ensuring our merge velocity is not limited to our test velocity
  • Tide: allows us to merge PRs selected via GitHub queries rather than ordered in a queue, allowing for significantly higher merge velocity in tandem with splice

Scaling Project Health

With workflow automation addressed, we turned our attention to project health. We chose to use Google Cloud Storage (GCS) as our source of truth for all test data, allowing us to lean on established infrastructure, and allowed the community to contribute results. We then built a variety of tools to help individuals and the project as a whole make sense of this data, including:

  • Gubernator: display the results and test history for a given PR
  • Kettle: transfer data from GCS to a publicly accessible bigquery dataset
  • PR dashboard: a workflow-aware dashboard that allows contributors to understand which PRs require attention and why
  • Triage: identify common failures that happen across all jobs and tests
  • Testgrid: display test results for a given job across all runs, summarize test results across groups of jobs

We approached the Cloud Native Computing Foundation (CNCF) to develop DevStats to glean insights from our GitHub events such as:

Into the Beyond

Today, the Kubernetes project spans over 125 repos across five orgs. There are 31 Special Interests Groups and 10 Working Groups coordinating development within the project. In the last year the project has had participation from over 13,800 unique developers on GitHub.

On any given weekday our Prow instance runs over 10,000 CI jobs; from March 2017 to March 2018 it ran 4.3 million jobs. Most of these jobs involve standing up an entire Kubernetes cluster, and exercising it using real world scenarios. They allow us to ensure all supported releases of Kubernetes work across cloud providers, container engines, and networking plugins. They make sure the latest releases of Kubernetes work with various optional features enabled, upgrade safely, meet performance requirements, and work across architectures.

With today’s announcement from CNCF– noting that Google Cloud has begun transferring ownership and management of the Kubernetes project’s cloud resources to CNCF community contributors, we are excited to embark on another journey. One that allows the project infrastructure to be owned and operated by the community of contributors, following the same open governance model that has worked for the rest of the project. Sound exciting to you? Come talk to us at #sig-testing on kubernetes.slack.com.

Want to find out more? Come check out these resources:

Blog: 2018 Steering Committee Election Cycle Kicks Off

$
0
0

Author: Paris Pittman (Google), Jorge Castro (Heptio), Ihor Dvoretskyi (CNCF)

Having a clear, definable governance model is crucial for the health of open source projects. For one of the highest velocity projects in the open source world, governance is critical especially for one as large and active as Kubernetes, which is one of the most high-velocity projects in the open source world. A clear structure helps users trust that the project will be nurtured and progress forward. Initially, this structure was laid by the former 7 member bootstrap committee composed of founders and senior contributors with a goal to create the foundational governance building blocks.

The initial charter and establishment of an election process to seat a full Steering Committee was a part of those first building blocks. Last year, the bootstrap committee kicked off the first Kubernetes Steering Committee election which brought forth 6 new members from the community as voted on by contributors. These new members plus the bootstrap committee formed the Steering Committee that we know today. This yearly election cycle will continue to ensure that new representatives get cycled through to add different voices and thoughts on the Kubernetes project strategy.

The committee has worked hard on topics that will streamline the project and how we operate. SIG (Special Interest Group) governance was an overarching recurring theme this year: Kubernetes community is not a monolithic organization, but a huge, distributed community, where Special Interest Groups (SIGs) and Working Groups (WGs) are the atomic community units, that are making Kubernetes so successful from the ground.

Contributors - this is where you come in.

There are three seats up for election this year. The voters guide will get you up to speed on the specifics of this years election including candidate bios as they are updated in real time. The elections process doc will steer you towards eligibility, operations, and the fine print.

1) Nominate yourself, someone else, and/or put your support to others.

Want to help chart our course? Interested in governance and community topics? Add your name! The nomination process is optional.

2) Vote.

On September 19th, eligible voters will receive an email poll invite conducted by CIVS. The newly elected will be announced at the weekly community meeting on Thursday, October 4th at 5pm UTC.

To those who are running:

Helpful resources

  • Steering Committee - who sits on the committee and terms, their projects and meetings info
  • Steering Committee Charter - this is a great read if you’re interested in running (or assessing for the best candidates!)
  • Election Process
  • Voters Guide! - Updated on a rolling basis. This guide will always have the latest information throughout the election cycle. The complete schedule of events and candidate bios will be housed here.

Blog: Hands On With Linkerd 2.0

$
0
0

Author: Thomas Rampelberg (Buoyant)

Linkerd 2.0 was recently announced as generally available (GA), signaling its readiness for production use. In this tutorial, we’ll walk you through how to get Linkerd 2.0 up and running on your Kubernetes cluster in a matter seconds.

But first, what is Linkerd and why should you care? Linkerd is a service sidecar that augments a Kubernetes service, providing zero-config dashboards and UNIX-style CLI tools for runtime debugging, diagnostics, and reliability. Linkerd is also a service mesh, applied to multiple (or all) services in a cluster to provide a uniform layer of telemetry, security, and control across them.

Linkerd works by installing ultralight proxies into each pod of a service. These proxies report telemetry data to, and receive signals from, a control plane. This means that using Linkerd doesn’t require any code changes, and can even be installed live on a running service. Linkerd is fully open source, Apache v2 licensed, and is hosted by the Cloud Native Computing Foundation (just like Kubernetes itself!)

Without further ado, let’s see just how quickly you can get Linkerd running on your Kubernetes cluster. In this tutorial, we’ll walk you through how to deploy Linkerd on any Kubernetes 1.9+ cluster and how to use it to debug failures in a sample gRPC application.

Step 1: Install the demo app 🚀

Before we install Linkerd, let’s start by installing a basic gRPC demo application called Emojivoto onto your Kubernetes cluster. To install Emojivoto, run:

curl https://run.linkerd.io/emojivoto.yml | kubectl apply -f -

This command downloads the Kubernetes manifest for Emojivoto, and uses kubectl to apply it to your Kubernetes cluster. Emojivoto is comprised of several services that run in the “emojivoto” namespace. You can see the services by running:

kubectl get -n emojivoto deployments

You can also see the app live by running

minikube -n emojivoto service web-svc --url # if you’re on minikube

… or:

kubectl get svc web-svc -n emojivoto -o jsonpath="{.status.loadBalancer.ingress[0].*}" #

… if you’re somewhere else

Click around. You might notice that some parts of the application are broken! If you were to inspect your handly local Kubernetes dashboard, you wouldn’t see very much interesting—as far as Kubernetes is concerned, the app is running just fine. This is a very common situation! Kubernetes understands whether your pods are running, but not whether they are responding properly.

In the next few steps, we’ll walk you through how to use Linkerd to diagnose the problem.

Step 2: Install Linkerd’s CLI

We’ll start by installing Linkerd’s command-line interface (CLI) onto your local machine. Visit the Linkerd releases page, or simply run:

curl -sL https://run.linkerd.io/install | sh

Once installed, add the linkerd command to your path with:

export PATH=$PATH:$HOME/.linkerd2/bin

You should now be able to run the command linkerd version, which should display:

Client version: v2.0
Server version: unavailable

“Server version: unavailable” means that we need to add Linkerd’s control plane to the cluster, which we’ll do next. But first, let’s validate that your cluster is prepared for Linkerd by running:

linkerd check --pre

This handy command will report any problems that will interfere with your ability to install Linkerd. Hopefully everything looks OK and you’re ready to move on to the next step.

Step 3: Install Linkerd’s control plane onto the cluster

In this step, we’ll install Linkerd’s lightweight control plane into its own namespace (“linkerd”) on your cluster. To do this, run:

linkerd install | kubectl apply -f -

This command generates a Kubernetes manifest and uses kubectl command to apply it to your Kubernetes cluster. (Feel free to inspect the manifest before you apply it.)

(Note: if your Kubernetes cluster is on GKE with RBAC enabled, you’ll need an extra step: you must grant a ClusterRole of cluster-admin to your Google Cloud account first, in order to install certain telemetry features in the control plane. To do that, run: kubectl create clusterrolebinding cluster-admin-binding-$USER --clusterrole=cluster-admin --user=$(gcloud config get-value account).)

Depending on the speed of your internet connection, it may take a minute or two for your Kubernetes cluster to pull the Linkerd images. While that’s happening, we can validate that everything’s happening correctly by running:

linkerd check

This command will patiently wait until Linkerd has been installed and is running.

Finally, we’re ready to view Linkerd’s dashboard! Just run:

linkerd dashboard

If you see something like below, Linkerd is now running on your cluster. 🎉

Step 4: Add Linkerd to the web service

At this point we have the Linkerd control plane installed in the “linkerd” namespace, and we have our emojivoto demo app installed in the “emojivoto” namespace. But we haven’t actually added Linkerd to our service yet. So let’s do that.

In this example, let’s pretend we are the owners of the “web” service. Other services, like “emoji” and “voting”, are owned by other teams–so we don’t want to touch them.

There are a couple ways to add Linkerd to our service. For demo purposes, the easiest is to do something like this:

kubectl get -n emojivoto deploy/web -o yaml | linkerd inject - | kubectl apply -f -

This command retrieves the manifest of the “web” service from Kubernetes, runs this manifest through linkerd inject, and finally reapplies it to the Kubernetes cluster. The linkerd inject command augments the manifest to include Linkerd’s data plane proxies. As with linkerd install, linkerd inject is a pure text operation, meaning that you can inspect the input and output before you use it. Since “web” is a Deployment, Kubernetes is kind enough to slowly roll the service one pod at a time–meaning that “web” can be serving traffic live while we add Linkerd to it!

We now have a service sidecar running on the “web” service!

Step 5: Debugging for Fun and for Profit

Congratulations! You now have a full gRPC application running on your Kubernetes cluster with Linkerd installed on the “web” service. Of course, that application is failing when you use it–so now let’s use Linkerd to track down those errors.

If you glance at the Linkerd dashboard (the linkerd dashboard command), you should see all services in the “emojivoto” namespace show up. Since “web” has the Linkerd service sidecar installed on it, you’ll also see success rate, requests per second, and latency percentiles show up.

That’s pretty neat, but the first thing you might notice is that success rate is well below 100%! Click on “web” and let’s dig in.

You should now be looking at the Deployment page for the web service. The first thing you’ll see here is that web is taking traffic from vote-bot (a service included in the Emojivoto manifest to continually generate a low level of live traffic), and has two outgoing dependencies, emoji and voting.

The emoji service is operating at 100%, but the voting service is failing! A failure in a dependent service may be exactly what’s causing the errors that web is returning.

Let’s scroll a little further down the page, we’ll see a live list of all traffic endpoints that “web” is receiving. This is interesting:

There are two calls that are not at 100%: the first is vote-bot’s call the “/api/vote” endpoint. The second is the “VotePoop” call from the web service to the voting service. Very interesting! Since /api/vote is an incoming call, and “/VotePoop” is an outgoing call, this is a good clue that that the failure of the vote service’s VotePoop endpoint is what’s causing the problem!

Finally, if we click on the “tap” icon for that row in the far right column, we’ll be taken to live list of requests that match this endpoint. This allows us to confirm that the requests are failing (they all have gRPC status code 2, indicating an error).

At this point we have the ammunition we need to talk to the owners of the vote “voting” service. We’ve identified an endpoint on their service that consistently returns an error, and have found no other obvious sources of failures in the system.

We hope you’ve enjoyed this journey through Linkerd 2.0. There is much more for you to explore. For example, everything we did above using the web UI can also be accomplished via pure CLI commands, e.g. linkerd top, linkerd stat, and linkerd tap.

Also, did you notice the little Grafana icon on the very first page we looked at? Linkerd ships with automatic Grafana dashboards for all those metrics, allowing you to view everything you’re seeing in the Linkerd dashboard in a time series format. Check it out!

Want more?

In this tutorial, we’ve shown you how to install Linkerd on a cluster, add it as a service sidecar to just one service–while the service is receiving live traffic!—and use it to debug a runtime issue. But this is just the tip of the iceberg. We haven’t even touched any of Linkerd’s reliability or security features!

Linkerd has a thriving community of adopters and contributors, and we’d love for YOU to be a part of it. For more, check out the docs and GitHub repo, join the Linkerd Slack and mailing lists (users, developers, announce), and, of course, follow @linkerd on Twitter! We can’t wait to have you aboard!

Blog: Kubernetes 1.12: Kubelet TLS Bootstrap and Azure Virtual Machine Scale Sets (VMSS) Move to General Availability

$
0
0

Author: The 1.12 Release Team

We’re pleased to announce the delivery of Kubernetes 1.12, our third release of 2018!

Today’s release continues to focus on internal improvements and graduating features to stable in Kubernetes. This newest version graduates key features such as security and Azure. Notable additions in this release include two highly-anticipated features graduating to general availability: Kubelet TLS Bootstrap and Support for Azure Virtual Machine Scale Sets (VMSS).

These new features mean increased security, availability, resiliency, and ease of use to get production applications to market faster. The release also signifies the increasing maturation and sophistication of Kubernetes on the developer side.

Let’s dive into the key features of this release:

Introducing General Availability of Kubelet TLS Bootstrap

We’re excited to announce General Availability (GA) of Kubelet TLS Bootstrap. In Kubernetes 1.4, we introduced an API for requesting certificates from a cluster-level Certificate Authority (CA). The original intent of this API is to enable provisioning of TLS client certificates for kubelets. This feature allows for a kubelet to bootstrap itself into a TLS-secured cluster. Most importantly, it automates the provision and distribution of signed certificates.

Before, when a kubelet ran for the first time, it had to be given client credentials in an out-of-band process during cluster startup. The burden was on the operator to provision these credentials. Because this task was so onerous to manually execute and complex to automate, many operators deployed clusters with a single credential and single identity for all kubelets. These setups prevented deployment of node lockdown features like the Node authorizer and the NodeRestriction admission controller.

To alleviate this, SIG Auth introduced a way for kubelet to generate a private key and a CSR for submission to a cluster-level certificate signing process. The v1 (GA) designation indicates production hardening and readiness, and comes with the guarantee of long-term backwards compatibility.

Alongside this, Kubelet server certificate bootstrap and rotation is moving to beta. Currently, when a kubelet first starts, it generates a self-signed certificate/key pair that is used for accepting incoming TLS connections. This feature introduces a process for generating a key locally and then issuing a Certificate Signing Request to the cluster API server to get an associated certificate signed by the cluster’s root certificate authority. Also, as certificates approach expiration, the same mechanism will be used to request an updated certificate.

Support for Azure Virtual Machine Scale Sets (VMSS) and Cluster-Autoscaler is Now Stable

Azure Virtual Machine Scale Sets (VMSS) allow you to create and manage a homogenous VM pool that can automatically increase or decrease based on demand or a set schedule. This enables you to easily manage, scale, and load balance multiple VMs to provide high availability and application resiliency, ideal for large-scale applications that can run as Kubernetes workloads.

With this new stable feature, Kubernetes supports the scaling of containerized applications with Azure VMSS, including the ability to integrate it with cluster-autoscaler to automatically adjust the size of the Kubernetes clusters based on the same conditions.

Additional Notable Feature Updates

RuntimeClass is a new cluster-scoped resource that surfaces container runtime properties to the control plane being released as an alpha feature.

Snapshot / restore functionality for Kubernetes and CSI is being introduced as an alpha feature. This provides standardized APIs design (CRDs) and adds PV snapshot/restore support for CSI volume drivers.

Topology aware dynamic provisioning is now in beta, meaning storage resources can now understand where they live. This also includes beta support to AWS EBS and GCE PD.

Configurable pod process namespace sharing is moving to beta, meaning users can configure containers within a pod to share a common PID namespace by setting an option in the PodSpec.

Taint node by condition is now in beta, meaning users have the ability to represent node conditions that block scheduling by using taints.

Arbitrary / Custom Metrics in the Horizontal Pod Autoscaler is moving to a second beta to test some additional feature enhancements. This reworked Horizontal Pod Autoscaler functionality includes support for custom metrics and status conditions.

Improvements that will allow the Horizontal Pod Autoscaler to reach proper size faster are moving to beta.

Vertical Scaling of Pods is now in beta, which makes it possible to vary the resource limits on a pod over its lifetime. In particular, this is valuable for pets (i.e., pods that are very costly to destroy and re-create).

Encryption at rest via KMS is now in beta. This adds multiple encryption providers, including Google Cloud KMS, Azure Key Vault, AWS KMS, and Hashicorp Vault, that will encrypt data as it is stored to etcd.

Availability

Kubernetes 1.12 is available for download on GitHub. To get started with Kubernetes, check out these interactive tutorials. You can also install 1.12 using Kubeadm.

5 Day Features Blog Series

If you’re interested in exploring these features more in depth, check back next week for our 5 Days of Kubernetes series where we’ll highlight detailed walkthroughs of the following features:

  • Day 1 - Kubelet TLS Bootstrap
  • Day 2 - Support for Azure Virtual Machine Scale Sets (VMSS) and Cluster-Autoscaler
  • Day 3 - Snapshots Functionality
  • Day 4 - RuntimeClass
  • Day 5 - Topology Resources

Release team

This release is made possible through the effort of hundreds of individuals who contributed both technical and non-technical content. Special thanks to the release team led by Tim Pepper, Orchestration & Containers Lead, at VMware Open Source Technology Center. The 36 individuals on the release team coordinate many aspects of the release, from documentation to testing, validation, and feature completeness.

As the Kubernetes community has grown, our release process represents an amazing demonstration of collaboration in open source software development. Kubernetes continues to gain new users at a rapid clip. This growth creates a positive feedback cycle where more contributors commit code creating a more vibrant ecosystem. Kubernetes has over 22,000 individual contributors to date and an active community of more than 45,000 people.

Project Velocity

The CNCF has continued refining DevStats, an ambitious project to visualize the myriad contributions that go into the project. K8s DevStats illustrates the breakdown of contributions from major company contributors, as well as an impressive set of preconfigured reports on everything from individual contributors to pull request lifecycle times. On average, 259 different companies and over 1,400 individuals contribute to Kubernetes each month. Check out DevStats to learn more about the overall velocity of the Kubernetes project and community.

User Highlights

Established, global organizations are using Kubernetes in production at massive scale. Recently published user stories from the community include:

Is Kubernetes helping your team? Share your story with the community.

Ecosystem Updates

  • CNCF recently released the findings of their bi-annual CNCF survey, finding that the use of cloud native technologies in production has grown over 200% within the last six months.
  • CNCF expanded its certification offerings to include a Certified Kubernetes Application Developer exam. The CKAD exam certifies an individual’s ability to design, build, configure, and expose cloud native applications for Kubernetes. More information can be found here.
  • CNCF added a new partner category, Kubernetes Training Partners (KTP). KTPs are a tier of vetted training providers who have deep experience in cloud native technology training. View partners and learn more here.
  • CNCF also offers online training that teaches the skills needed to create and configure a real-world Kubernetes cluster.
  • Kubernetes documentation now features user journeys: specific pathways for learning based on who readers are and what readers want to do. Learning Kubernetes is easier than ever for beginners, and more experienced users can find task journeys specific to cluster admins and application developers.

KubeCon

The world’s largest Kubernetes gathering, KubeCon + CloudNativeCon is coming to Shanghai from November 13-15, 2018 and Seattle from December 10-13, 2018. This conference will feature technical sessions, case studies, developer deep dives, salons and more! Register today!

Webinar

Join members of the Kubernetes 1.12 release team on November 6th at 10am PDT to learn about the major features in this release. Register here.

Get Involved

The simplest way to get involved with Kubernetes is by joining one of the many Special Interest Groups (SIGs) that align with your interests. Have something you’d like to broadcast to the Kubernetes community? Share your voice at our weekly community meeting, and through the channels below.

Thank you for your continued feedback and support.

Blog: Health checking gRPC servers on Kubernetes

$
0
0

Author: Ahmet Alp Balkan (Google)

gRPC is on its way to becoming the lingua franca for communication between cloud-native microservices. If you are deploying gRPC applications to Kubernetes today, you may be wondering about the best way to configure health checks. In this article, we will talk aboutgrpc-health-probe, a Kubernetes-native way to health check gRPC apps.

If you’re unfamiliar, Kubernetes health checks (liveness and readiness probes) is what’s keeping your applications available while you’re sleeping. They detect unresponsive pods, mark them unhealthy, and cause these pods to be restarted or rescheduled.

Kubernetes does not support gRPC health checks natively. This leaves the gRPC developers with the following three approaches when they deploy to Kubernetes:

options for health checking grpc on kubernetes today

  1. httpGet probe: Cannot be natively used with gRPC. You need to refactor your app to serve both gRPC and HTTP/1.1 protocols (on different port numbers).
  2. tcpSocket probe: Opening a socket to gRPC server is not meaningful, since it cannot read the response body.
  3. exec probe: This invokes a program in a container’s ecosystem periodically. In the case of gRPC, this means you implement a health RPC yourself, then write and ship a client tool with your container.

Can we do better? Absolutely.

Introducing “grpc-health-probe”

To standardize the “exec probe” approach mentioned above, we need:

  • a standard health check “protocol” that can be implemented in any gRPC server easily.
  • a standard health check “tool” that can query the health protocol easily.

Thankfully, gRPC has a standard health checking protocol. It can be used easily from any language. Generated code and the utilities for setting the health status are shipped in nearly all language implementations of gRPC.

If youimplement this health check protocol in your gRPC apps, you can then use a standard/common tool to invoke this Check() method to determine server status.

The next thing you need is the “standard tool”, and it’s thegrpc-health-probe.

With this tool, you can use the same health check configuration in all your gRPC applications. This approach requires you to:

  1. Find the gRPC “health” module in your favorite language and start using it (example Go library).
  2. Ship thegrpc_health_probe binary in your container.
  3. Configure Kubernetes “exec” probe to invoke the “grpc_health_probe” tool in the container.

In this case, executing “grpc_health_probe” will call your gRPC server overlocalhost, since they are in the same pod.

What’s next

grpc-health-probe project is still in its early days and it needs your feedback. It supports a variety of features like communicating with TLS servers and configurable connection/RPC timeouts.

If you are running a gRPC server on Kubernetes today, try using the gRPC Health Protocol and try the grpc-health-probe in your deployments, and give feedback.

Further reading

Blog: Building a Network Bootable Server Farm for Kubernetes with LTSP

$
0
0

Author: Andrei Kvapil (WEDOS)

k8s+ltsp

In this post, I’m going to introduce you to a cool technology for Kubernetes, LTSP. It is useful for large baremetal Kubernetes deployments.

You don’t need to think about installing an OS and binaries on each node anymore. Why? You can do that automatically through Dockerfile!

You can buy and put 100 new servers into a production environment and get them working immediately - it’s really amazing!

Intrigued? Let me walk you through how it works.

Summary

First, we need to understand how exactly it works.

In short, for all nodes we have prepared the image with the OS, Docker, Kubelet and everything else that you need there. This image with the kernel is building automatically by CI using Dockerfile. End nodes are booting the kernel and OS from this image via the network.

Nodes are using overlays as the root filesystem and after reboot any changes will be lost (like in Docker containers). You have a config-file where you can describe mounts and some initial commands which should be executed during node boot (Example: set root user ssh-key and kubeadm join commands)

Image Preparation Process

We will use LTSP project because it’s gives us everything we need to organize the network booting environment. Basically, LTSP is a pack of shell-scripts which makes our life much easier.

LTSP provides a initramfs module, a few helper-scripts, and some configuration systems which prepare the system during the early state of boot, before the main init process call.

This is what the image preparation procedure looks like:

  • You’re deploying the basesystem in the chroot environment.
  • Make any needed changes there, install software.
  • Run the ltsp-build-image command

After that, you will get the squashed image from the chroot with all the software inside. Each node will download this image during the boot and use it as the rootfs. For the update node, you can just reboot it. The new squashed image will be downloaded and mounted into the rootfs.

Server Components

The server part of LTSP includes two components in our case:

  • TFTP-server - TFTP is the initial protocol, it is used the download the kernel, initramfs and main config.
  • NBD-server - NBD protocol is used to distribute the squashed rootfs image to the clients. It is the fastest way, but if you want, it can be replaced by the NFS or AoE protocol.

You should also have:

  • DHCP-server - it will distribute the IP-settings and a few specific options to the clients to make it possible for them to boot from our LTSP-server.

Node Booting Process

This is how the node is booting up

  • The first time, the node will ask DHCP for IP-settings and next-server, filename options.
  • Next, the node will apply settings and download bootloader (pxelinux or grub)
  • Bootloader will download and read config with the kernel and initramfs image.
  • Then bootloader will download the kernel and initramfs and execute it with specific cmdline options.
  • During the boot, initramfs modules will handle options from cmdline and do some actions like connect NBD-device, prepare overlay rootfs, etc.
  • Afterwards it will call the ltsp-init system instead of the normal init.
  • ltsp-init scripts will prepare the system on the earlier stage, before the main init will be called. Basically it applies the setting from lts.conf (main config): write fstab and rc.local entries etc.
  • Call the main init (systemd) which is booting configured system as usual, mounts shares from fstab, start targets and services, executes commands from rc.local file.
  • In the end you have a fully configured and booted system ready for further operations.

Preparing the Server

As I said before, I’m preparing the LTSP-server with the squashed image automatically using Dockerfile. This method is quite good because you have all steps described in your git repository. You have versioning, branches, CI and everything that you used to use for preparing your usual Docker projects.

Otherwise, you can deploy the LTSP server manually by executing all steps by hand. This is a good practice for learning and understanding the basic principles.

Just repeat all the steps listed here by hand, just to try to install LTSP without Dockerfile.

Used Patches List

LTSP still has some issues which authors don’t want to apply, yet. However LTSP is easy customizable so I prepared a few patches for myself and will share them here.

I’ll create a fork if the community will warmly accept my solution.

  • feature-grub.diff LTSP does not support EFI by default, so I’ve prepared a patch which adds GRUB2 with EFI support.
  • feature_preinit.diff This patch adds a PREINIT option to lts.conf, which allows you to run custom commands before the main init call. It may be useful to modify the systemd units and configure the network. It’s remarkable that all environment variables from the boot environment are saved and you can use them in your scripts.
  • feature_initramfs_params_from_lts_conf.diff Solves s problem with NBD_TO_RAM option, after this patch you can specify it on lts.conf inside chroot. (not in tftp directory)
  • nbd-server-wrapper.sh This is not a patch but a special wrapper script which allows you to run NBD-server in the foreground. It is useful if you want to run it inside a Docker container.

Dockerfile Stages

We will use stage building in our Dockerfile to leave only the needed parts in our Docker image. The unused parts will be removed from the final image.

ltsp-base
(install basic LTSP server software)
   |
   |---basesystem
   |   (prepare chroot with main software and kernel)
   |     |
   |     |---builder
   |     |   (build additional software from sources, if needed)
   |     |
   |     '---ltsp-image
   |         (install additional software, docker, kubelet and build squashed image)
   |
   '---final-stage
       (copy squashed image, kernel and initramfs into first stage)

Stage 1: ltsp-base

Let’s start writing our Dockerfile. This is the first part:

FROM ubuntu:16.04 as ltsp-baseADD nbd-server-wrapper.sh /bin/ADD /patches/feature-grub.diff /patches/feature-grub.diffRUN apt-get -y update \&& apt-get -y install \      ltsp-server \      tftpd-hpa \      nbd-server \      grub-common \      grub-pc-bin \      grub-efi-amd64-bin \      curl \      patch \&& sed -i 's|in_target mount|in_target_nofail mount|'\      /usr/share/debootstrap/functions \  # Add EFI support and Grub bootloader (#1745251)&& patch -p2 -d /usr/sbin < /patches/feature-grub.diff \&& rm -rf /var/lib/apt/lists \&& apt-get clean

At this stage our Docker image has already been installed:

  • NBD-server
  • TFTP-server
  • LTSP-scripts with grub bootloader support (for EFI)

Stage 2: basesystem

In this stage we will prepare a chroot environment with basesystem, and install basic software with the kernel.

We will use the classic debootstrap instead of ltsp-build-client to prepare the base image, because ltsp-build-client will install GUI and few other things which we don’t need for the server deployment.

FROM ltsp-base as basesystemARG DEBIAN_FRONTEND=noninteractive# Prepare base systemRUN debootstrap --arch amd64 xenial /opt/ltsp/amd64# Install updatesRUNecho"\      deb http://archive.ubuntu.com/ubuntu xenial main restricted universe multiverse\n\      deb http://archive.ubuntu.com/ubuntu xenial-updates main restricted universe multiverse\n\      deb http://archive.ubuntu.com/ubuntu xenial-security main restricted universe multiverse"\> /opt/ltsp/amd64/etc/apt/sources.list \&& ltsp-chroot apt-get -y update \&& ltsp-chroot apt-get -y upgrade# Installing LTSP-packagesRUN ltsp-chroot apt-get -y install ltsp-client-core# Apply initramfs patches# 1: Read params from /etc/lts.conf during the boot (#1680490)# 2: Add support for PREINIT variables in lts.confADD /patches /patchesRUN patch -p4 -d /opt/ltsp/amd64/usr/share < /patches/feature_initramfs_params_from_lts_conf.diff \&& patch -p3 -d /opt/ltsp/amd64/usr/share < /patches/feature_preinit.diff# Write new local client config for boot NBD image to ram:RUNecho"[Default]\nLTSP_NBD_TO_RAM = true"\> /opt/ltsp/amd64/etc/lts.conf# Install packagesRUNecho'APT::Install-Recommends "0";\nAPT::Install-Suggests "0";'\>> /opt/ltsp/amd64/etc/apt/apt.conf.d/01norecommend \&& ltsp-chroot apt-get -y install \      software-properties-common \      apt-transport-https \      ca-certificates \      ssh \      bridge-utils \      pv \      jq \      vlan \      bash-completion \      screen \      vim \      mc \      lm-sensors \      htop \      jnettop \      rsync \      curl \      wget \      tcpdump \      arping \      apparmor-utils \      nfs-common \      telnet \      sysstat \      ipvsadm \      ipset \      make# Install kernelRUN ltsp-chroot apt-get -y install linux-generic-hwe-16.04

Note that you may encounter problems with some packages, such as lvm2. They have not fully optimized for installing in an unprivileged chroot. Their postinstall scripts try to call some privileged commands which can fail with errors and block the package installation.

Solution:

  • Some of them can be installed before the kernel without any problems (like lvm2)
  • But for some of them you will need to use this workaround to install without the postinstall script.

Stage 3: builder

Now we can build all the necessary software and kernel modules. It’s really cool that you can do that automatically in this stage. You can skip this stage if you have nothing to do here.

Here is example for install latest MLNX_EN driver:

FROM basesystem as builder# Set cpuinfo (for building from sources)RUN cp /proc/cpuinfo /opt/ltsp/amd64/proc/cpuinfo# Compile Mellanox driverRUN ltsp-chroot sh -cx \'  VERSION=4.3-1.0.1.0-ubuntu16.04-x86_64 \&& curl -L http://www.mellanox.com/downloads/ofed/MLNX_EN-${VERSION%%-ubuntu*}/mlnx-en-${VERSION}.tgz \      | tar xzf - \&& export \        DRIVER_DIR="$(ls -1 | grep "MLNX_OFED_LINUX-\|mlnx-en-")" \        KERNEL="$(ls -1t /lib/modules/ | head -n1)" \&& cd "$DRIVER_DIR" \&& ./*install --kernel "$KERNEL" --without-dkms --add-kernel-support \&& cd - \&& rm -rf "$DRIVER_DIR" /tmp/mlnx-en* /tmp/ofed*'# Save kernel modulesRUN ltsp-chroot sh -c \' export KERNEL="$(ls -1t /usr/src/ | grep -m1 "^linux-headers" | sed "s/^linux-headers-//g")" \&& tar cpzf /modules.tar.gz /lib/modules/${KERNEL}/updates'

Stage 4: ltsp-image

In this stage we will install what we built in the previous step:

FROM basesystem as ltsp-image# Retrieve kernel modulesCOPY --from=builder /opt/ltsp/amd64/modules.tar.gz /opt/ltsp/amd64/modules.tar.gz# Install kernel modulesRUN ltsp-chroot sh -c \' export KERNEL="$(ls -1t /usr/src/ | grep -m1 "^linux-headers" | sed "s/^linux-headers-//g")" \&& tar xpzf /modules.tar.gz \&& depmod -a "${KERNEL}" \&& rm -f /modules.tar.gz'

Then do some additional changes to finalize our ltsp-image:

# Install dockerRUN ltsp-chroot sh -c \'  curl -fsSL https://download.docker.com/linux/ubuntu/gpg | apt-key add - \&& echo "deb https://download.docker.com/linux/ubuntu xenial stable" \> /etc/apt/sources.list.d/docker.list \&& apt-get -y update \&& apt-get -y install \        docker-ce=$(apt-cache madison docker-ce | grep 17.03 | head -1 | awk "{print $ 3}")'# Configure docker optionsRUNDOCKER_OPTS="$(echo\      --storage-driver=overlay2 \      --iptables=false\      --ip-masq=false\      --log-driver=json-file \      --log-opt=max-size=10m \      --log-opt=max-file=5\)"\&& sed "/^ExecStart=/ s|$| $DOCKER_OPTS|g"\      /opt/ltsp/amd64/lib/systemd/system/docker.service \> /opt/ltsp/amd64/etc/systemd/system/docker.service# Install kubeadm, kubelet and kubectlRUN ltsp-chroot sh -c \'  curl -s https://packages.cloud.google.com/apt/doc/apt-key.gpg | apt-key add - \&& echo "deb http://apt.kubernetes.io/ kubernetes-xenial main" \> /etc/apt/sources.list.d/kubernetes.list \&& apt-get -y update \&& apt-get -y install kubelet kubeadm kubectl cri-tools'# Disable automatic updatesRUN rm -f /opt/ltsp/amd64/etc/apt/apt.conf.d/20auto-upgrades# Disable apparmor profilesRUN ltsp-chroot find /etc/apparmor.d \      -maxdepth 1\      -type f \      -name "sbin.*"\      -o -name "usr.*"\      -exec ln -sf "{}" /etc/apparmor.d/disable/ \;# Write kernel cmdline optionsRUNKERNEL_OPTIONS="$(echo\init=/sbin/init-ltsp \      forcepae \console=tty1 \console=ttyS0,9600n8 \      nvme_core.default_ps_max_latency_us=0\)"\&& sed -i "/^CMDLINE_LINUX_DEFAULT=/ s|=.*|=\"${KERNEL_OPTIONS}\"|"\"/opt/ltsp/amd64/etc/ltsp/update-kernels.conf"

Then we will make the squashed image from our chroot:

# Cleanup cachesRUN rm -rf /opt/ltsp/amd64/var/lib/apt/lists \&& ltsp-chroot apt-get clean# Build squashed imageRUN ltsp-update-image

Stage 5: Final Stage

In the final stage we will save only our squashed image and kernels with initramfs.

FROM ltsp-baseCOPY --from=ltsp-image /opt/ltsp/images /opt/ltsp/imagesCOPY --from=ltsp-image /etc/nbd-server/conf.d /etc/nbd-server/conf.dCOPY --from=ltsp-image /var/lib/tftpboot /var/lib/tftpboot

Ok, now we have docker image which includes:

  • TFTP-server
  • NBD-server
  • configured bootloader
  • kernel with initramfs
  • squashed rootfs image

Usage

OK, now when our docker-image with LTSP-server, kernel, initramfs and squashed rootfs fully prepared we can run the deployment with it.

We can do that as usual, but one more thing is networking. Unfortunately, we can’t use the standard Kubernetes service for our deployment, because during the boot, our nodes are not part of Kubernetes cluster and they requires ExternalIP, but Kubernetes always enables NAT for ExternalIPs, and there is no way to disable this behavior.

For now I have two ways for avoid this: use hostNetwork: true or use pipework. The second option will also provide you redundancy because, in case of failure, the IP will be moved with the Pod to another node. Unfortunately, pipework is not native and a less secure method. If you have some better option for that please let me know.

Here is example for deployment with hostNetwork:

apiVersion:extensions/v1beta1kind:Deploymentmetadata:name:ltsp-serverlabels:app:ltsp-serverspec:selector:matchLabels:name:ltsp-serverreplicas:1template:metadata:labels:name:ltsp-serverspec:hostNetwork:truecontainers:-name:tftpdimage:registry.example.org/example/ltsp:latestcommand:["/usr/sbin/in.tftpd","-L","-u","tftp","-a",":69","-s","/var/lib/tftpboot"]lifecycle:postStart:exec:command:["/bin/sh","-c","cd /var/lib/tftpboot/ltsp/amd64; ln -sf config/lts.conf ."]volumeMounts:-name:configmountPath:"/var/lib/tftpboot/ltsp/amd64/config"-name:nbd-serverimage:registry.example.org/example/ltsp:latestcommand:["/bin/nbd-server-wrapper.sh"]volumes:-name:configconfigMap:name:ltsp-config

As you can see it also requires configmap with lts.conf file. Here is example part from mine:

apiVersion: v1
kind: ConfigMap
metadata:
  name: ltsp-config
data:
  lts.conf: |
    [default]
    KEEP_SYSTEM_SERVICES           = "ssh ureadahead dbus-org.freedesktop.login1 systemd-logind polkitd cgmanager ufw rpcbind nfs-kernel-server"

    PREINIT_00_TIME                = "ln -sf /usr/share/zoneinfo/Europe/Prague /etc/localtime"
    PREINIT_01_FIX_HOSTNAME        = "sed -i '/^127.0.0.2/d' /etc/hosts"
    PREINIT_02_DOCKER_OPTIONS      = "sed -i 's|^ExecStart=.*|ExecStart=/usr/bin/dockerd -H fd:// --storage-driver overlay2 --iptables=false --ip-masq=false --log-driver=json-file --log-opt=max-size=10m --log-opt=max-file=5|' /etc/systemd/system/docker.service"

    FSTAB_01_SSH                   = "/dev/data/ssh     /etc/ssh          ext4 nofail,noatime,nodiratime 0 0"
    FSTAB_02_JOURNALD              = "/dev/data/journal /var/log/journal  ext4 nofail,noatime,nodiratime 0 0"
    FSTAB_03_DOCKER                = "/dev/data/docker  /var/lib/docker   ext4 nofail,noatime,nodiratime 0 0"

    # Each command will stop script execution when fail
    RCFILE_01_SSH_SERVER           = "cp /rofs/etc/ssh/*_config /etc/ssh; ssh-keygen -A"
    RCFILE_02_SSH_CLIENT           = "mkdir -p /root/.ssh/; echo 'ssh-rsa AAAAB3NzaC1yc2EAAAADAQABAAABAQDBSLYRaORL2znr1V4a3rjDn3HDHn2CsvUNK1nv8+CctoICtJOPXl6zQycI9KXNhANfJpc6iQG1ZPZUR74IiNhNIKvOpnNRPyLZ5opm01MVIDIZgi9g0DUks1g5gLV5LKzED8xYKMBmAfXMxh/nsP9KEvxGvTJB3OD+/bBxpliTl5xY3Eu41+VmZqVOz3Yl98+X8cZTgqx2dmsHUk7VKN9OZuCjIZL9MtJCZyOSRbjuo4HFEssotR1mvANyz+BUXkjqv2pEa0I2vGQPk1VDul5TpzGaN3nOfu83URZLJgCrX+8whS1fzMepUYrbEuIWq95esjn0gR6G4J7qlxyguAb9 admin@kubernetes' >> /root/.ssh/authorized_keys"
    RCFILE_03_KERNEL_DEBUG         = "sysctl -w kernel.unknown_nmi_panic=1 kernel.softlockup_panic=1; modprobe netconsole netconsole=@/vmbr0,@10.9.0.15/"
    RCFILE_04_SYSCTL               = "sysctl -w fs.file-max=20000000 fs.nr_open=20000000 net.ipv4.neigh.default.gc_thresh1=80000 net.ipv4.neigh.default.gc_thresh2=90000 net.ipv4.neigh.default.gc_thresh3=100000"
    RCFILE_05_FORWARD              = "echo 1 > /proc/sys/net/ipv4/ip_forward"
    RCFILE_06_MODULES              = "modprobe br_netfilter"
    RCFILE_07_JOIN_K8S             = "kubeadm join --token 2a4576.504356e45fa3d365 10.9.0.20:6443 --discovery-token-ca-cert-hash sha256:e3b0c44298fc1c149afbf4c8996fb92427ae41e4649b934ca495991b7852b855"
  • KEEP_SYSTEM_SERVICES - during the boot, LTSP automatically removes some services, this variable is needed to prevent this behavior.
  • PREINIT_* - commands listed here will be executed before systemd runs (this function was added by the feature_preinit.diff patch)
  • FSTAB_* - entries written here will be added to the /etc/fstab file. As you can see, I use the nofail option, that means that if a partition doesn’t exist, it will continue to boot without error. If you have fully diskless nodes you can remove the FSTAB settings or configure the remote filesystem there.
  • RCFILE_* - those commands will be written to rc.local file, which will be called by systemd during the boot. Here I load the kernel modules and add some sysctl tunes, then call the kubeadm join command, which adds my node to the Kubernetes cluster.

You can get more details on all the variables used from lts.conf manpage.

Now you can configure your DHCP. Basically you should set the next-server and filename options.

I use ISC-DHCP server, and here is an example dhcpd.conf:

shared-network ltsp-netowrk {
    subnet 10.9.0.0 netmask 255.255.0.0 {
        authoritative;
        default-lease-time -1;
        max-lease-time -1;

        option domain-name              "example.org";
        option domain-name-servers      10.9.0.1;
        option routers                  10.9.0.1;
        next-server                     ltsp-1;  # write LTSP-server hostname here

        if option architecture = 00:07 {
            filename "/ltsp/amd64/grub/x86_64-efi/core.efi";
        } else {
            filename "/ltsp/amd64/grub/i386-pc/core.0";
        }

        range 10.9.200.0 10.9.250.254; 
    }

You can start from this, but what about me, I have multiple LTSP-servers and I configure leases statically for each node via the Ansible playbook.

Try to run your first node. If everything was right, you will have a running system there. The node also will be added to your Kubernetes cluster.

Now you can try to make your own changes.

If you need something more, note that LTSP can be easily changed to meet your needs. Feel free to look into the source code and you can find many answers there.


Blog: KubeDirector: The easy way to run complex stateful applications on Kubernetes

$
0
0

Author: Thomas Phelan (BlueData)

KubeDirector is an open source project designed to make it easy to run complex stateful scale-out application clusters on Kubernetes.

KubeDirector is built using the custom resource definition (CRD) framework and leverages the native Kubernetes API extensions and design philosophy. This enables transparent integration with Kubernetes user/resource management as well as existing clients and tools.

We recently introduced the KubeDirector project, as part of a broader open source Kubernetes initiative we call BlueK8s. I’m happy to announce that the pre-alpha code for KubeDirector is now available. And in this blog post, I’ll show how it works.

KubeDirector provides the following capabilities: * The ability to run non-cloud native stateful applications on Kubernetes without modifying the code. In other words, it’s not necessary to decompose these existing applications to fit a microservices design pattern. * Native support for preserving application-specific configuration and state. * An application-agnostic deployment pattern, minimizing the time to onboard new stateful applications to Kubernetes.

KubeDirector enables data scientists familiar with data-intensive distributed applications such as Hadoop, Spark, Cassandra, TensorFlow, Caffe2, etc. to run these applications on Kubernetes – with a minimal learning curve and no need to write GO code. The applications controlled by KubeDirector are defined by some basic metadata and an associated package of configuration artifacts. The application metadata is referred to as a KubeDirectorApp resource.

To understand the components of KubeDirector, clone the repository on GitHub using a command similar to:

git clone http://<userid>@github.com/bluek8s/kubedirector.

The KubeDirectorApp definition for the Spark 2.2.1 application is located in the file kubedirector/deploy/example_catalog/cr-app-spark221e2.json.

 ~> cat kubedirector/deploy/example_catalog/cr-app-spark221e2.json
 {"apiVersion": "kubedirector.bluedata.io/v1alpha1","kind": "KubeDirectorApp","metadata": {"name" : "spark221e2"
    },"spec" : {"systemctlMounts": true,"config": {"node_services": [
                {"service_ids": ["ssh","spark","spark_master","spark_worker"
                    ],
…

The configuration of an application cluster is referred to as a KubeDirectorCluster resource. The KubeDirectorCluster definition for a sample Spark 2.2.1 cluster is located in the filekubedirector/deploy/example_clusters/cr-cluster-spark221.e1.yaml.

~> cat kubedirector/deploy/example_clusters/cr-cluster-spark221.e1.yaml
apiVersion: "kubedirector.bluedata.io/v1alpha1"
kind: "KubeDirectorCluster"
metadata:
  name: "spark221e2"
spec:
  app: spark221e2
  roles:
  - name: controller
    replicas: 1
    resources:
      requests:
        memory: "4Gi"
        cpu: "2"
      limits:
        memory: "4Gi"
        cpu: "2"
  - name: worker
    replicas: 2
    resources:
      requests:
        memory: "4Gi"
        cpu: "2"
      limits:
        memory: "4Gi"
        cpu: "2"
  - name: jupyter
…

Running Spark on Kubernetes with KubeDirector

With KubeDirector, it’s easy to run Spark clusters on Kubernetes.

First, verify that Kubernetes (version 1.9 or later) is running, using the command kubectl version

~> kubectl version
Client Version: version.Info{Major:"1", Minor:"11", GitVersion:"v1.11.3", GitCommit:"a4529464e4629c21224b3d52edfe0ea91b072862", GitTreeState:"clean", BuildDate:"2018-09-09T18:02:47Z", GoVersion:"go1.10.3", Compiler:"gc", Platform:"linux/amd64"}
Server Version: version.Info{Major:"1", Minor:"11", GitVersion:"v1.11.3", GitCommit:"a4529464e4629c21224b3d52edfe0ea91b072862", GitTreeState:"clean", BuildDate:"2018-09-09T17:53:03Z", GoVersion:"go1.10.3", Compiler:"gc", Platform:"linux/amd64"}                                    

Deploy the KubeDirector service and the example KubeDirectorApp resource definitions with the commands:

cd kubedirector
make deploy

These will start the kubedirector pod:

~> kubectl get pods
NAME                           READY     STATUS     RESTARTS     AGE
kubedirector-58cf59869-qd9hb   1/1       Running    0            1m     

List the installed kubedirector applications with kubectl get KubeDirectorApp

~> kubectl get KubeDirectorApp
NAME           AGE
cassandra311   30m
spark211up     30m
spark221e2     30m

Now you can launch a Spark 2.2.1 cluster using the example KubeDirectorCluster file and thekubectl create -f deploy/example_clusters/cr-cluster-spark211up.yaml command. Verify that the spark cluster has been started:

~> kubectl get pods
NAME                             READY     STATUS    RESTARTS   AGE
kubedirector-58cf59869-djdwl     1/1       Running   0          19m
spark221e2-controller-zbg4d-0    1/1       Running   0          23m
spark221e2-jupyter-2km7q-0       1/1       Running   0          23m
spark221e2-worker-4gzbz-0        1/1       Running   0          23m
spark221e2-worker-4gzbz-1        1/1       Running   0          23m

The running services now include the spark services:

~> kubectl get service
NAME                                TYPE         CLUSTER-IP        EXTERNAL-IP    PORT(S)                                                    AGE
kubedirector                        ClusterIP    10.98.234.194     <none>         60000/TCP                                                  1d
kubernetes                          ClusterIP    10.96.0.1         <none>         443/TCP                                                    1d
svc-spark221e2-5tg48                ClusterIP    None              <none>         8888/TCP                                                   21s
svc-spark221e2-controller-tq8d6-0   NodePort     10.104.181.123    <none>         22:30534/TCP,8080:31533/TCP,7077:32506/TCP,8081:32099/TCP  20s
svc-spark221e2-jupyter-6989v-0      NodePort     10.105.227.249    <none>         22:30632/TCP,8888:30355/TCP                                20s
svc-spark221e2-worker-d9892-0       NodePort     10.107.131.165    <none>         22:30358/TCP,8081:32144/TCP                                20s
svc-spark221e2-worker-d9892-1       NodePort     10.110.88.221     <none>         22:30294/TCP,8081:31436/TCP                                20s

Pointing the browser at port 31533 connects to the Spark Master UI:

kubedirector

That’s all there is to it! In fact, in the example above we also deployed a Jupyter notebook along with the Spark cluster.

To start another application (e.g. Cassandra), just specify another KubeDirectorApp file:

kubectl create -f deploy/example_clusters/cr-cluster-cassandra311.yaml

See the running cassandra cluster:

~> kubectl get pods
NAME                              READY     STATUS    RESTARTS   AGE
cassandra311-seed-v24r6-0         1/1       Running   0          1m
cassandra311-seed-v24r6-1         1/1       Running   0          1m
cassandra311-worker-rqrhl-0       1/1       Running   0          1m
cassandra311-worker-rqrhl-1       1/1       Running   0          1m
kubedirector-58cf59869-djdwl      1/1       Running   0          1d
spark221e2-controller-tq8d6-0     1/1       Running   0          22m
spark221e2-jupyter-6989v-0        1/1       Running   0          22m
spark221e2-worker-d9892-0         1/1       Running   0          22m
spark221e2-worker-d9892-1         1/1       Running   0          22m

Now you have a Spark cluster (with a Jupyter notebook) and a Cassandra cluster running on Kubernetes. Use kubectl get service to see the set of services.

~> kubectl get service
NAME                                TYPE         CLUSTER-IP       EXTERNAL-IP   PORT(S)                                                   AGE
kubedirector                        ClusterIP    10.98.234.194    <none>        60000/TCP                                                 1d
kubernetes                          ClusterIP    10.96.0.1        <none>        443/TCP                                                   1d
svc-cassandra311-seed-v24r6-0       NodePort     10.96.94.204     <none>        22:31131/TCP,9042:30739/TCP                               3m
svc-cassandra311-seed-v24r6-1       NodePort     10.106.144.52    <none>        22:30373/TCP,9042:32662/TCP                               3m
svc-cassandra311-vhh29              ClusterIP    None             <none>        8888/TCP                                                  3m
svc-cassandra311-worker-rqrhl-0     NodePort     10.109.61.194    <none>        22:31832/TCP,9042:31962/TCP                               3m
svc-cassandra311-worker-rqrhl-1     NodePort     10.97.147.131    <none>        22:31454/TCP,9042:31170/TCP                               3m
svc-spark221e2-5tg48                ClusterIP    None             <none>        8888/TCP                                                  24m
svc-spark221e2-controller-tq8d6-0   NodePort     10.104.181.123   <none>        22:30534/TCP,8080:31533/TCP,7077:32506/TCP,8081:32099/TCP 24m
svc-spark221e2-jupyter-6989v-0      NodePort     10.105.227.249   <none>        22:30632/TCP,8888:30355/TCP                               24m
svc-spark221e2-worker-d9892-0       NodePort     10.107.131.165   <none>        22:30358/TCP,8081:32144/TCP                               24m
svc-spark221e2-worker-d9892-1       NodePort     10.110.88.221    <none>        22:30294/TCP,8081:31436/TCP                               24m

Get Involved

KubeDirector is a fully open source, Apache v2 licensed, project – the first of multiple open source projects within a broader initiative we call BlueK8s. The pre-alpha code for KubeDirector has just been released and we would love for you to join the growing community of developers, contributors, and adopters. Follow @BlueK8s on Twitter and get involved through these channels:

Blog: Introducing the Non-Code Contributor’s Guide

$
0
0

Author: Noah Abrahams (InfoSiftr), Jonas Rosland (VMware), Ihor Dvoretskyi (CNCF)

It was May 2018 in Copenhagen, and the Kubernetes community was enjoying the contributor summit at KubeCon/CloudNativeCon, complete with the first run of the New Contributor Workshop. As a time of tremendous collaboration between contributors, the topics covered ranged from signing the CLA to deep technical conversations. Along with the vast exchange of information and ideas, however, came continued scrutiny of the topics at hand to ensure that the community was being as inclusive and accommodating as possible. Over that spring week, some of the pieces under the microscope included the many themes being covered, and how they were being presented, but also the overarching characteristics of the people contributing and the skill sets involved. From the discussions and analysis that followed grew the idea that the community was not benefiting as much as it could from the many people who wanted to contribute, but whose strengths were in areas other than writing code.

This all led to an effort called the Non-Code Contributor’s Guide.

Now, it’s important to note that Kubernetes is rare, if not unique, in the open source world, in that it was defined very early on as both a project and a community. While the project itself is focused on the codebase, it is the community of people driving it forward that makes the project successful. The community works together with an explicit set of community values, guiding the the day-to-day behavior of contributors whether on GitHub, Slack, Discourse, or sitting together over tea or coffee.

By having a community that values people first, and explicitly values a diversity of people, the Kubernetes project is building a product to serve people with diverse needs. The different backgrounds of the contributors bring different approaches to the problem solving, with different methods of collaboration, and all those different viewpoints ultimately create a better project.

The Non-Code Contributor’s Guide aims to make it easy for anyone to contribute to the Kubernetes project in a way that makes sense for them. This can be in many forms, technical and non-technical, based on the person’s knowledge of the project and their available time. Most individuals are not developers, and most of the world’s developers are not paid to fully work on open source projects. Based on this we have started an ever-growing list of possible ways to contribute to the Kubernetes project in a Non-Code way!

Get Involved

Some of the ways that you can contribute to the Kubernetes community without writing a single line of code include:

The guide to get started with Kubernetes project contribution is documented on Github, and as the Non-Code Contributors Guide is a part of that Kubernetes Contributors Guide, it can be found here. As stated earlier, this list is not exhaustive and will continue to be a work in progress.

To date, the typical Non-Code contributions fall into the following categories:

  • Roles that are based on skill sets other than “software developer”
  • Non-Code contributions in primarily code-based roles
  • “Post-Code” roles, that are not code-based, but require knowledge of either the code base or management of the code base

If you, dear reader, have any additional ideas for a Non-Code way to contribute, whether or not it fits in an existing category, the team will always appreciate if you could help us expand the list.

If a contribution of the Non-Code nature appeals to you, please read the Non-Code Contributions document, and then check the Contributor Role Board to see if there are any open positions where your expertise could be best used! If there are no listed open positions that match your skill set, drop on by the #sig-contribex channel on Slack, and we’ll point you in the right direction.

We hope to see you contributing to the Kubernetes community soon!

Blog: Support for Azure VMSS, Cluster-Autoscaler and User Assigned Identity

$
0
0

Author: Krishnakumar R (KK) (Microsoft), Pengfei Ni (Microsoft)

Introduction

With Kubernetes v1.12, Azure virtual machine scale sets (VMSS) and cluster-autoscaler have reached their General Availability (GA) and User Assigned Identity is available as a preview feature.

Azure VMSS allow you to create and manage identical, load balanced VMs that automatically increase or decrease based on demand or a set schedule. This enables you to easily manage and scale multiple VMs to provide high availability and application resiliency, ideal for large-scale applications like container workloads [1].

Cluster autoscaler allows you to adjust the size of the Kubernetes clusters based on the load conditions automatically.

Another exciting feature which v1.12 brings to the table is the the ability to use User Assigned Identities with Kubernetes clusters [12].

In this article, we will do a brief overview of VMSS, cluster autoscaler and user assigned identity features on Azure.

VMSS

Azure’s Virtual Machine Scale sets (VMSS) feature offers users an ability to automatically create VMs from a single central configuration, provide load balancing via L4 and L7 load balancing, provide a path to use availability zones for high availability, provides large-scale VM instances et. al.

VMSS consists of a group of virtual machines, which are identical and can be managed and configured at a group level. More details of this feature in Azure itself can be found at the following link [1].

With Kubernetes v1.12 customers can create k8s cluster out of VMSS instances and utilize VMSS features.

Cluster components on Azure

Generally, standalone Kubernetes cluster in Azure consists of the following parts

  • Compute - the VM itself and its properties.
  • Networking - this includes the IPs and load balancers.
  • Storage - the disks which are associated with the VMs.

Compute

Compute in cloud k8s cluster consists of the VMs. These VMs are created by provisioning tools such as acs-engine or AKS (in case of managed service). Eventually, they run various system daemons such as kubelet, kube-api server etc. either as a process (in some versions) or as a docker container.

Networking

In Azure Kubernetes cluster various networking components are brought together to provide features required for users. Typically they consist of the network interfaces, network security groups, public IP resource, VNET (virtual networks), load balancers etc.

Storage

Kubernetes clusters are built on top of disks created in Azure. In a typical configuration, we have managed disks which are used to hold the regular OS images and a separate disk is used for etcd.

Cloud provider components

Kubernetes cloud provider interface provides interactions with clouds for managing cloud-specific resources, e.g. public IPs and routes. A good overview of these components is given in [2]. In case of Azure Kubernetes cluster, the Kubernetes interactions go through the Azure cloud provider layer and contact the various services running in the cloud.

The cloud provider implementation of K8s can be largely divided into the following component interfaces which we need to implement:

  1. Load Balancer
  2. Instances
  3. Zones
  4. Routes

In addition to the above interfaces, the storage services from the cloud provider is linked via the volume plugin layer.

Azure cloud provider implementation and VMSS

In the Azure cloud provider, for every type of cluster we implement, there is a VMType option which we specify. In case of VMSS, the VM type is “vmss”. The provisioning software (acs-engine, in future AKS etc.) would setup these values in /etc/kubernetes/azure.json file. Based on this type, various implementations would get instantiated [3]

The load balancer interface provides access to the underlying cloud provider load balancer service. The information about the load balancers and the control operations on them are required for Kubernetes to handle the services which gets hosted on the Kubernetes cluster. For VMSS support the changes ensure that the VMSS instances are part of the load balancer pool as required.

The instances interfaces help the cloud controller to get various details about a node from the cloud provider layer. For example, the details of a node like the IP address, the instance id etc, is obtained by the controller by means of the instances interfaces which the cloud provider layer registers with it. In case of VMSS support, we talk to VMSS service to gather information regarding the instances.

The zones interfaces help the cloud controller to get zone information for each node. Scheduler could spread pods to different availability zones with such information. It is also required for supporting topology aware dynamic provisioning features, e.g. AzureDisk. Each VMSS instances will be labeled with its current zone and region.

The routes interfaces help the cloud controller to setup advanced routes for Pod network. For example, a route with prefix node’s podCIDR and next hop node’s internal IP will be set for each node. In case of VMSS support, the next hops are VMSS virtual machines’ internal IP address.

The Azure volume plugin interfaces have been modified for VMSS to work properly. For example, the attach/detach to the AzureDisk have been modified to perform these operations at VMSS instance level.

Setting up a VMSS cluster on Azure

The following link [4] provides an example of acs-engine to create a Kubernetes cluster.

acs-engine deploy --subscription-id <subscription id> \
    --dns-prefix <dns> --location <location> \
    --api-model examples/kubernetes.json

API model file provides various configurations which acs-engine uses to create a cluster. The API model here [5] gives a good starting configuration to setup the VMSS cluster.

Once a VMSS cluster is created, here are some of the steps you can run to understand more about the cluster setup. Here is the output of kubectl get nodes from a cluster created using the above command:

$ kubectl get nodes
NAME                                 STATUS    ROLES     AGE       VERSION
k8s-agentpool1-92998111-vmss000000   Ready     agent     1h        v1.12.0-rc.2
k8s-agentpool1-92998111-vmss000001   Ready     agent     1h        v1.12.0-rc.2
k8s-master-92998111-0                Ready     master    1h        v1.12.0-rc.2

This cluster consists of two worker nodes and one master. Now how do we check which node is which in Azure parlance? In VMSS listing, we can see a single VMSS:

$ az vmss list -o table -g k8sblogkk1
Name                          ResourceGroup    Location    Zones      Capacity  Overprovision    UpgradePolicy
----------------------------  ---------------  ----------  -------  ----------  ---------------  ---------------
k8s-agentpool1-92998111-vmss  k8sblogkk1       westus2                       2  False            Manual

The nodes which we see as agents (in the kubectl get nodes command) are part of this vmss. We can use the following command to list the instances which are part of the VM scale set:

$ az vmss list-instances -g k8sblogkk1 -n k8s-agentpool1-92998111-vmss -o table
  InstanceId  LatestModelApplied    Location    Name                            ProvisioningState    ResourceGroup    VmId
------------  --------------------  ----------  ------------------------------  -------------------  ---------------  ------------------------------------
           0  True                  westus2     k8s-agentpool1-92998111-vmss_0  Succeeded            K8SBLOGKK1       21c57d6c-9c8f-4a62-970f-63ed0fcba53f
           1  True                  westus2     k8s-agentpool1-92998111-vmss_1  Succeeded            K8SBLOGKK1       840743b9-0076-4a2e-920e-5ba9da296665

The node name does not match the name in the vm scale set, but if we run the following command to list the providerID we can find the matching node which resembles the instance name:

$  kubectl describe nodes k8s-agentpool1-92998111-vmss000000| grep ProviderID
ProviderID:                  azure:///subscriptions/<subscription id>/resourceGroups/k8sblogkk1/providers/Microsoft.Compute/virtualMachineScaleSets/k8s-agentpool1-92998111-vmss/virtualMachines/0

Current Status and Future

Currently the following is supported:

  1. VMSS master nodes and worker nodes
  2. VMSS on worker nodes and Availability set on master nodes combination.
  3. Per vm disk attach
  4. Azure Disk & Azure File support
  5. Availability zones (Alpha)

In future there will be support for the following:

  1. AKS with VMSS support
  2. Per VM instance public IP

Cluster Autoscaler

A Kubernetes cluster consists of nodes. These nodes can be virtual machines, bare metal servers or could be even virtual node (virtual kubelet). To avoid getting lost in permutations and combinations of Kubernetes ecosystem ;-), let’s consider that the cluster we are discussing consists of virtual machines, which are hosted in a cloud (eg: Azure, Google or AWS). What this effectively means is that you have access to virtual machines which run Kubernetes agents and a master node which runs k8s services like API server. A detailed version of k8s architecture can be found here [11].

The number of nodes which are required on a cluster depends on the workload on the cluster. When the load goes up there is a need to increase the nodes and when it subsides, there is a need to reduce the nodes and clean up the resources which are no longer in use. One way this can be taken care of is to manually scale up the nodes which are part of the Kubernetes cluster and manually scale down when the demand reduces. But shouldn’t this be done automatically ? Answer to this question is the Cluster Autoscaler (CA).

The cluster autoscaler itself runs as a pod within the kubernetes cluster. The following figure illustrates the high level view of the setup with respect to the k8s cluster:

Since Cluster Autoscaler is a pod within the k8s cluster, it can use the in-cluster config and the Kubernetes go client [10] to contact the API server.

Internals

The API server is the central service which manages the state of the k8s cluster utilizing a backing store (an etcd database), runs on the management node or runs within the cloud (in case of managed service such as AKS). For any component within the Kubernetes cluster to figure out the state of the cluster, like for example the nodes registered in the cluster, contacting the API server is the way to go.

In order to simplify our discussion let’s divide the CA functionality into 3 parts as given below:

The main portion of the CA is a control loop which keeps running at every scan interval. This loop is responsible for updating the autoscaler metrics and health probes. Before this loop is entered auto scaler performs various operations such as claiming the leader state after performing a Kubernetes leader election. The main loop initializes static autoscaler component. This component initializes the underlying cloud provider based on the parameters passed onto the CA.

Various operations performed by the CA to manage the state of the cluster is passed onto the cloud provider component. Some examples like - increase target size, decrease target size etc, results in the cloud provider component talking to the cloud services internally and performing operations such as adding a node or deleting a node. These operations are performed on group of nodes in the cluster. The static autoscaler also keeps tab on the state of the system by querying the API server - operations such as list pods and list nodes are used to get hold of such information.

The decision to make a scale up is based on pods which remain unscheduled and a variety of checks and balances. The nodes which are free to be scaled down are deleted from the cluster and deleted from the cloud itself. The cluster autoscaler applies checks and balances before scaling up and scaling down - for example the nodes which have been recently added are given special consideration. During the deletion the nodes are drained to ensure that no disruption happens to the running pods.

Setting up CA on Azure:

Cluster Autoscaler is available as an add-on with acs-engine. The following link [15] has an example configuration file used to deploy autoscaler with acs-engine. The following link [8] provides details on manual step by step way to do the same.

In acs-engine case we use the the regular command line to deploy:

acs-engine deploy --subscription-id <subscription id> \
    --dns-prefix <dns> --location <location> \
    --api-model examples/kubernetes.json

The main difference are the following lines in the config file at [15] makes sure that CA is deployed as an addon:

"addons": [
          {"name": "cluster-autoscaler","enabled": true,"config": {"minNodes": "1","maxNodes": "5"
            }
          }
        ]

The config section in the json above can be used to provide the configuration to the cluster autoscaler pod, eg: min and max nodes as above.

Once the setup completes we can see that the cluster-autoscaler pod is deployed in the system namespace:

$kubectl get pods -n kube-system  | grep autoscaler
cluster-autoscaler-7bdc74d54c-qvbjs             1/1       Running             1          6m

Here is the output from the CA configmap and events from a sample cluster:

$kubectl -n kube-system describe configmap cluster-autoscaler-status
Name:         cluster-autoscaler-status
Namespace:    kube-system
Labels:       <none>
Annotations:  cluster-autoscaler.kubernetes.io/last-updated=2018-10-02 01:21:17.850010508 +0000 UTC

Data
====
status:
----
Cluster-autoscaler status at 2018-10-02 01:21:17.850010508 +0000 UTC:
Cluster-wide:
  Health:      Healthy (ready=3 unready=0 notStarted=0 longNotStarted=0 registered=3 longUnregistered=0)
               LastProbeTime:      2018-10-02 01:21:17.772229859 +0000 UTC m=+3161.412682204
               LastTransitionTime: 2018-10-02 00:28:49.944222739 +0000 UTC m=+13.584675084
  ScaleUp:     NoActivity (ready=3 registered=3)
               LastProbeTime:      2018-10-02 01:21:17.772229859 +0000 UTC m=+3161.412682204
               LastTransitionTime: 2018-10-02 00:28:49.944222739 +0000 UTC m=+13.584675084
  ScaleDown:   NoCandidates (candidates=0)
               LastProbeTime:      2018-10-02 01:21:17.772229859 +0000 UTC m=+3161.412682204
               LastTransitionTime: 2018-10-02 00:39:50.493307405 +0000 UTC m=+674.133759650

NodeGroups:
  Name:        k8s-agentpool1-92998111-vmss
  Health:      Healthy (ready=2 unready=0 notStarted=0 longNotStarted=0 registered=2 longUnregistered=0 cloudProviderTarget=2 (minSize=1, maxSize=5))
               LastProbeTime:      2018-10-02 01:21:17.772229859 +0000 UTC m=+3161.412682204
               LastTransitionTime: 2018-10-02 00:28:49.944222739 +0000 UTC m=+13.584675084
  ScaleUp:     NoActivity (ready=2 cloudProviderTarget=2)
               LastProbeTime:      2018-10-02 01:21:17.772229859 +0000 UTC m=+3161.412682204
               LastTransitionTime: 2018-10-02 00:28:49.944222739 +0000 UTC m=+13.584675084
  ScaleDown:   NoCandidates (candidates=0)
               LastProbeTime:      2018-10-02 01:21:17.772229859 +0000 UTC m=+3161.412682204
               LastTransitionTime: 2018-10-02 00:39:50.493307405 +0000 UTC m=+674.133759650


Events:
  Type    Reason          Age   From                Message
  ----    ------          ----  ----                -------
  Normal  ScaleDownEmpty  42m   cluster-autoscaler  Scale-down: removing empty node k8s-agentpool1-92998111-vmss000002

As can be seen the events, the cluster autoscaler scaled down and deleted a node as there was no load on this cluster. The rest of the configmap in this case indicates that there are no further actions which the autoscaler is taking at this moment.

Current status and future:

Cluster Autoscaler currently supports four VM types: standard (VMAS), VMSS, ACS and AKS. In the future, Cluster Autoscaler will be integrated within AKS product, so that users can enable it by one-click.

User Assigned Identity

Inorder for the Kubernetes cluster components to securely talk to the cloud services, it needs to authenticate with the cloud provider. In Azure Kubernetes clusters, up until now this was done using two ways - Service Principals or Managed Identities. In case of service principal the credentials are stored within the cluster and there are password rotation and other challenges which user needs to incur to accommodate this model. Managed service identities takes out this burden from the user and manages the service instances directly [12].

There are two kinds of managed identities possible - one is system assigned and another is user assigned. In case of system assigned identity each vm in the Kubernetes cluster is assigned a managed identity during creation. This identity is used by various Kubernetes components needing access to Azure resources. Examples to these operations are getting/updating load balancer configuration, getting/updating vm information etc. With the system assigned managed identity, user has no control over the identity which is assigned to the underlying vm. The system automatically assigns it and this reduces the flexibility for the user.

With v1.12 we bring user assigned managed identity support for Kubernetes. With this support user does not have to manage any passwords but at the same time has the flexibility to manage the identity which is used by the cluster. For example if the user needs to allow access to a cluster for a specific storage account or a Azure key vault, the user assigned identity can be created in advance and key vault access provided.

Internals

To understand the internals, we will focus on a cluster created using acs-engine. This can be configured in other ways, but the basic interactions are of the same pattern.

The acs-engine sets up the cluster with the required configuration. The /etc/kubernetes/azure.json file provides a way for the cluster components (eg: kube-apiserver) to gather configuration on how to access the cloud resources. In a user managed identity cluster there is a value filled with the key as UserAssignedIdentityID. This value is filled with the client id of the user assigned identity created by acs-engine or provided by the user, however the case may be. The code which does the authentication for Kubernetes on azure can be found here [14]. This code uses Azure adal packages to get authenticated to access various resources in the cloud. In case of user assigned identity the following API call is made to get new token:

adal.NewServicePrincipalTokenFromMSIWithUserAssignedID(msiEndpoint,
env.ServiceManagementEndpoint,
config.UserAssignedIdentityID)

This calls hits either the instance metadata service or the vm extension [12] to gather the token which is then used to access various resources.

Setting up a cluster with user assigned identity

With the upstream support for user assigned identity in v1.12, it is now supported in the acs-engine to create a cluster with the user assigned identity. The json config files present here [13] can be used to create a cluster with user assigned identity. The same step used to create a vmss cluster can be used to create a cluster which has user assigned identity assigned.

acs-engine deploy --subscription-id <subscription id> \
    --dns-prefix <dns> --location <location> \
    --api-model examples/kubernetes-msi-userassigned/kube-vmss.json

The main config values here are the following:

"useManagedIdentity": true"userAssignedID": "acsenginetestid"

The first one useManagedIdentity indicates to acs-engine that we are going to use the managed identity extension. This sets up the necessary packages and extensions required for the managed identities to work. The next one userAssignedID provides the information on the user identity which is to be used with the cluster.

Current status and future

Currently we support the user assigned identity creation with the cluster using deploy of the acs-engine. In future this will become part of AKS.

Get involved

For azure specific discussions - please checkout the Azure SIG page at [6] and come and join the #sig-azure slack channel for more.

For CA, please checkout the Autoscaler project here [7] and join the #sig-autoscaling Slack for more discussions.

For the acs-engine (the unmanaged variety) on Azure docs can be found here: [9]. More details about the managed service from Azure Kubernetes Service (AKS) here [5].

References

1) https://docs.microsoft.com/en-us/azure/virtual-machine-scale-sets/overview

2) https://kubernetes.io/docs/concepts/architecture/cloud-controller/

3) https://github.com/kubernetes/kubernetes/blob/master/pkg/cloudprovider/providers/azure/azure_vmss.go

4) https://github.com/Azure/acs-engine/blob/master/docs/kubernetes/deploy.md

5) https://docs.microsoft.com/en-us/azure/aks/

6) https://github.com/kubernetes/community/tree/master/sig-azure

7) https://github.com/kubernetes/autoscaler

8) https://github.com/kubernetes/autoscaler/blob/master/cluster-autoscaler/cloudprovider/azure/README.md

9) https://github.com/Azure/acs-engine

10) https://github.com/kubernetes/client-go

11) https://kubernetes.io/docs/concepts/architecture/

12) https://docs.microsoft.com/en-us/azure/active-directory/managed-identities-azure-resources/overview

13) https://github.com/Azure/acs-engine/tree/master/examples/kubernetes-msi-userassigned

14) https://github.com/kubernetes/kubernetes/blob/master/pkg/cloudprovider/providers/azure/auth/azure_auth.go

15) https://github.com/Azure/acs-engine/tree/master/examples/addons/cluster-autoscaler

Blog: Introducing Volume Snapshot Alpha for Kubernetes

$
0
0

Author: Jing Xu (Google) Xing Yang (Huawei), Saad Ali (Google)

Kubernetes v1.12 introduces alpha support for volume snapshotting. This feature allows creating/deleting volume snapshots, and the ability to create new volumes from a snapshot natively using the Kubernetes API.

What is a Snapshot?

Many storage systems (like Google Cloud Persistent Disks, Amazon Elastic Block Storage, and many on-premise storage systems) provide the ability to create a “snapshot” of a persistent volume. A snapshot represents a point-in-time copy of a volume. A snapshot can be used either to provision a new volume (pre-populated with the snapshot data) or to restore the existing volume to a previous state (represented by the snapshot).

Why add Snapshots to Kubernetes?

The Kubernetes volume plugin system already provides a powerful abstraction that automates the provisioning, attaching, and mounting of block and file storage.

Underpinning all these features is the Kubernetes goal of workload portability: Kubernetes aims to create an abstraction layer between distributed systems applications and underlying clusters so that applications can be agnostic to the specifics of the cluster they run on and application deployment requires no “cluster specific” knowledge.

The Kubernetes Storage SIG identified snapshot operations as critical functionality for many stateful workloads. For example, a database administrator may want to snapshot a database volume before starting a database operation.

By providing a standard way to trigger snapshot operations in the Kubernetes API, Kubernetes users can now handle use cases like this without having to go around the Kubernetes API (and manually executing storage system specific operations).

Instead, Kubernetes users are now empowered to incorporate snapshot operations in a cluster agnostic way into their tooling and policy with the comfort of knowing that it will work against arbitrary Kubernetes clusters regardless of the underlying storage.

Additionally these Kubernetes snapshot primitives act as basic building blocks that unlock the ability to develop advanced, enterprise grade, storage administration features for Kubernetes: such as data protection, data replication, and data migration.

Which volume plugins support Kubernetes Snapshots?

Kubernetes supports three types of volume plugins: in-tree, Flex, and CSI. See Kubernetes Volume Plugin FAQ for details.

Snapshots are only supported for CSI drivers (not for in-tree or Flex). To use the Kubernetes snapshots feature, ensure that a CSI Driver that implements snapshots is deployed on your cluster.

As of the publishing of this blog, the following CSI drivers support snapshots:

Snapshot support for other drivers is pending, and should be available soon. Read the “Container Storage Interface (CSI) for Kubernetes Goes Beta” blog post to learn more about CSI and how to deploy CSI drivers.

Kubernetes Snapshots API

Similar to the API for managing Kubernetes Persistent Volumes, Kubernetes Volume Snapshots introduce three new API objects for managing snapshots:

  • VolumeSnapshot
    • Created by a Kubernetes user to request creation of a snapshot for a specified volume. It contains information about the snapshot operation such as the timestamp when the snapshot was taken and whether the snapshot is ready to use.
    • Similar to the PersistentVolumeClaim object, the creation and deletion of this object represents a user desire to create or delete a cluster resource (a snapshot).
  • VolumeSnapshotContent
    • Created by the CSI volume driver once a snapshot has been successfully created. It contains information about the snapshot including snapshot ID.
    • Similar to the PersistentVolume object, this object represents a provisioned resource on the cluster (a snapshot).
    • Like PersistentVolumeClaim and PersistentVolume objects, once a snapshot is created, the VolumeSnapshotContent object binds to the VolumeSnapshot for which it was created (with a one-to-one mapping).
  • VolumeSnapshotClass
    • Created by cluster administrators to describe how snapshots should be created. including the driver information, the secrets to access the snapshot, etc.

It is important to note that unlike the core Kubernetes Persistent Volume objects, these Snapshot objects are defined as CustomResourceDefinitions (CRDs). The Kubernetes project is moving away from having resource types pre-defined in the API server, and is moving towards a model where the API server is independent of the API objects. This allows the API server to be reused for projects other than Kubernetes, and consumers (like Kubernetes) can simply install the resource types they require as CRDs.

CSI Drivers that support snapshots will automatically install the required CRDs. Kubernetes end users only need to verify that a CSI driver that supports snapshots is deployed on their Kubernetes cluster.

In addition to these new objects, a new, DataSource field has been added to the PersistentVolumeClaim object:

type PersistentVolumeClaimSpec struct {
	AccessModes []PersistentVolumeAccessMode
	Selector *metav1.LabelSelector
	Resources ResourceRequirements
	VolumeName string
	StorageClassName *string
	VolumeMode *PersistentVolumeMode
	DataSource *TypedLocalObjectReference
}

This new alpha field enables a new volume to be created and automatically pre-populated with data from an existing snapshot.

Kubernetes Snapshots Requirements

Before using Kubernetes Volume Snapshotting, you must:

  • Ensure a CSI driver implementing snapshots is deployed and running on your Kubernetes cluster.
  • Enable the Kubernetes Volume Snapshotting feature via new Kubernetes feature gate (disabled by default for alpha):
    • Set the following flag on the API server binary: --feature-gates=VolumeSnapshotDataSource=true

Before creating a snapshot, you also need to specify CSI driver information for snapshots by creating a VolumeSnapshotClass object and setting the snapshotter field to point to your CSI driver. In the example of VolumeSnapshotClass below, the CSI driver is com.example.csi-driver. You need at least one VolumeSnapshotClass object per snapshot provisioner. You can also set a default VolumeSnapshotClass for each individual CSI driver by putting an annotation snapshot.storage.kubernetes.io/is-default-class: "true" in the class definition.

apiVersion: snapshot.storage.k8s.io/v1alpha1
kind: VolumeSnapshotClass
metadata:
  name: default-snapclass
  annotations:
    snapshot.storage.kubernetes.io/is-default-class: "true"
snapshotter: com.example.csi-driver


apiVersion: snapshot.storage.k8s.io/v1alpha1
kind: VolumeSnapshotClass
metadata:
  name: csi-snapclass
snapshotter: com.example.csi-driver
parameters:
  fakeSnapshotOption: foo
  csiSnapshotterSecretName: csi-secret
  csiSnapshotterSecretNamespace: csi-namespace

You must set any required opaque parameters based on the documentation for your CSI driver. As the example above shows, the parameter fakeSnapshotOption: foo and any referenced secret(s) will be passed to CSI driver during snapshot creation and deletion. The default CSI external-snapshotter reserves the parameter keys csiSnapshotterSecretName and csiSnapshotterSecretNamespace. If specified, it fetches the secret and passes it to the CSI driver when creating and deleting a snapshot.

And finally, before creating a snapshot, you must provision a volume using your CSI driver and populate it with some data that you want to snapshot (see the CSI blog post on how to create and use CSI volumes).

Creating a new Snapshot with Kubernetes

Once a VolumeSnapshotClass object is defined and you have a volume you want to snapshot, you may create a new snapshot by creating a VolumeSnapshot object.

The source of the snapshot specifies the volume to create a snapshot from. It has two parameters:

  • kind - must be PersistentVolumeClaim
  • name - the PVC API object name

The namespace of the volume to snapshot is assumed to be the same as the namespace of the VolumeSnapshot object.

apiVersion: snapshot.storage.k8s.io/v1alpha1
kind: VolumeSnapshot
metadata:
  name: new-snapshot-demo
  namespace: demo-namespace
spec:
  snapshotClassName: csi-snapclass
  source:
    name: mypvc
    kind: PersistentVolumeClaim

In the VolumeSnapshot spec, user can specify the VolumeSnapshotClass which has the information about which CSI driver should be used for creating the snapshot . When the VolumeSnapshot object is created, the parameter fakeSnapshotOption: foo and any referenced secret(s) from the VolumeSnapshotClass are passed to the CSI plugin com.example.csi-driver via a CreateSnapshot call.

In response, the CSI driver triggers a snapshot of the volume and then automatically creates a VolumeSnapshotContent object to represent the new snapshot, and binds the new VolumeSnapshotContent object to the VolumeSnapshot, making it ready to use. If the CSI driver fails to create the snapshot and returns error, the snapshot controller reports the error in the status of VolumeSnapshot object and does not retry (this is different from other controllers in Kubernetes, and is to prevent snapshots from being taken at an unexpected time).

If a snapshot class is not specified, the external snapshotter will try to find and set a default snapshot class for the snapshot. The CSI driver specified by snapshotter in the default snapshot class must match the CSI driver specified by the provisioner in the storage class of the PVC.

Please note that the alpha release of Kubernetes Snapshot does not provide any consistency guarantees. You have to prepare your application (pause application, freeze filesystem etc.) before taking the snapshot for data consistency.

You can verify that the VolumeSnapshot object is created and bound with VolumeSnapshotContent by running kubectl describe volumesnapshot:

  • Ready should be set to true under Status to indicate this volume snapshot is ready for use.
  • Creation Time field indicates when the snapshot is actually created (cut).
  • Restore Size field indicates the minimum volume size when restoring a volume from the snapshot.
  • Snapshot Content Name field in the spec points to the VolumeSnapshotContent object created for this snapshot.

Importing an existing snapshot with Kubernetes

You can always import an existing snapshot to Kubernetes by manually creating a VolumeSnapshotContent object to represent the existing snapshot. Because VolumeSnapshotContent is a non-namespace API object, only a system admin may have the permission to create it. Once a VolumeSnapshotContent object is created, the user can create a VolumeSnapshot object pointing to the VolumeSnapshotContent object. The external-snapshotter controller will mark snapshot as ready after verifying the snapshot exists and the binding between VolumeSnapshot and VolumeSnapshotContent objects is correct. Once bound, the snapshot is ready to use in Kubernetes.

A VolumeSnapshotContent object should be created with the following fields to represent a pre-provisioned snapshot:

  • csiVolumeSnapshotSource - Snapshot identifying information.
    • snapshotHandle - name/identifier of the snapshot. This field is required.
    • driver - CSI driver used to handle this volume. This field is required. It must match the snapshotter name in the snapshot controller.
    • creationTime and restoreSize - these fields are not required for pre-provisioned volumes. The external-snapshotter controller will automatically update them after creation.
  • volumeSnapshotRef - Pointer to the VolumeSnapshot object this object should bind to.
    • name and namespace - It specifies the name and namespace of the VolumeSnapshot object which the content is bound to.
    • UID - these fields are not required for pre-provisioned volumes.The external-snapshotter controller will update the field automatically after binding. If user specifies UID field, he/she must make sure that it matches with the binding snapshot’s UID. If the specified UID does not match the binding snapshot’s UID, the content is considered an orphan object and the controller will delete it and its associated snapshot.
  • snapshotClassName - This field is optional. The external-snapshotter controller will update the field automatically after binding.
apiVersion: snapshot.storage.k8s.io/v1alpha1
kind: VolumeSnapshotContent
metadata:
  name: static-snapshot-content
spec:
  csiVolumeSnapshotSource:
    driver: com.example.csi-driver
    snapshotHandle: snapshotcontent-example-id
  volumeSnapshotRef:
    kind: VolumeSnapshot
    name: static-snapshot-demo
    namespace: demo-namespace

A VolumeSnapshot object should be created to allow a user to use the snapshot:

  • snapshotClassName - name of the volume snapshot class. This field is optional. If set, the snapshotter field in the snapshot class must match the snapshotter name of the snapshot controller. If not set, the snapshot controller will try to find a default snapshot class.
  • snapshotContentName - name of the volume snapshot content. This field is required for pre-provisioned volumes.
apiVersion: snapshot.storage.k8s.io/v1alpha1
kind: VolumeSnapshot
metadata:
  name: static-snapshot-demo
  namespace: demo-namespace
spec:
  snapshotClassName: csi-snapclass
  snapshotContentName: static-snapshot-content

Once these objects are created, the snapshot controller will bind them together, and set the field Ready (under Status) to True to indicate the snapshot is ready to use.

Provision a new volume from a snapshot with Kubernetes

To provision a new volume pre-populated with data from a snapshot object, use the new dataSource field in the PersistentVolumeClaim. It has three parameters:

  • name - name of the VolumeSnapshot object representing the snapshot to use as source
  • kind - must be VolumeSnapshot
  • apiGroup - must be snapshot.storage.k8s.io

The namespace of the source VolumeSnapshot object is assumed to be the same as the namespace of the PersistentVolumeClaim object.

apiVersion: v1
kind: PersistentVolumeClaim
metadata:
  name: pvc-restore
  Namespace: demo-namespace
spec:
  storageClassName: csi-storageclass
  dataSource:
    name: new-snapshot-demo
    kind: VolumeSnapshot
    apiGroup: snapshot.storage.k8s.io
  accessModes:
    - ReadWriteOnce
  resources:
    requests:
      storage: 1Gi

When the PersistentVolumeClaim object is created, it will trigger provisioning of a new volume that is pre-populated with data from the specified snapshot.

As a storage vendor, how do I add support for snapshots to my CSI driver?

To implement the snapshot feature, a CSI driver MUST add support for additional controller capabilities CREATE_DELETE_SNAPSHOT and LIST_SNAPSHOTS, and implement additional controller RPCs: CreateSnapshot, DeleteSnapshot, and ListSnapshots. For details, see the CSI spec.

Although Kubernetes is as minimally prescriptive on the packaging and deployment of a CSI Volume Driver as possible, it provides a suggested mechanism for deploying an arbitrary containerized CSI driver on Kubernetes to simplify deployment of containerized CSI compatible volume drivers.

As part of this recommended deployment process, the Kubernetes team provides a number of sidecar (helper) containers, including a new external-snapshotter sidecar container.

The external-snapshotter watches the Kubernetes API server for VolumeSnapshot and VolumeSnapshotContent objects and triggers CreateSnapshot and DeleteSnapshot operations against a CSI endpoint. The CSI external-provisioner sidecar container has also been updated to support restoring volume from snapshot using the new dataSource PVC field.

In order to support snapshot feature, it is recommended that storage vendors deploy the external-snapshotter sidecar containers in addition to the external provisioner the external attacher, along with their CSI driver in a statefulset as shown in the following diagram.

In this example deployment yaml file, two sidecar containers, the external provisioner and the external snapshotter, and CSI drivers are deployed together with the hostpath CSI plugin in the statefulset pod. Hostpath CSI plugin is a sample plugin, not for production.

What are the limitations of alpha?

The alpha implementation of snapshots for Kubernetes has the following limitations:

  • Does not support reverting an existing volume to an earlier state represented by a snapshot (alpha only supports provisioning a new volume from a snapshot).
  • Does not support “in-place restore” of an existing PersistentVolumeClaim from a snapshot: i.e. provisioning a new volume from a snapshot, but updating an existing PersistentVolumeClaim to point to the new volume and effectively making the PVC appear to revert to an earlier state (alpha only supports using a new volume provisioned from a snapshot via a new PV/PVC).
  • No snapshot consistency guarantees beyond any guarantees provided by storage system (e.g. crash consistency).

What’s next?

Depending on feedback and adoption, the Kubernetes team plans to push the CSI Snapshot implementation to beta in either 1.13 or 1.14.

How can I learn more?

Check out additional documentation on the snapshot feature here: http://k8s.io/docs/concepts/storage/volume-snapshots and https://kubernetes-csi.github.io/docs/

How do I get involved?

This project, like all of Kubernetes, is the result of hard work by many contributors from diverse backgrounds working together.

In addition to the contributors who have been working on the Snapshot feature:

We offer a huge thank you to all the contributors in Kubernetes Storage SIG and CSI community who helped review the design and implementation of the project, including but not limited to the following:

If you’re interested in getting involved with the design and development of CSI or any part of the Kubernetes Storage system, join the Kubernetes Storage Special Interest Group (SIG). We’re rapidly growing and always welcome new contributors.

Blog: Kubernetes v1.12: Introducing RuntimeClass

$
0
0

Author: Tim Allclair (Google)

Kubernetes originally launched with support for Docker containers running native applications on a Linux host. Starting with rkt in Kubernetes 1.3 more runtimes were coming, which lead to the development of the Container Runtime Interface (CRI). Since then, the set of alternative runtimes has only expanded: projects like Kata Containers and gVisor were announced for stronger workload isolation, and Kubernetes’ Windows support has been steadily progressing.

With runtimes targeting so many different use cases, a clear need for mixed runtimes in a cluster arose. But all these different ways of running containers have brought a new set of problems to deal with:

  • How do users know which runtimes are available, and select the runtime for their workloads?
  • How do we ensure pods are scheduled to the nodes that support the desired runtime?
  • Which runtimes support which features, and how can we surface incompatibilities to the user?
  • How do we account for the varying resource overheads of the runtimes?

RuntimeClass aims to solve these issues.

RuntimeClass in Kubernetes 1.12

RuntimeClass was recently introduced as an alpha feature in Kubernetes 1.12. The initial implementation focuses on providing a runtime selection API, and paves the way to address the other open problems.

The RuntimeClass resource represents a container runtime supported in a Kubernetes cluster. The cluster provisioner sets up, configures, and defines the concrete runtimes backing the RuntimeClass. In its current form, a RuntimeClassSpec holds a single field, the RuntimeHandler. The RuntimeHandler is interpreted by the CRI implementation running on a node, and mapped to the actual runtime configuration. Meanwhile the PodSpec has been expanded with a new field, RuntimeClassName, which names the RuntimeClass that should be used to run the pod.

Why is RuntimeClass a pod level concept? The Kubernetes resource model expects certain resources to be shareable between containers in the pod. If the pod is made up of different containers with potentially different resource models, supporting the necessary level of resource sharing becomes very challenging. For example, it is extremely difficult to support a loopback (localhost) interface across a VM boundary, but this is a common model for communication between two containers in a pod.

What’s next?

The RuntimeClass resource is an important foundation for surfacing runtime properties to the control plane. For example, to implement scheduler support for clusters with heterogeneous nodes supporting different runtimes, we might add NodeAffinity terms to the RuntimeClass definition. Another area to address is managing the variable resource requirements to run pods of different runtimes. The Pod Overhead proposal was an early take on this that aligns nicely with the RuntimeClass design, and may be pursued further.

Many other RuntimeClass extensions have also been proposed, and will be revisited as the feature continues to develop and mature. A few more extensions that are being considered include:

  • Surfacing optional features supported by runtimes, and better visibility into errors caused by incompatible features.
  • Automatic runtime or feature discovery, to support scheduling decisions without manual configuration.
  • Standardized or conformant RuntimeClass names that define a set of properties that should be supported across clusters with RuntimeClasses of the same name.
  • Dynamic registration of additional runtimes, so users can install new runtimes on existing clusters with no downtime.
  • “Fitting” a RuntimeClass to a pod’s requirements. For instance, specifying runtime properties and letting the system match an appropriate RuntimeClass, rather than explicitly assigning a RuntimeClass by name.

RuntimeClass will be under active development at least through 2019, and we’re excited to see the feature take shape, starting with the RuntimeClass alpha in Kubernetes 1.12.

Learn More

Blog: Topology-Aware Volume Provisioning in Kubernetes

$
0
0

Author: Michelle Au (Google)

The multi-zone cluster experience with persistent volumes is improving in Kubernetes 1.12 with the topology-aware dynamic provisioning beta feature. This feature allows Kubernetes to make intelligent decisions when dynamically provisioning volumes by getting scheduler input on the best place to provision a volume for a pod. In multi-zone clusters, this means that volumes will get provisioned in an appropriate zone that can run your pod, allowing you to easily deploy and scale your stateful workloads across failure domains to provide high availability and fault tolerance.

Previous challenges

Before this feature, running stateful workloads with zonal persistent disks (such as AWS ElasticBlockStore, Azure Disk, GCE PersistentDisk) in multi-zone clusters had many challenges. Dynamic provisioning was handled independently from pod scheduling, which meant that as soon as you created a PersistentVolumeClaim (PVC), a volume would get provisioned. This meant that the provisioner had no knowledge of what pods were using the volume, and any pod constraints it had that could impact scheduling.

This resulted in unschedulable pods because volumes were provisioned in zones that:

  • did not have enough CPU or memory resources to run the pod
  • conflicted with node selectors, pod affinity or anti-affinity policies
  • could not run the pod due to taints

Another common issue was that a non-StatefulSet pod using multiple persistent volumes could have each volume provisioned in a different zone, again resulting in an unschedulable pod.

Suboptimal workarounds included overprovisioning of nodes, or manual creation of volumes in the correct zones, making it difficult to dynamically deploy and scale stateful workloads.

The topology-aware dynamic provisioning feature addresses all of the above issues.

Supported Volume Types

In 1.12, the following drivers support topology-aware dynamic provisioning:

  • AWS EBS
  • Azure Disk
  • GCE PD (including Regional PD)
  • CSI (alpha) - currently only the GCE PD CSI driver has implemented topology support

Design Principles

While the initial set of supported plugins are all zonal-based, we designed this feature to adhere to the Kubernetes principle of portability across environments. Topology specification is generalized and uses a similar label-based specification like in Pod nodeSelectors and nodeAffinity. This mechanism allows you to define your own topology boundaries, such as racks in on-premise clusters, without requiring modifications to the scheduler to understand these custom topologies.

In addition, the topology information is abstracted away from the pod specification, so a pod does not need knowledge of the underlying storage system’s topology characteristics. This means that you can use the same pod specification across multiple clusters, environments, and storage systems.

Getting Started

To enable this feature, all you need to do is to create a StorageClass with volumeBindingMode set to WaitForFirstConsumer:

kind: StorageClass
apiVersion: storage.k8s.io/v1
metadata:
  name: topology-aware-standard
provisioner: kubernetes.io/gce-pd
volumeBindingMode: WaitForFirstConsumer
parameters:
  type: pd-standard

This new setting instructs the volume provisioner to not create a volume immediately, and instead, wait for a pod using an associated PVC to run through scheduling. Note that previous StorageClass zone and zones parameters do not need to be specified anymore, as pod policies now drive the decision of which zone to provision a volume in.

Next, create a pod and PVC with this StorageClass. This sequence is the same as before, but with a different StorageClass specified in the PVC. The following is a hypothetical example, demonstrating the capabilities of the new feature by specifying many pod constraints and scheduling policies:

  • multiple PVCs in a pod
  • nodeAffinity across a subset of zones
  • pod anti-affinity on zones
apiVersion: apps/v1
kind: StatefulSet
metadata:
  name: web
spec:   
  serviceName: "nginx"
  replicas: 2
  selector:
    matchLabels:
      app: nginx
  template:
    metadata:
      labels:
        app: nginx
    spec:
      affinity:
        nodeAffinity:
          requiredDuringSchedulingIgnoredDuringExecution:
            nodeSelectorTerms:
            - matchExpressions:
              - key: failure-domain.beta.kubernetes.io/zone
                operator: In
                values:
                - us-central1-a
                - us-central1-f
        podAntiAffinity:
          requiredDuringSchedulingIgnoredDuringExecution:
          - labelSelector:
              matchExpressions:
              - key: app
                operator: In
                values:
                - nginx
            topologyKey: failure-domain.beta.kubernetes.io/zone
      containers:
      - name: nginx
        image: gcr.io/google_containers/nginx-slim:0.8
        ports:
        - containerPort: 80
          name: web
        volumeMounts:
        - name: www
          mountPath: /usr/share/nginx/html
        - name: logs
          mountPath: /logs
 volumeClaimTemplates:
  - metadata:
      name: www
    spec:
      accessModes: [ "ReadWriteOnce" ]
      storageClassName: topology-aware-standard
      resources:
        requests:
          storage: 10Gi
  - metadata:
      name: logs
    spec:
      accessModes: [ "ReadWriteOnce" ]
      storageClassName: topology-aware-standard
      resources:
        requests:
          storage: 1Gi

Afterwards, you can see that the volumes were provisioned in zones according to the policies set by the pod:

$ kubectl get pv -o=jsonpath='{range .items[*]}{.spec.claimRef.name}{"\t"}{.metadata.labels.failure\-domain\.beta\.kubernetes\.io/zone}{"\n"}{end}'
www-web-0       us-central1-f
logs-web-0      us-central1-f
www-web-1       us-central1-a
logs-web-1      us-central1-a

How can I learn more?

Official documentation on the topology-aware dynamic provisioning feature is available here:https://kubernetes.io/docs/concepts/storage/storage-classes/#volume-binding-mode

Documentation for CSI drivers is available at https://kubernetes-csi.github.io/docs/

What’s next?

We are actively working on improving this feature to support:

  • more volume types, including dynamic provisioning for local volumes
  • dynamic volume attachable count and capacity limits per node

How do I get involved?

If you have feedback for this feature or are interested in getting involved with the design and development, join the Kubernetes Storage Special-Interest-Group (SIG). We’re rapidly growing and always welcome new contributors.

Special thanks to all the contributors that helped bring this feature to beta, including Cheng Xing (verult), Chuqiang Li (lichuqiang), David Zhu (davidz627), Deep Debroy (ddebroy), Jan Šafránek (jsafrane), Jordan Liggitt (liggitt), Michelle Au (msau42), Pengfei Ni (feiskyer), Saad Ali (saad-ali), Tim Hockin (thockin), and Yecheng Fu (cofyc).

Blog: 2018 Steering Committee Election Results

$
0
0

Authors: Jorge Castro (Heptio), Ihor Dvoretskyi (CNCF), Paris Pittman (Google)

Results

The Kubernetes Steering Committee Election is now complete and the following candidates came ahead to secure two year terms that start immediately:

Big Thanks!

  • Steering Committee Member Emeritus Quinton Hoole for his service to the community over the past year. We look forward to
  • The candidates that came forward to run for election. May we always have a strong set of people who want to push community forward like yours in every election.
  • All 307 voters who cast a ballot.
  • And last but not least…Cornell University for hosting CIVS!

Get Involved with the Steering Committee

You can follow along to Steering Committee backlog items and weigh in by filing an issue or creating a PR against their repo. They meet bi-weekly on Wednesdays at 8pm UTC and regularly attend Meet Our Contributors.

Steering Committee Meetings:

Meet Our Contributors Steering AMA’s: